‘Ranger Ink’ Category

  1. Bowtied For Lumberjack

    3rd November, 2022 by iGirlZoe

    igirlzoe: tim holtz lumberjack plaid distress ranger ink

    Hello friends. I’m sharing another card I made for the Tim Holtz LIVE launch of the newest member of the Distress family, Lumberjack Plaid. You can see the makes and watch the LIVE replay over on Tim’s blog.

    igirlzoe: tim holtz lumberjack plaid distress ranger ink
    The new Bowtied colorize die is a perfect match for Lumberjack Plaid and pops over the top of the awesome new Tree Rings 3D folder which I embossed onto distress kraft heavystock and added walnut stain and ground espresso distress inks over the raised areas.

    igirlzoe: tim holtz lumberjack plaid distress ranger ink
    I cut the Bowtied Colorize thinlits die from distress watercolor cardstock and swiped through a paint wash of (retired) pumice stone distress paint. I used Lumberjack Plaid oxide ink pad for the lighter layer and the original ink pad for the darker layers of the colorize. Adding a little ground espresso distress ink to the edges to darken.

    igirlzoe: tim holtz lumberjack plaid distress ranger ink
    My obsession with the box label from the Department Store CMS458 stamp set continues. I stamped it onto copier paper in distress archival ink and added a stamped seal in Lumberjack Plaid distress ink with a stamp from the Holiday Postmarks CMS323 set; gluing it over the bottom of the bow.

    Thanks for stopping by and let me know if you have any questions.

    Zoe


    affiliate links used at no cost to you


  2. Lumberjack Plaid

    2nd November, 2022 by iGirlZoe

    igirlzoe: tim holtz lumberjack plaid distress ranger ink

    Hello friends. Did you meet the newest member of the Tim Holtz Distress family, Lumberjack Plaid?! I think you’ll agree that Lumberjack Plaid is a real nice good honest red! LOL You can get a formal introduction and see the makes and LIVE replay over on Tim’s blog.

    igirlzoe: tim holtz lumberjack plaid distress ranger ink
    I absolutely love the depth of the color from Lumberjack Plaid and it’s so easy to grunge up by adding a little brown from the distress palette. It’s an immediate favorite for this grunge lover.

    igirlzoe: tim holtz lumberjack plaid distress ranger ink
    I die cut the lantern and candles from Candlelight thinlits die set. I love this set and although I’ve cut the candles many times, it was the first time I had cut the lantern! I know right?! I used distress watercolor cardstock and Lumberjack Plaid spray stain and ink pad.

    igirlzoe: tim holtz lumberjack plaid distress ranger ink
    I paired it with the new Modern Festive die set, which I was determined to make vintage! 😉

    igirlzoe: tim holtz lumberjack plaid distress ranger ink
    The background is a stamp called Sparkles and Christmas CMS324 which I brayered with distress archival ink and stamped without using a grid block to give a more weathered look. The sparkles are from the Wise Men thinlits die set.

    igirlzoe: tim holtz lumberjack plaid distress ranger ink
    I added a stamped sentiment from the new Holiday Sketchbook CMS456 stamp set.
    Thanks for stopping by and let me know if you have any questions.

    Zoe


    affiliate links used at no cost to you


  3. Seasonal Distress

    10th October, 2022 by iGirlZoe

    igirlzoe: tim holtz ranger seasonal distress sizzix modern festive create and craft tv pillow box

    Hello friends, hope you had a wonderful weekend. Did you see the Tim Holtz LIVE launch on Saturday? Tim showcased the new Ranger Seasonal Distress products. If you want to see the fantastic demo with so many tips and techniques, it’s over on Tim’s blog.

    igirlzoe: tim holtz ranger seasonal distress sizzix modern festive create and craft tv pillow box
    I am properly obsessed with the new Distress Gray Woodgrain Cardstock and used it to make a small pillow box ready to fill with some treats to gift. I’m equally a smitten kitten for the Distress Snowfall Grit-Paste and since discovering how vintage the Distress Mica Stains can look, I’m regretting not stocking up on last years colors. Fortunately next season, last seasons palette will return and in the meantime I stocked up, but I saved you some. 😉

    igirlzoe: tim holtz ranger seasonal distress sizzix modern festive create and craft tv pillow box
    I used this awesome “Tim Holtz Back From The Vault” die set, “Pillow Box & Tags” to create the pillow box.

    PLEASE NOTE: This die set is ONLY available from Create and Craft TV and go on sale on Tuesday 11th October at 4PM+ 8PM UK and Wednesday 12th October at 8AM UK, while stocks last. They ship international, please see website for details.

    igirlzoe: tim holtz ranger seasonal distress sizzix modern festive create and craft tv pillow box
    I die cut the pillow boxes from Distress Gray Woodgrain Craftstock, lightly blended walnut stain distress ink over the top and once dry, added a strip of scor-tape to the connecting edges ready to assemble.

    igirlzoe: tim holtz ranger seasonal distress sizzix modern festive create and craft tv pillow box
    I die cut distress watercolor cardstock with the new Modern Festive dies.

    igirlzoe: tim holtz ranger seasonal distress sizzix modern festive create and craft tv pillow box
    I spritzed the die cuts with the new Fresh Balsam Distress Mica Stain, dried, sanded and blended in walnut stain distress ink.

    igirlzoe: tim holtz ranger seasonal distress sizzix modern festive create and craft tv pillow box
    I used dies from the AWESOME Chapter 3 dies by Tim Holtz. The tag is from the Collector set and the numbers are from the Specimen set. I absolutely love having these die sets in my collection and have them permanently in my die cart because I’m constantly reaching for them. I cut the tag from Distress Gray Woodgrain Cardstock.

    igirlzoe: tim holtz ranger seasonal distress sizzix modern festive create and craft tv pillow box
    I inked up the Festive Modern die cuts and once dry, added some of the new Distress Snowfall Grit-Paste. This is the perfect amount of sparkle for this glitter hating grunge lover!

    igirlzoe: tim holtz ranger seasonal distress sizzix modern festive create and craft tv pillow box
    I added some of the idea-ology Christmas Droplets which I covered in mushroom alcohol ink.

    NOTE: If you add alcohol ink to these droplets and rub, it will remove the base color. I happen to like this because it makes it look imperfect and grungier, but if you don’t want that, just drop the alcohol ink over the top and walk away.

    igirlzoe: tim holtz ranger seasonal distress sizzix modern festive create and craft tv pillow box
    I added some string around the box which I tied the tiny 25 tag to.

    igirlzoe: tim holtz ranger seasonal distress sizzix modern festive create and craft tv pillow box
    Don’t be fooled by the name Modern Festive or the glimmer of the Seasonal Mica Stain and the sparkle of Snowfall Grit-Paste; all can be vintage grunge. These tiny boxes were so quick to make and you could add the greenery to a gift box, tag, card, to give a few suggestions.

    Thanks for stopping by and let me know if you have any questions.
    Zoe

    The seasonal distress products are available while stocks last.

    affiliate links used at no cost to you


  4. Christmas Cutouts

    2nd October, 2022 by iGirlZoe

    igirlzoe: tim holtz sizzix christmas tree ring 3D christmas cutouts layered tags curio box

    Hello friends, hope you’re having a nice weekend. I’ve been humming Christmas tunes all day, probably because of the amazing Tim Holtz Sizzix Christmas LIVE launch yesterday. You can watch the replay and see all of the incredible makes over on Tim’s blog.

    igirlzoe: tim holtz sizzix christmas tree ring 3D christmas cutouts layered tags curio box
    I loved the Christmas cutouts set as soon as I saw it. I love the tiny scene you can build. I decided to make a little box that can be filled with gift tags that you could have on hand during the Christmas season or gift to someone who loves handmade, but may not be a maker themselves. And of course you can make them pretty pretty or grungy.

    igirlzoe: tim holtz sizzix christmas tree ring 3D christmas cutouts layered tags curio box
    I used the curio box bigz XL die which is still available and linked at the end of the post. I cut from distress kraft heavystock to give a nice sturdy base and top. I secured the word dies from the Christmas Cutouts set with tape and ran it through my machine.

    igirlzoe: tim holtz sizzix christmas tree ring 3D christmas cutouts layered tags curio box
    I covered the sides with candied apple distress paint mixed with a little ground espresso distress paint.

    igirlzoe: tim holtz sizzix christmas tree ring 3D christmas cutouts layered tags curio box
    I cut a second curio box top from idea-ology backdrops christmas paper to line the inside of the top.

    igirlzoe: tim holtz sizzix christmas tree ring 3D christmas cutouts layered tags curio box
    I cut a piece from the same paper to line the base of the box.

    igirlzoe: tim holtz sizzix christmas tree ring 3D christmas cutouts layered tags curio box
    The inside lining of the curio box gives you a base to glue in letters so they’re inset.

    igirlzoe: tim holtz sizzix christmas tree ring 3D christmas cutouts layered tags curio box
    I cut them from the new seasonal woodgrain black cardstock. I set aside the outer piece to make a tag with later. I cut the center shapes from the seasonal woodgrain white cardstock and glued them into place with distress collage medium.

    igirlzoe: tim holtz sizzix christmas tree ring 3D christmas cutouts layered tags curio box
    For the top of the box I embossed a piece of distress kraft heavystock with the new Tree Rings 3D embossing folder. I simply added gathered twigs distress ink to the top of the embossed tree ring.

    igirlzoe: tim holtz sizzix christmas tree ring 3D christmas cutouts layered tags curio box
    I added the embossed piece to the top of the box and decorated with some of the cutouts inked with distress ink. The houses were cut from idea-ology metallic kraftstock, sanded and inked with walnut stain distress ink.

    Box Side Panels
    igirlzoe: tim holtz sizzix christmas tree ring 3D christmas cutouts layered tags curio box
    igirlzoe: tim holtz sizzix christmas tree ring 3D christmas cutouts layered tags curio box
    igirlzoe: tim holtz sizzix christmas tree ring 3D christmas cutouts layered tags curio box
    igirlzoe: tim holtz sizzix christmas tree ring 3D christmas cutouts layered tags curio box

    igirlzoe: tim holtz sizzix christmas tree ring 3D christmas cutouts layered tags curio box
    I made some little gift tags to fill the box with. I cut the mini tree ring (twice) using the bigz die, still available and linked at the end of the post. I carefully cut away the inside with a craft knife and embossed the center piece with the Tree Ring 3D embossing folder.

    igirlzoe: tim holtz sizzix christmas tree ring 3D christmas cutouts layered tags curio box
    I used the complete piece as a base and reassembled the other pieces on top. You could slip a piece of ribbon between if you wished. I punched a small hole in one side and added an idea-ology o ring to thread onto ribbon.

    I should add that the mini tree ring bigz die comes with an embossing folder to specifically fit the tree ring. However, the 3D embossing folders are so incredibly detailed, it was worth the extra effort to use the new Tree Ring 3D embossing folder.

    igirlzoe: tim holtz sizzix christmas tree ring 3D christmas cutouts layered tags curio box
    I used leftover idea-ology metallic kraftstock from the cutout houses and backed the PEACE outer cut from seasonal woodgrain black cardstock used for the inserts on the side of the box top. I used the new Layered Tags and cards cut from the postale chapter 3 die set to create mini gift tags and cards.

    igirlzoe: tim holtz sizzix christmas tree ring 3D christmas cutouts layered tags curio box
    I will be sharing more gift cards/tags later in the season.

    Thanks for stopping by and let me know if you have any questions.
    Zoe


    affiliate links used at no cost to you


  5. Jack Sparrows Crypt

    15th August, 2022 by iGirlZoe

    igirlzoe: tim holtz distress crypt paste ranger ink sizzix skulls 3D folder

    Hello friends. Hope you’re doing well. Did you catch the LIVE launch of the Tim Holtz Seasonal Distress products? You can watch the replay and Tim’s amazing demos over on his blog. Please note these products are seasonal, so if you want them and it’s in your budget, I recommend you don’t wait, especially not for the Crypt-Paste with me and Tami B stocking up like it’s the grit-paste apocalypse.

    igirlzoe: tim holtz distress crypt paste ranger ink sizzix skulls 3D folder
    I was delighted to see “Crypt-Paste” back in a bigger pot, the single serve pots were not enough for this grit-paste loving girl! The crypt-paste is bittier and grittier and it spreads like butta and as I had the bigger pot I decided to go to town with it and create a Tombstone fit for a pirate!

    igirlzoe: tim holtz distress crypt paste ranger ink sizzix skulls 3D folder
    I took an etcetera mini tombstone overlay and trims from the etcetera bat web trims set and covered the pieces with a white gesso wash. Once dry, I added crypt-paste to the parts of the tombstone that would show.

    igirlzoe: tim holtz distress crypt paste ranger ink sizzix skulls 3D folder
    Using more of the trims from the bat web trims set, mount onto the back of the base of the tombstone to create a shelf to sit idea-ology pieces on later. I covered the crypt paste with hickory smoke distress paint. I love that the translucency of the crypt-paste means you don’t get white showing through and it really is grittier.

    igirlzoe: tim holtz distress crypt paste ranger ink sizzix skulls 3D folder
    The new Skulls 3D folder is nothing short of amazing. You don’t fully appreciate the depth and detail of the 3D until you have it in your hands and can’t quite believe one pass in a folder gives you THIS!! Make sure you check out Tim’s YouTube replay to see what he did with this folder and the black woodgrain surface! WOW!

    I covered a piece of distress watercolor cardstock with a hickory smoke distress paint wash and set aside to dry. I embossed with the Skulls 3D folder then dry brushed white gesso onto the raised parts.

    igirlzoe: tim holtz distress crypt paste ranger ink sizzix skulls 3D folder
    I adhered the 3D skulls background to the tag part of the tombstone overlay and added the tombstone top. To create a side to the tombstone, I mounted 2 trims from the bat web trims set on top of each other to match the height of the top and bottom of the tombtone overlay, trimmed to size and added to the side. I used distress collage medium to glue and lots of clamps to hold in place while it dried!

    igirlzoe: tim holtz distress crypt paste ranger ink sizzix skulls 3D folder
    Using the new Theory alphanumeric thinlits dies, I added “1729” the year that Captain Jack Sparrow met his untimely death.

    igirlzoe: tim holtz distress crypt paste ranger ink sizzix skulls 3D folder
    Using an older piece of halloween idea-ology I hoarded I covered with gesso and wiped away the excess. Once dry I dry brushed black soot distress paint over the top and wiped with a cloth so the black sits in the recessed areas.

    igirlzoe: tim holtz distress crypt paste ranger ink sizzix skulls 3D folder
    I added some moss that I bought from a craft store. You will sometimes find this kind of moss in the model railway section. I painted on a layer of distress collage medium, pressed moss into it and allowed to air dry.

    igirlzoe: tim holtz distress crypt paste ranger ink sizzix skulls 3D folder
    I used a palette knife to spread Crypt-Paste along the edge of the trims to hide the seam and match the rest of the tombstone. Once dry, I covered with hickory smoke distress paint and later dry brushed with black soot distress paint.

    igirlzoe: tim holtz distress crypt paste ranger ink sizzix skulls 3D folder
    Using the Theory alphanumeric thinlits dies again, I cut “Jack Sparrow” from idea-ology black kraft stock several times and layered to give the letters some depth. I lightly sanded small areas and added along the base of the tombstone.

    igirlzoe: tim holtz distress crypt paste ranger ink sizzix skulls 3D folder
    I was able to place idea-ology items along the shelf I created by adding etcetera trims to the back of the tombstone overlay. I covered a bottle from the idea-ology tiny vials with a layer of distress collage medium and once dry, a layer of black soot distress paint. Adding an idea-ology label and skull and cross bones remnant rub. I used mummy cloth colored with distress ink for Jack’s bandana and sewed some beads into the side to imitate Jack’s beaded dreadlock. You can just about see them on the left hand side of the skull.

    Thanks for stopping by and let me know if you have any questions.

    Zoe


    affiliate links used at no cost to you


  6. Uncharted Mariner

    24th June, 2022 by iGirlZoe

    igirlzoe: tim holtz uncharted mariner distress ranger ink

    Hello friends. Happy FriYAY! Nearly weekend and I’ve got plans to spend this weekend making and I’m excited about that. I’m also excited about the new Distress. Did you meet the newest member of the Tim Holtz distress family, Uncharted Mariner? If you missed the new distress launch, you can catch the replay and maker inspiration over on Tim’s blog.

    igirlzoe: tim holtz uncharted mariner distress ranger ink
    I LOVE LOVE LOVE Uncharted Mariner. When I opened the box I gasped and swooned and I knew it was going into my favorites tin alongside my other desert island distress inks. I love the names that Tim comes up with and I wanted to celebrate the name and the color. Let’s get into some of the details…

    igirlzoe: tim holtz uncharted mariner distress ranger ink
    Using the Uncharted Mariner distress ink pad, I inked up a background stamp from the The Professor 2 (CMS395) stamp set, misted the stamp with water and lightly stamped onto a piece of distress watercolor cardstock (smooth side) cut to fit a small etcetera thickboard tag, which I had swiped in a pumice stone distress ink wash.

    igirlzoe: tim holtz uncharted mariner distress ranger ink
    By misting the stamp with water after inking and before stamping, you will get a smudged image, but that’s what I was going for so the background would be out of focus and subtle.

    igirlzoe: tim holtz uncharted mariner distress ranger ink
    Ok, not going to lie… I over-trimmed the background, said some bad words and decided to make it work by adding a panel of cracked leather cardstock to the top. This however caused another problem… I glued the cracked leather cardstock over the distress watercolor cardstock and there was a ridge. By the time I noticed the ridge it was too late to pull them up, so the next idea was born out of total necessity…

    igirlzoe: tim holtz uncharted mariner distress ranger ink
    So onto the solution to cover “the ridge of cardstock doom”…

    I needed something with some height or texture and the Foundry 3D embossing folder was perfect. I embossed a piece of idea-ology metallic kraftstock, covered with a layer of ground espresso distress paint. Because the metallic kraftstock is shiny, there’s nothing for the paint to cling to, no “tooth”, so you may need to run your paintbrush over the background a couple of times to get coverage and wipe the excess away with a clean cloth. I also added mushroom and rust alcohol inks to portions of the background.

    igirlzoe: tim holtz uncharted mariner distress ranger ink
    What ridge? What wrongly trimmed cardstock? This is exactly to plan! 😉

    And this is how I make most of the time. It’s a series of corrected missteps and happy accidents. I just want you to know that I have no idea what I’m doing, but I have fun messing it up and fixing it up, and that’s what really matters.

    I added a label I stamped with the Apothecary stamp set (CMS138). I have a few stamp sets that I keep out all the time and this is one. I LOVE these labels! I added a stamp from the new Eccentric stamp set (CMS448) inside the label.

    igirlzoe: tim holtz uncharted mariner distress ranger ink
    For the porthole I used circle thin frame dies from Simon Says Stamp to create the porthole frame. The base layer is distress watercolor cardstock stamped with the new Bubble stamp (CMS449) with Uncharted Mariner distress ink. This stamp and this ink is a match made in heaven!! I added a chipboard circle over the top.

    igirlzoe: tim holtz uncharted mariner distress ranger ink
    I added a thin circle of adhesive foam so the acetate circle would sit away from the background.

    igirlzoe: tim holtz uncharted mariner distress ranger ink
    Then added the top layer and the inner circle which I cut from the embossed foundry sheet that I showed earlier in the post.

    Please note the above photos were to show the layers. I decorated the top of the porthole and added the fish before assembling. Here’s how…

    igirlzoe: tim holtz uncharted mariner distress ranger ink
    I covered the porthole frame with distress translucent grit-paste, once dry, covered with ground espresso distress paint. I used crackling campfire distress paint brushed over the grit-paste and idea-ology hardware heads to imitate rust.

    igirlzoe: tim holtz uncharted mariner distress ranger ink
    I stamped and fussy cut fish from the Tiny Things stamp set (CMS164). I used Uncharted Mariner distress oxide reinker to watercolor them and added to the inside of the porthole before assembling.

    igirlzoe: tim holtz uncharted mariner distress ranger ink
    Using more of that foundry embossed 3D metallic cardstock, I die cut using the decorative trims thinlits die set and added it to a thickboard etcetera pinked trim. I added a few fussy cut pieces to the edges of my tag. This is a cool design idea I picked up from the very talented Emma Williams.

    igirlzoe: tim holtz uncharted mariner distress ranger ink
    Using the Uncharted Mariner distress reinker, I watercolored this Dapper Uncharted Mariner from the Paris Memoirs stamp set (CMS159). I used walnut stain distress ink to watercolor his coat.

    igirlzoe: tim holtz uncharted mariner distress ranger ink
    I fussy cut, mounted some adhesive foam on the back and added him to the decorative trim ledge.

    igirlzoe: tim holtz uncharted mariner distress ranger ink
    I pushed a link of the idea-ology hook clasp through the hand and glued at the back to hold in place.

    igirlzoe: tim holtz uncharted mariner distress ranger ink
    I added a die cut a piece from the steampunk parts bigz die, again cut from the piece of foundry 3D embossed metallic kraftstock. I added a hardwear head to the top and curled the blades slightly.

    igirlzoe: tim holtz uncharted mariner distress ranger ink
    I melted Uncharted Mariner distress embossing glaze over Uncharted Mariner distress oxide ink, rubbed directly onto a piece of distress white heavystock. I love how dark and glossy it looks. I placed the alphanumeric bold thinlits dies onto the glazed background and die cut.

    igirlzoe: tim holtz uncharted mariner distress ranger ink
    I mounted the glazed letters over letters die cut from idea-ology black kraftstock. Using the alphanumeric marquis thinlits dies I added “Mariner” to the tag, die cut from the foundry 3D embossed cardstock.

    igirlzoe: tim holtz uncharted mariner distress ranger ink
    I’m not someone who uses a lot of color in my makes or uses it in a bold way. It’s usually an accent and support act to the browns that I love. Uncharted Mariner works so beautifully with the brown distress palette and I know this is going to be a forever favorite of mine.

    Thanks for stopping by and let me know if you have any questions.
    Zoe


    affiliate links used at no cost to you


  7. Pack Up Your Troubles

    24th March, 2022 by iGirlZoe

    igirlzoe: tim holtz saltwater taffy distress ranger ink

    Hello friends. Sending you all extra love and peace during these difficult times; I definitely need a big dose of joy at the moment and have found some by quietly making over here in Copenhagen, enjoying some spring sunshine and some new distress. Tim Holtz introduced us to the newest member of the distress family recently, Saltwater Taffy. The LIVE launch replay and maker inspiration are over on Tim’s blog.

    igirlzoe: tim holtz saltwater taffy distress ranger ink
    It’s such a pleasure to be a new distress color maker and when our boxes arrive with the new distress inside, we have no idea what color it is. My sweet husband makes a “drum roll” sound as I rip open the tissue paper to reveal the color and the name! Hands up who is obsessed with the names?!

    igirlzoe: tim holtz saltwater taffy distress ranger ink
    My remit for the new color is to use it with brown so I grabbed an old school BUT STILL AVAILABLE (at the time of writing this), Vintage Valise die. I cut the die twice from distress kraft heavystock (pic shows one set). I blended in ground espresso and walnut stain distress inks to the accessory parts (on the right), sanding a little and then blending with ink again to get a worn look. I stamped the base (on the left) with the plaid and nordic stamp set CMS243 with ground espresso distress archival ink.

    igirlzoe: tim holtz saltwater taffy distress ranger ink
    I smooshed saltwater taffy distress oxide ink onto my non stick craft mat, spritzed with a little water, picked up with a very fine paintbrush and painted between the lines. It doesn’t have to be perfect, it just lifts the plaid to look more dimensional.

    igirlzoe: tim holtz saltwater taffy distress ranger ink
    I turned the vintage valise base over and painted with a layer of saltwater taffy distress paint. Once dry, I stamped again with the plaid and nordic stamp CMS243 using ground espresso distress archival ink. I used distress paint and distress archival ink because they are permanent once dry and won’t rub off onto the journal going inside. (Ignore the side parts, they get added later).

    igirlzoe: tim holtz saltwater taffy distress ranger ink
    I added the handle, corners and straps to the valise using distress collage medium.

    igirlzoe: tim holtz saltwater taffy distress ranger ink
    Repeat on the second valise ready to assemble.

    igirlzoe: tim holtz saltwater taffy distress ranger ink
    I cut 3 strips of distress white heavystock to fit the inside of the valise. 1x strip 6 x 1.5 inches and 2x strips 3.75 x 1.5 inches. Score 0.25 inches in from each of the long edges.

    To make the valise wider just increase the width (1.5) of your strips. The length (6 and 3.75) and score line (0.25) measurements will remain the same.

    I glued into place and allowed to dry before adding the other valise piece on top.

    **I painted the inside of the strips once I had assembled it with ground espresso distress paint, (not pictured) but I recommend inking or painting before assembling. You can of course leave it blank but I thought it looked nicer when you peek inside and it’s matchy matchy.

    igirlzoe: tim holtz saltwater taffy distress ranger ink
    Using the travel label CMS108 stamp set I stamped in saltwater taffy distress oxide and heat embossed with saltwater taffy distress embossing glaze. I blended in ground espresso distress ink, spritzed with water and wiped the excess ink from the surface. The glaze acts as a resist and the ink sinks into some of the de-bossed areas.

    igirlzoe: tim holtz saltwater taffy distress ranger ink
    I added idea-ology hardware heads with a tiny dot of distress collage medium. Hardware heads have been out of stock for a little while but are not retired so keep checking with your local and online retailer. Some stores will allow you to enter your email and be notified when things are back in stock. Hope this helps.

    igirlzoe: tim holtz saltwater taffy distress ranger ink
    I created a simple travel journal by cutting distress kraft heavystock to fit the valise and used a scor-board to create the spine. I decorated the same way as the valise and die cut a couple of additional straps from the vintage valise bigz die to add to the journal.

    igirlzoe: tim holtz saltwater taffy distress ranger ink
    Using the travel labels CMS108 stamp set again, I stamped with distress archival ink onto distress white heavystock paper. I fussy cut, scrunched up and then inked each label. I sprayed with antique linen distress spray and once dry, added to the travel journal with distress collage medium.

    igirlzoe: tim holtz saltwater taffy distress ranger ink
    I sprayed the inside of the journal with saltwater taffy distress oxide spray. I LOVE how it looks over the distress kraft heavystock.

    igirlzoe: tim holtz saltwater taffy distress ranger ink
    I tucked the journal into the valise. Love the saltwater taffy distress paint showing on the inside.

    igirlzoe: tim holtz saltwater taffy distress ranger ink
    I stitched pages into the travel journal it was the first time I did it and it wasn’t as successful as I would have liked but I will work on it and do a tutorial for the travel journal if that helps. Let me know in comments.

    igirlzoe: tim holtz saltwater taffy distress ranger ink
    Another new distress in the family and I’m already excited to see what the next one will be and I know the next new distress won’t be yellow 😉 … If you know you know… if you don’t, watch the LIVE replay to the end.

    I have to be honest, I’d never used the vintage valise bigz die before this. It’s one that I had to have and then happily inventoried, stored, dusted and never used! Thank you Saltwater Taffy for inspiring me to use it.

    Thanks for stopping by.

    Zoe


    affiliate links used at no cost to you


  8. NEW Distress Archival Inks

    15th February, 2022 by iGirlZoe

    igirlzoe: tim holtz ranger ink distress archival ink distress embossing glazes

    Hello Friends! If like me you LOVE Distress you will have seen Tim Holtz launch new Distress Archival inks and Distress Embossing Glazes in some of the best loved distress palette on Saturday. You can watch the replay and Tim demo lots of cool techniques, plus all of the inspiration makes over on Tim’s blog.

    igirlzoe: tim holtz ranger ink distress archival ink distress embossing glazes
    I LOVE Distress Archival Inks and I’m so happy that Tim and Ranger have released some more. When I clapped eyes on Frayed Burlap I gasped! This is going to be added to my most used distress archival inks list, but of course I needed a swatch for every new color!

    igirlzoe: tim holtz ranger ink distress archival ink distress embossing glazes
    I created some labels so I would know which kit each ink pad came from. I stamped the tiny label from Mini Halloween 3 stamp set CMS140 in ground espresso distress archival ink and fussy cut. Die cut hashtags and numbers from distress white heavystock using alphanumeric label thinlits die set. Covered with distress archival ink by pressing the ink pad directly on top of the die cut. Assembled using distress collage medium.

    igirlzoe: tim holtz ranger ink distress archival ink distress embossing glazes
    I printed some tiny labels to add to the index tabs. These are printed onto inexpensive copy/printer paper. I added a border to make it easier to fussy cut the labels. Ranger have printable labels for all you distress products so you can get nice and organized.

    igirlzoe: tim holtz ranger ink distress archival ink distress embossing glazes
    To create the index card I cut a piece of card from distress white heavystock 2.25 x 3.75 inches, spritzed with water, one spray of frayed burlap distress spray ink and blotted with a paper towel. Gave it a blast with my heat tool and then stamped with frayed burlap distress archival ink with stamps from the Field Notes stamp set CMS396. To add contrast I stamped “FILED” and “CORRESPONDING ORDER” in ground espresso distress archival ink.

    igirlzoe: tim holtz ranger ink distress archival ink distress embossing glazes
    I sprayed each card with the corresponding color distress spray stain and all the stamping was done with the distress archival ink. It doesn’t matter if you stamp or spray first as the distress archival ink is not reactive with water like regular distress ink. If you don’t have a spray for each color, you could also use a distress ink pad squished onto your craft mat, spritzed with water and dip your index card into the ink wash and pick up the excess ink with a paper towel.

    igirlzoe: tim holtz ranger ink distress archival ink distress embossing glazes
    I die cut tabs using the (retired) tiny tabs + tags bigz die from distress white heavystock. I stamped a block of each distress archival ink onto the inside of the tab so it shows under the window, added the label with a tiny line of distress collage medium and use a dry cloth to wipe away any excess glue. Edge with walnut stain distress ink and add to the side of the index card with distress collage medium.

    igirlzoe: tim holtz ranger ink distress archival ink distress embossing glazes
    Distress Archival Ink Pad Mini Kit #4

    igirlzoe: tim holtz ranger ink distress archival ink distress embossing glazes
    Distress Archival Ink Pad Mini Kit #5

    igirlzoe: tim holtz ranger ink distress archival ink distress embossing glazes
    Distress Archival Ink Pad Mini Kit #6

    igirlzoe: tim holtz ranger ink distress archival ink distress embossing glazes
    Of course now I have to do the other 12 distress archival ink swatches too! LOL

    igirlzoe: tim holtz ranger ink distress archival ink distress embossing glazes
    igirlzoe: tim holtz ranger ink distress archival ink distress embossing glazes
    Thanks for stopping by. I’m excited to try out all the techniques that Tim showed during the LIVE launch. You can see all the details on Tim’s blog.

    Zoe


    affiliate links used at no cost to you


  9. Vault Series Christmas 2021

    20th November, 2021 by iGirlZoe

    igirlzoe: tim holtz sizzix vault series christmas 2021

    Happy Saturday friends. Day 6 of my week of Chrismas makes and I feel ready to bake some Christmas cookies and put up my Christmas tree. I’m sharing one of my makes from the launch of Tim Holtz Sizzix Christmas die release. You can see the replay and all the inspiration makes over on Tim’s Blog.

    igirlzoe: tim holtz sizzix vault series christmas 2021
    I LOVE the vault series. Both the Halloween 2021 set and this Christmas 2021 set. I really hope that Tim and Sizzix release more of these die sets. I love that “new to Tim Holtz” makers can now own these gorgeous dies and the more seasoned Addicts can add them to our collections.

    igirlzoe: tim holtz sizzix vault series christmas 2021
    Speaking of collections. I used the older (but still available) alphanumeric tiny upper dies mixed with the new festive bouquet and vault series christmas 2021 dies. I love how my die collection works together and how fun it is to mixy matchy the old and new. Let’s get into the details of this make…

    igirlzoe: tim holtz sizzix vault series christmas 2021
    I took an idea-ology framed panel and covered the frame with a layer of white gesso. Once dry, I dry brushed with iced spruce and vintage photo distress paints. Next I added distress crackle texture paste and set aside to air dry and crack. Finally I rubbed distress crayon into the cracks.

    I created a background on a piece of distress watercolor cardstock. I painted on layers of gesso and distress paint and stamped with distress archival ink. I stitched a border with my sewing machine before adding to the panel base and mounting the frame over the top.

    igirlzoe: tim holtz sizzix vault series christmas 2021
    Using my Dremel Micro I drilled a hole where I wanted my light to sit for the street light.

    igirlzoe: tim holtz sizzix vault series christmas 2021
    I only wanted 2 lights so I cut and discarded the excess. I love that you can cut the idea-ology tiny lights, just remember to cut the right end! I thread the lights up through from the back and secured the battery pack to the back of the framed panel.

    igirlzoe: tim holtz sizzix vault series christmas 2021
    I die cut the street light from the vault series christmas 2021 thinlits die set several times, glued the layers together and sprayed with black soot distress spray. Added a piece of vellum covered with fossilized amber distress paint to the back of the die cut.

    igirlzoe: tim holtz sizzix vault series christmas 2021
    Die cut several more street lights, glue together and cut the center bar out and mount underneath the light die cut pictured on the right. There’s an easier way to add layers by using a piece of fun foam! Tim shared this game changing tip with me after I had made this but you can see the how to here.

    igirlzoe: tim holtz sizzix vault series christmas 2021
    Place the street light over the tiny light and once you’re sure it fits, glue into place with distress collage medium.

    igirlzoe: tim holtz sizzix vault series christmas 2021
    Die cut the carolers, spray with black soot distress spray and add adhesive foam to the back of the die cuts. I left one side without foam as it was sitting it over the top of the other caroler and the foam was under his leg.

    igirlzoe: tim holtz sizzix vault series christmas 2021
    I mounted the carolers in such a way that the guy doesn’t look like he’s running off somewhere by hiding his “running off” leg behind the lady. I added the wreath and bow to the street light, the bow was coloured with seasonal mica spray to match the star. I love that Tim and Ranger released these seasonal mica sprays and crayons. Can’t wait to see what’s to come next year.

    igirlzoe: tim holtz sizzix vault series christmas 2021
    I created some snowballs by adding snowfall grit-paste to idea-ology baubles. Making sure your hands are ink free, put some snowfall on your fingers and roll the bauble between them. Lay on your non stick craft mat to dry. Repeat until you’re happy with the look.

    igirlzoe: tim holtz sizzix vault series christmas 2021
    I added scallop thickboard etcetera trims which I treated with the same technique as the framed panel. I glued them with distress collage medium and added idea-ology hardware heads to each end. This created the shelf for the carolers, street light and snowballs to sit on.

    igirlzoe: tim holtz sizzix vault series christmas 2021
    I added a star cut from the vault series christmas 2021 die set and sprayed with seasonal mica spray and splattered with picket fence distress paint.

    igirlzoe: tim holtz sizzix vault series christmas 2021
    I die cut some foliage from the festive bouquet thinlits die set and sprayed with seasonal mica spray.

    Thanks for stopping by.

    Zoe


    affiliate links used at no cost to you


  10. Witch-Craft

    5th November, 2021 by iGirlZoe

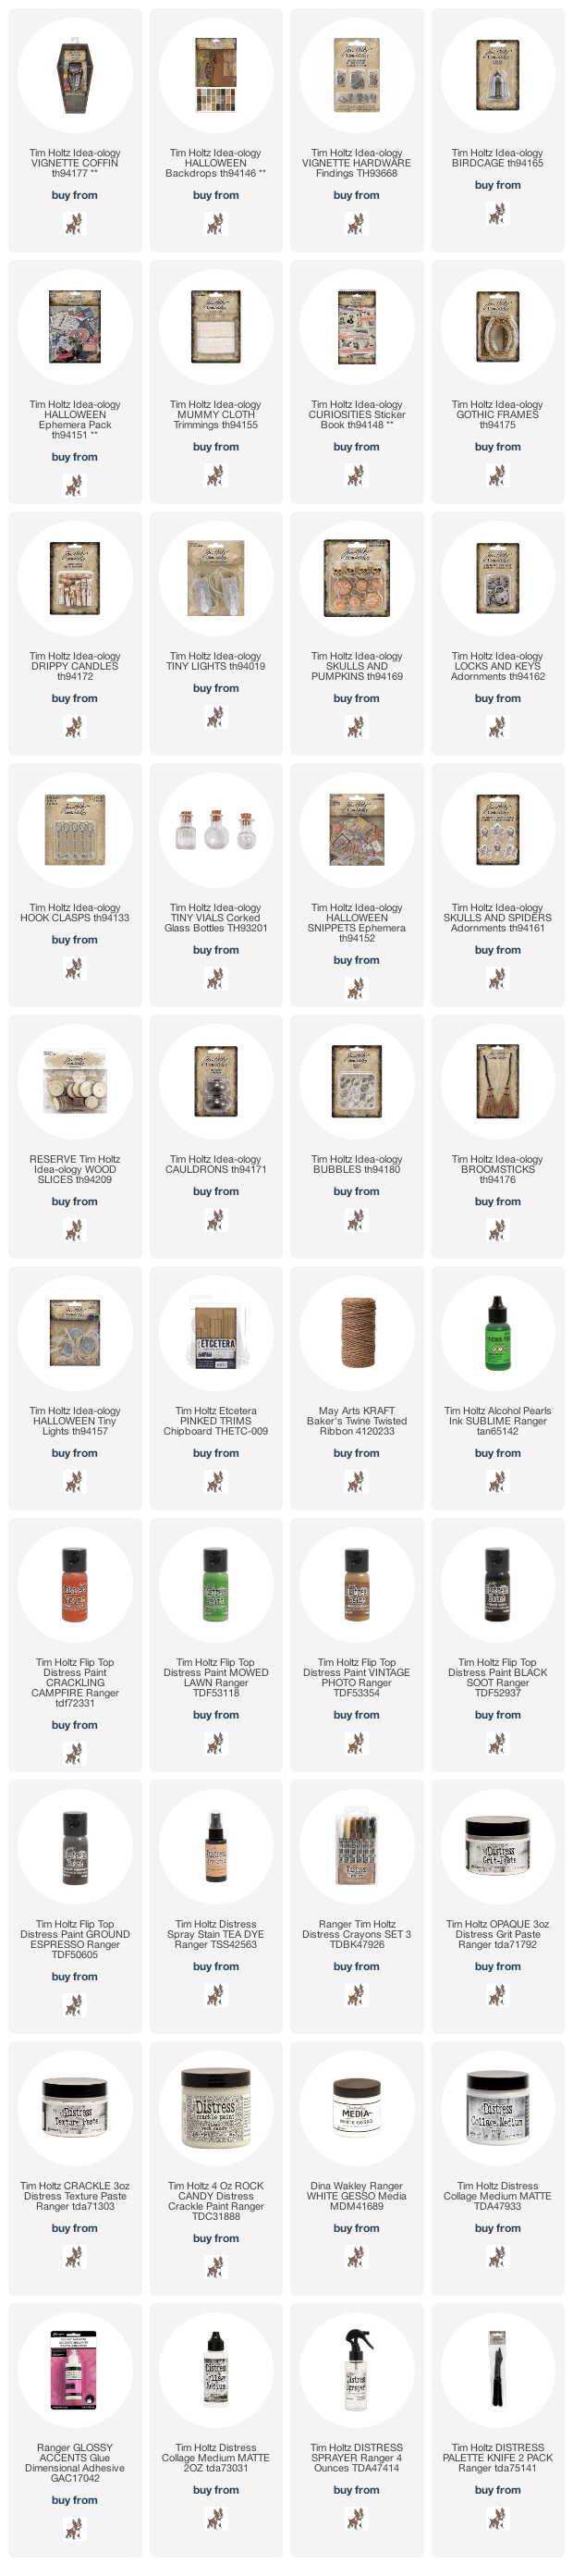
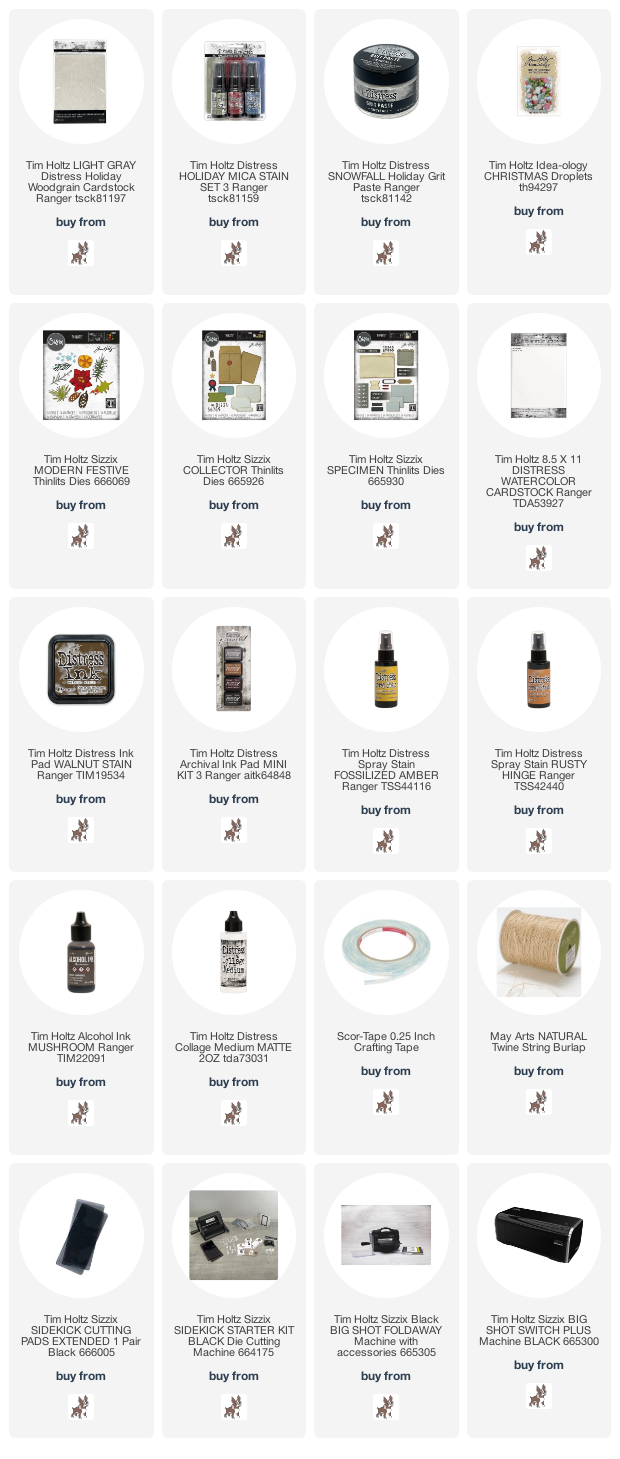
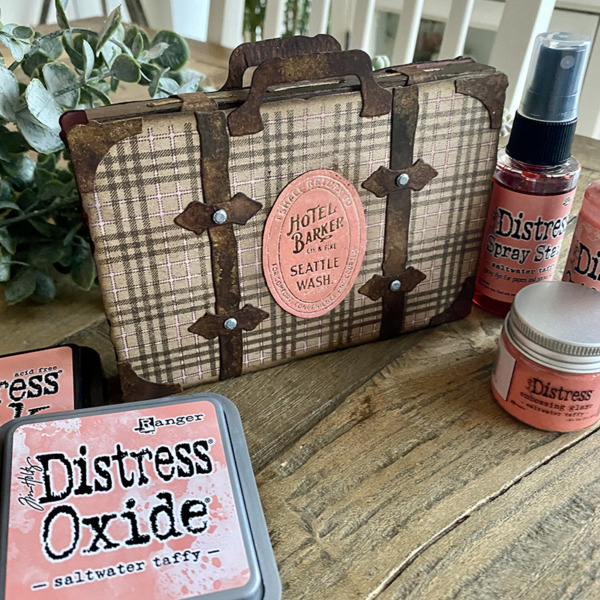
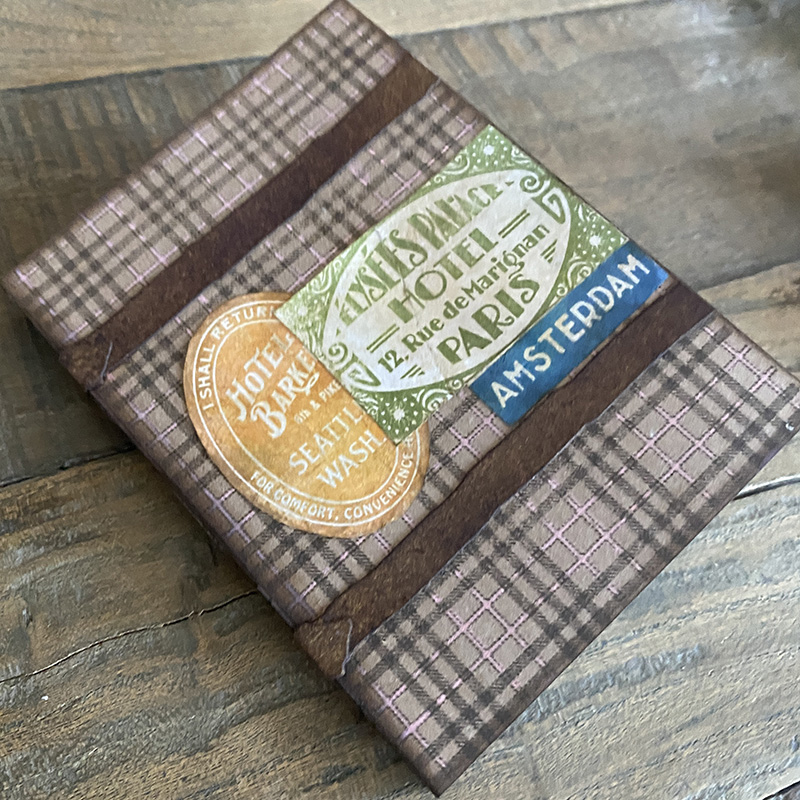
    Hello Friends and happy witching hour. Thank you so much for hanging out with me in Halloween town this week. I’m going to curl up in a big comfy chair with some snacks this weekend and read the comments and answer any questions. Today I’m sharing the last of my Halloween makes. This one I made for the Tim Holtz idea-ology Halloween LIVE launch, you can check out the replay over on Tim’s blog.


    This is a long blog post as I’ve tried to include how to’s where I can, so you may want to curl up in big comfy chair with some snacks too.

    igirlzoe: tim holtz idea-ology halloween 2021 witch
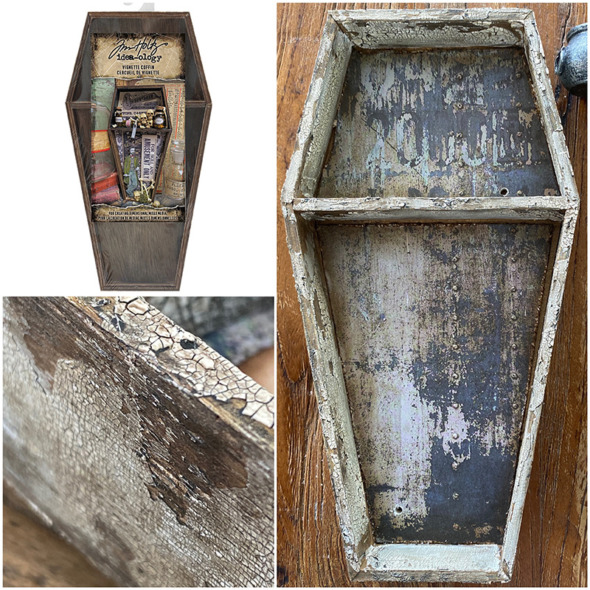
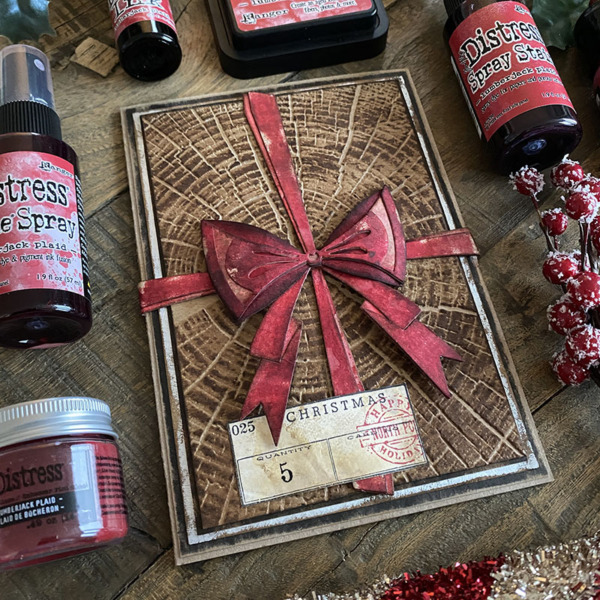
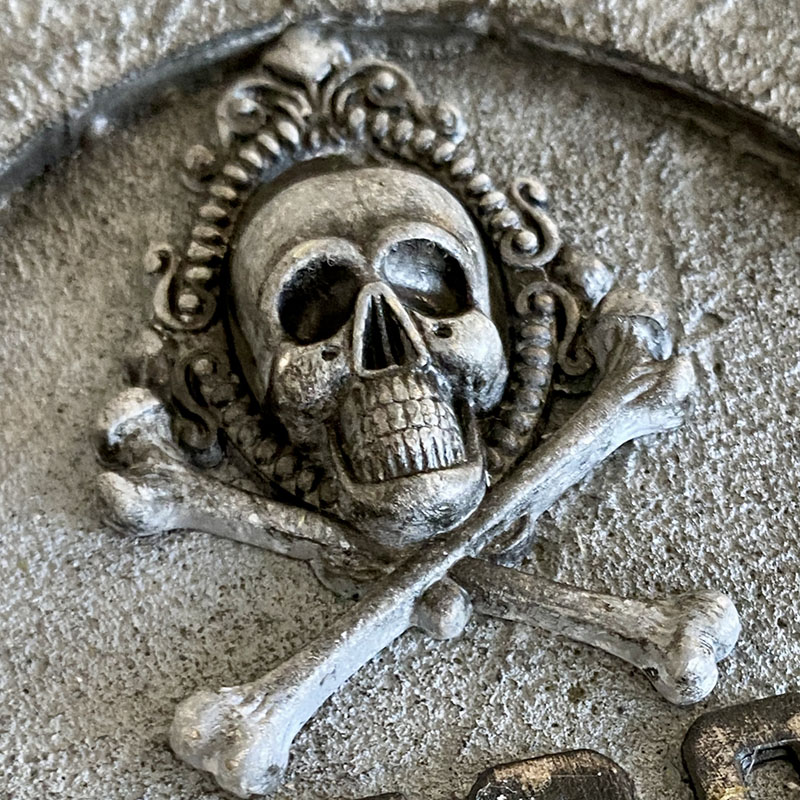
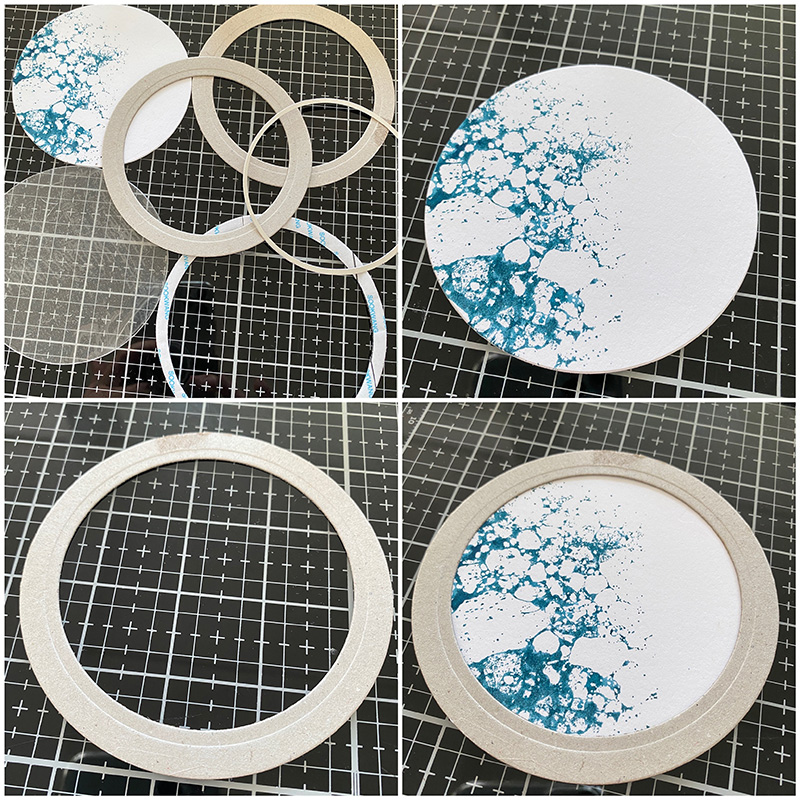
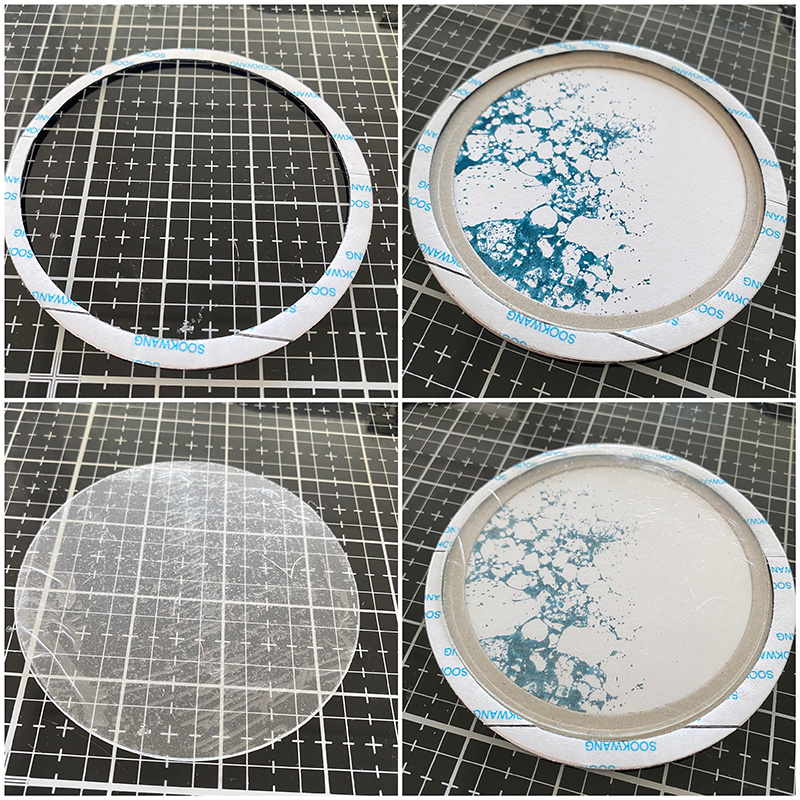
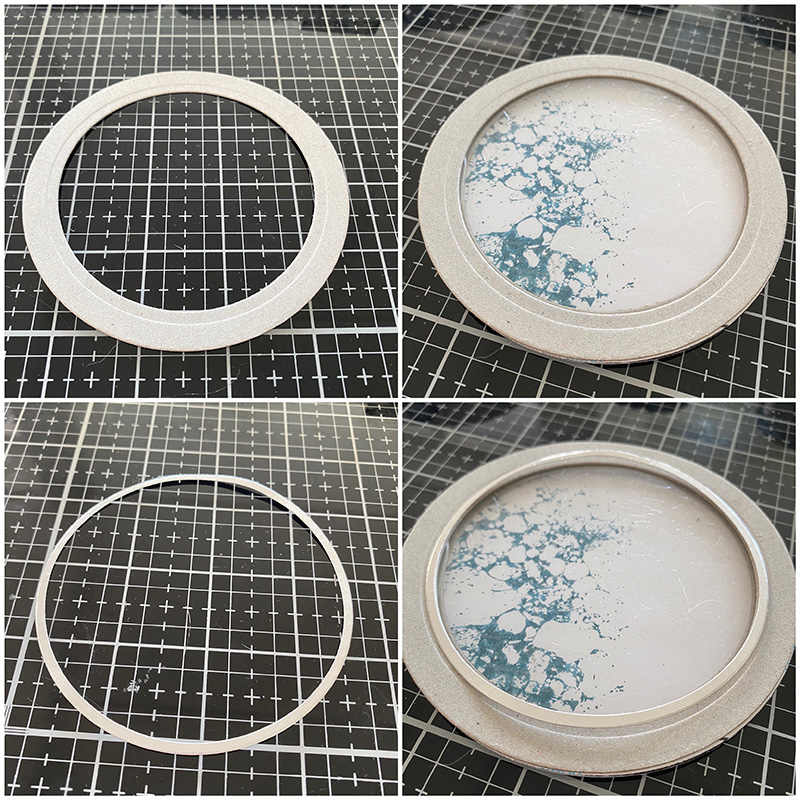
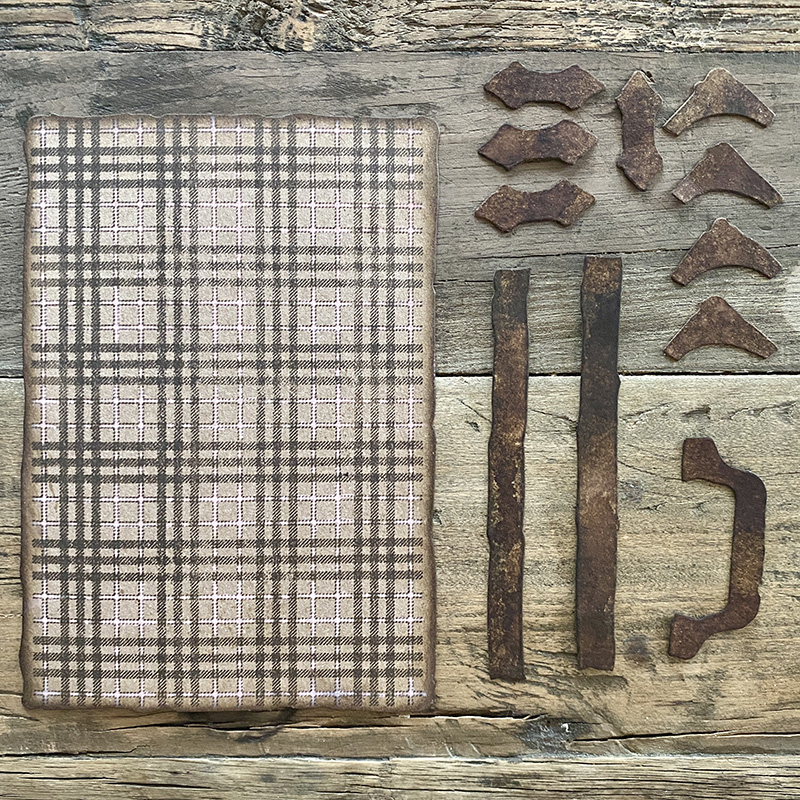
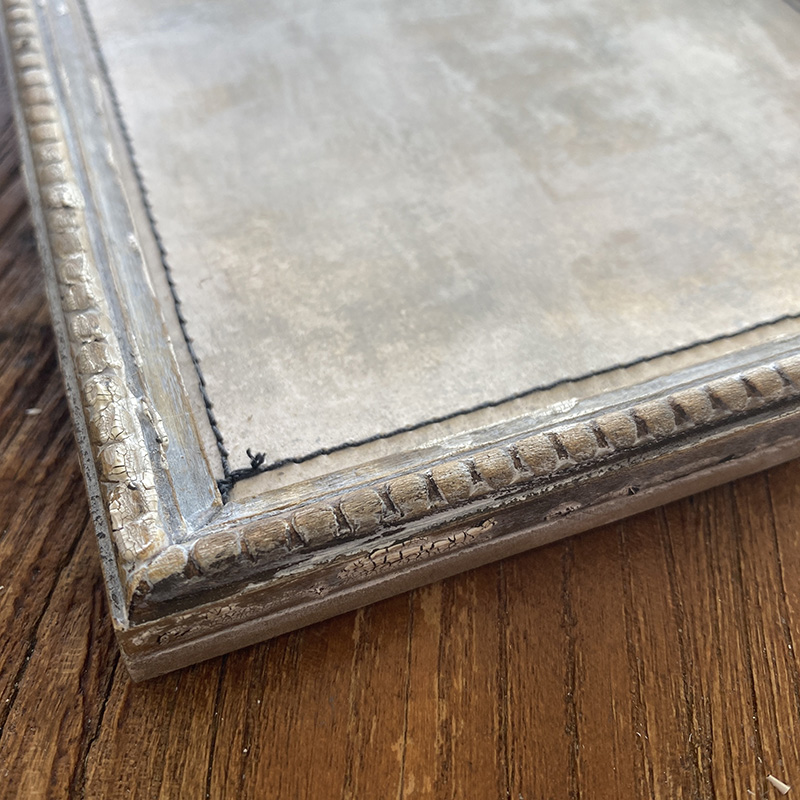
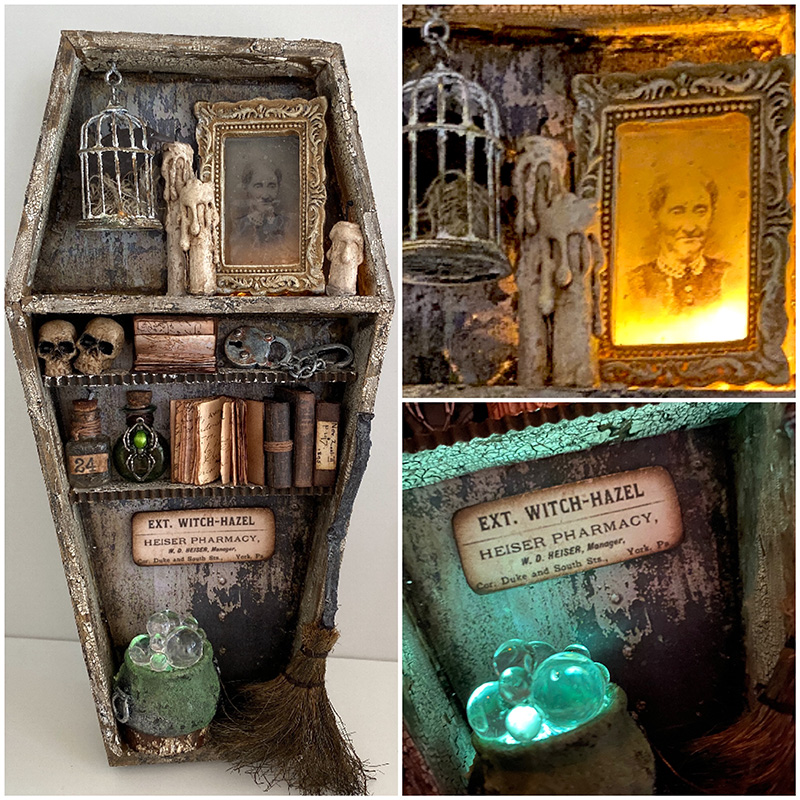
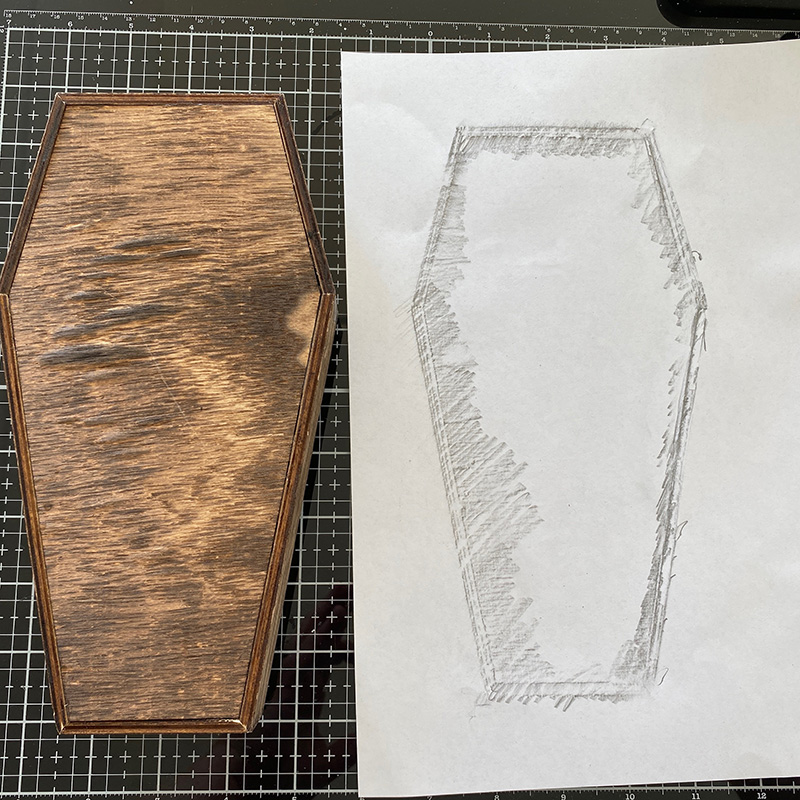
    For the surface I chose a vignette coffin from the idea-ology halloween line. Here’s how I altered it…

    igirlzoe: tim holtz idea-ology halloween 2021 witch
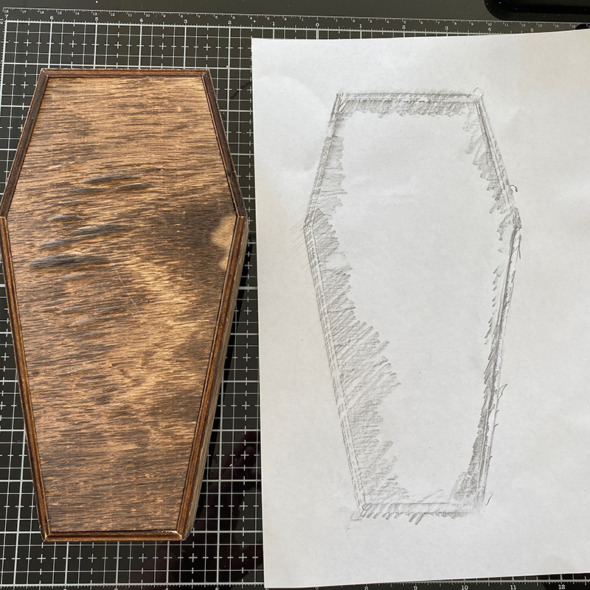
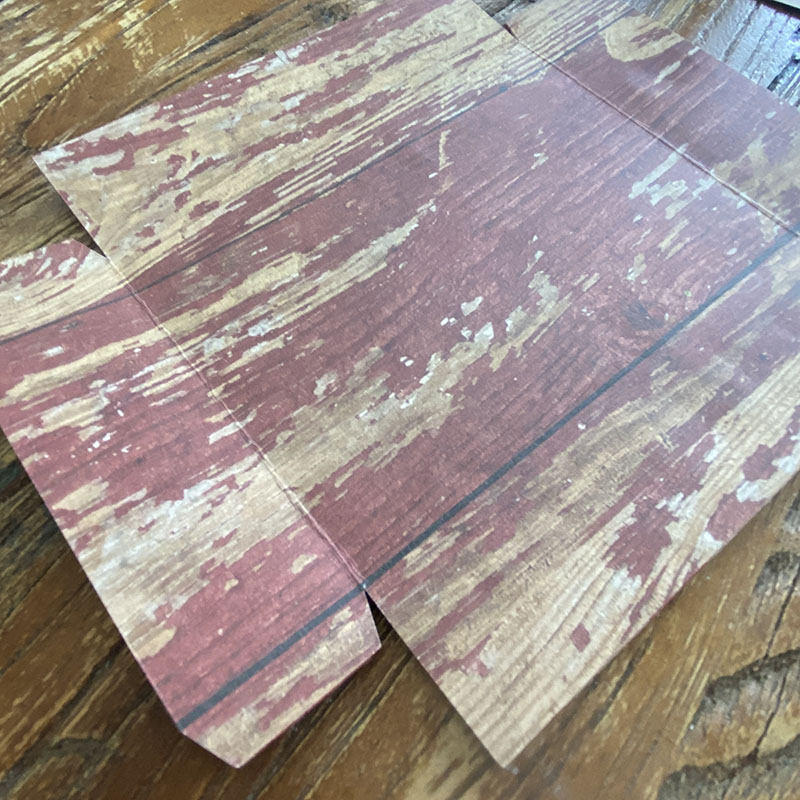
    Turn the vignette coffin over and take a “brass” rubbing from the back of it. You do this by placing a piece of copy paper over the top of the vignette and using the side of your pencil, gently rub around the edge of the vignette coffin.

    igirlzoe: tim holtz idea-ology halloween 2021 witch
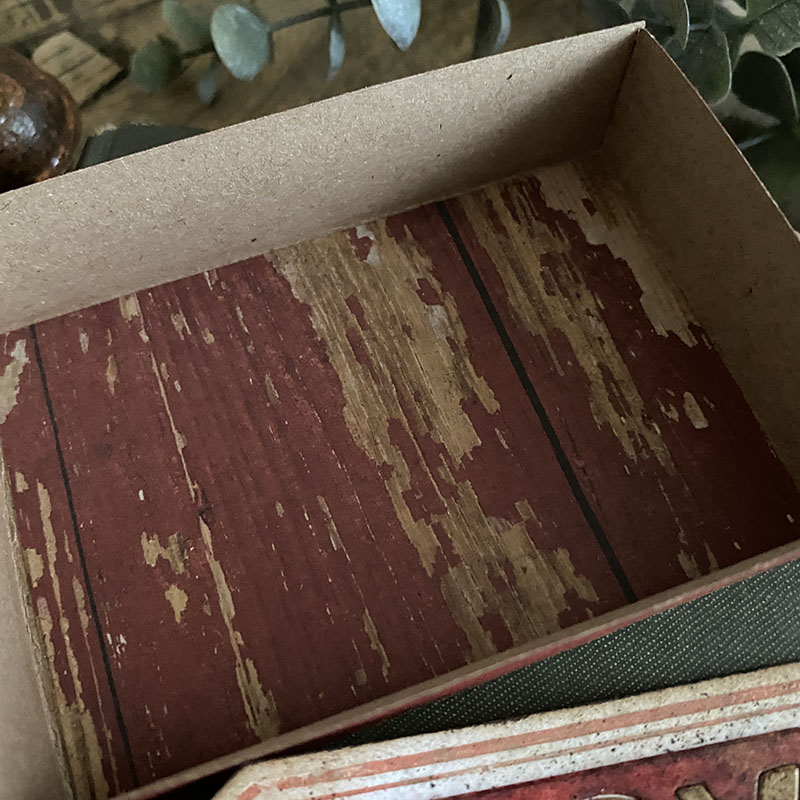
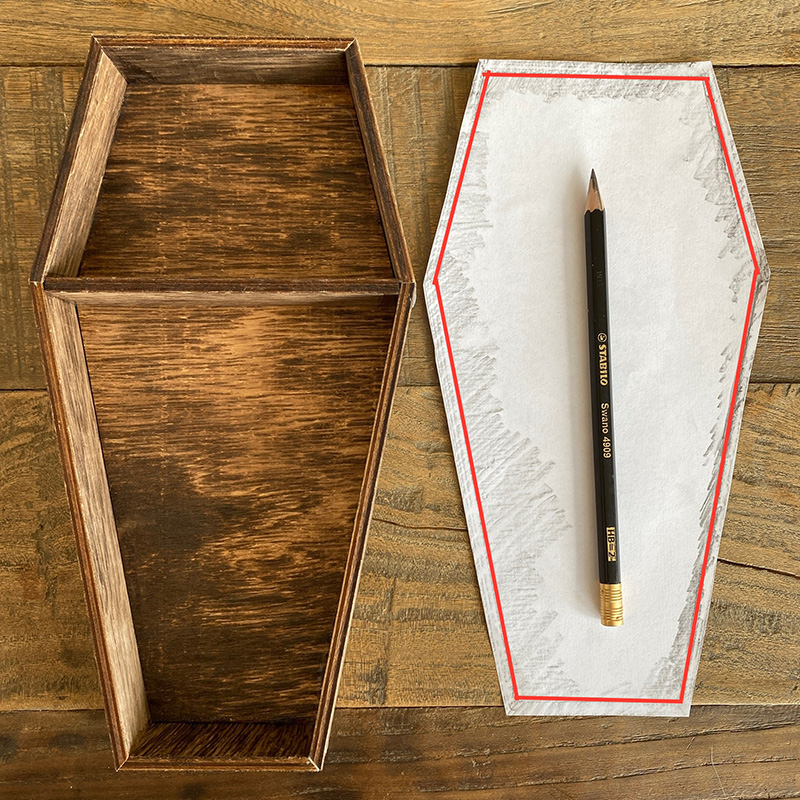
    Cut the template on the inside line (marked in red). This is the inside measurement of the vignette, trim to fit inside your vignette coffin and you will have a template to trace around to cut your background paper from.

    igirlzoe: tim holtz idea-ology halloween 2021 witch
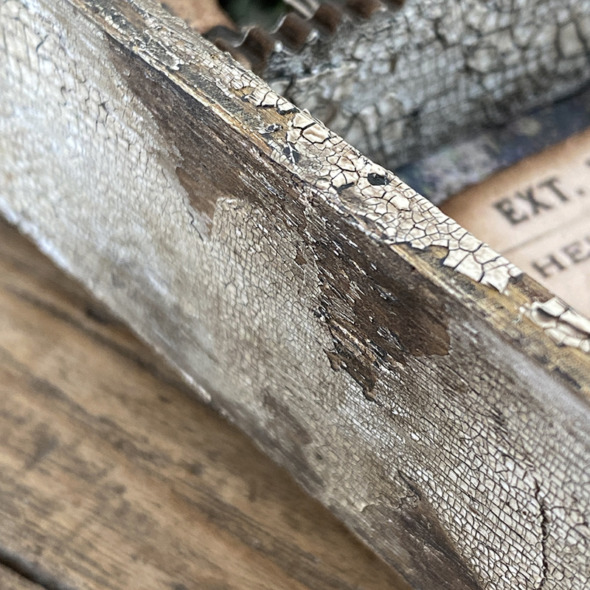
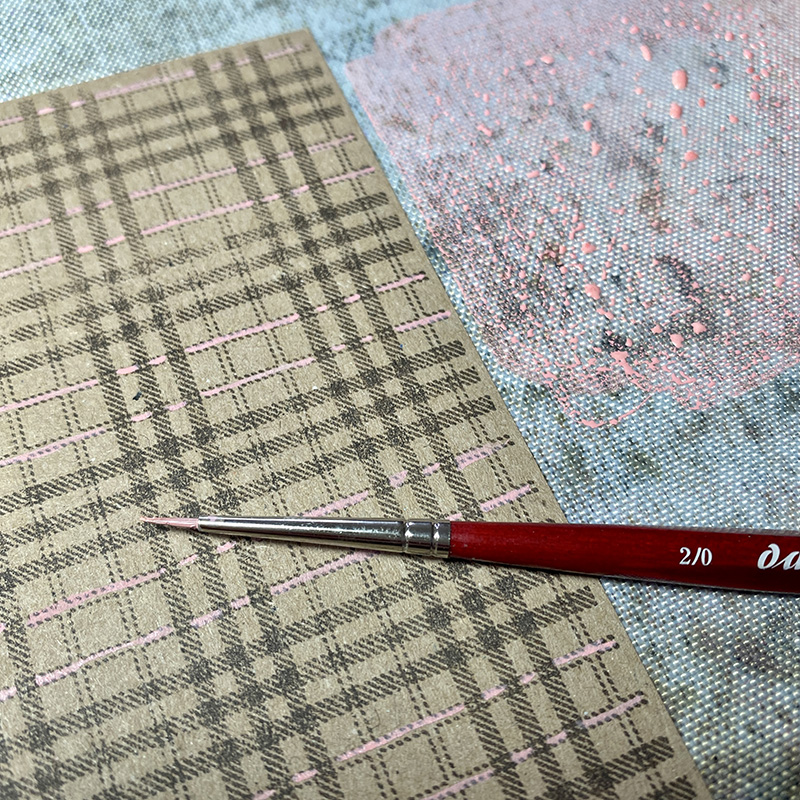
    I distressed the inside and outside edges by covering with a layer of white gesso and allowing to dry before adding vintage photo distress paint. Once dry I added distress crackle texture paste and set aside to dry and crack. Finally I rubbed in walnut stain distress crayon.

    igirlzoe: tim holtz idea-ology halloween 2021 witch
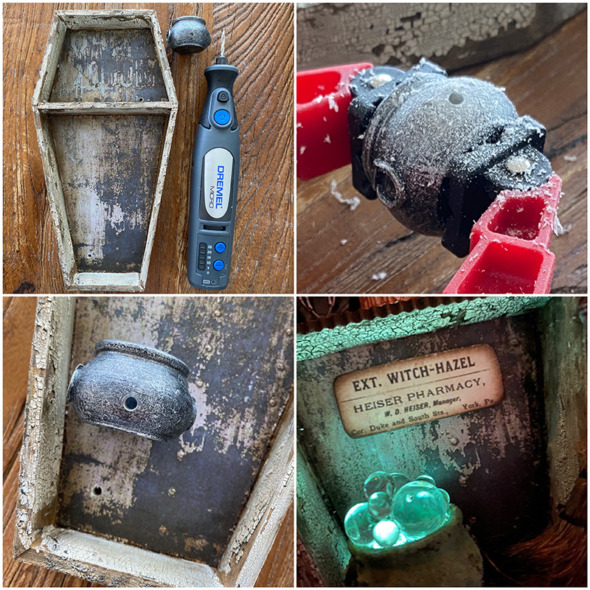
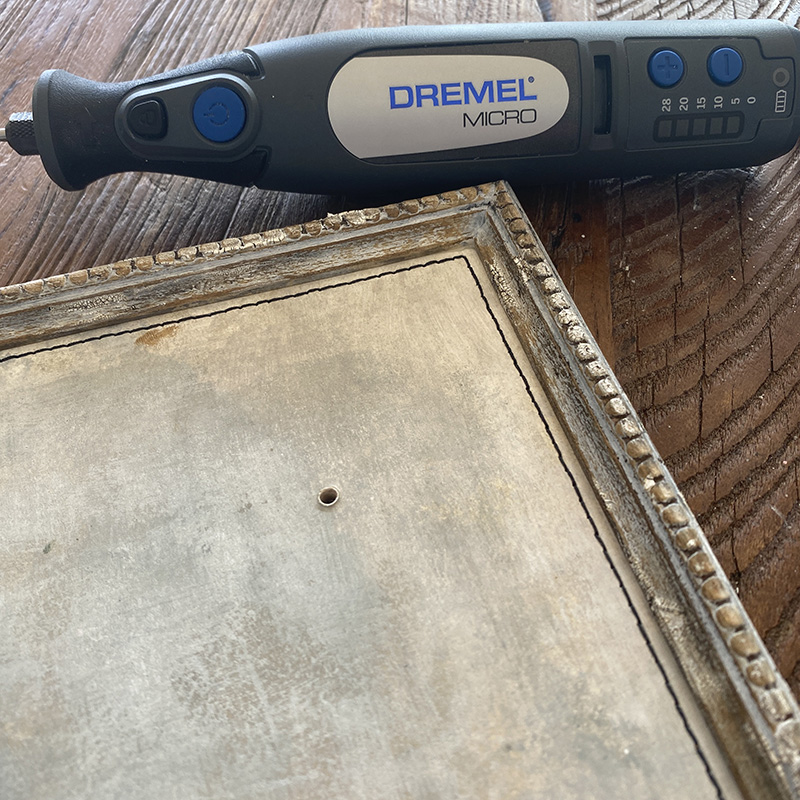
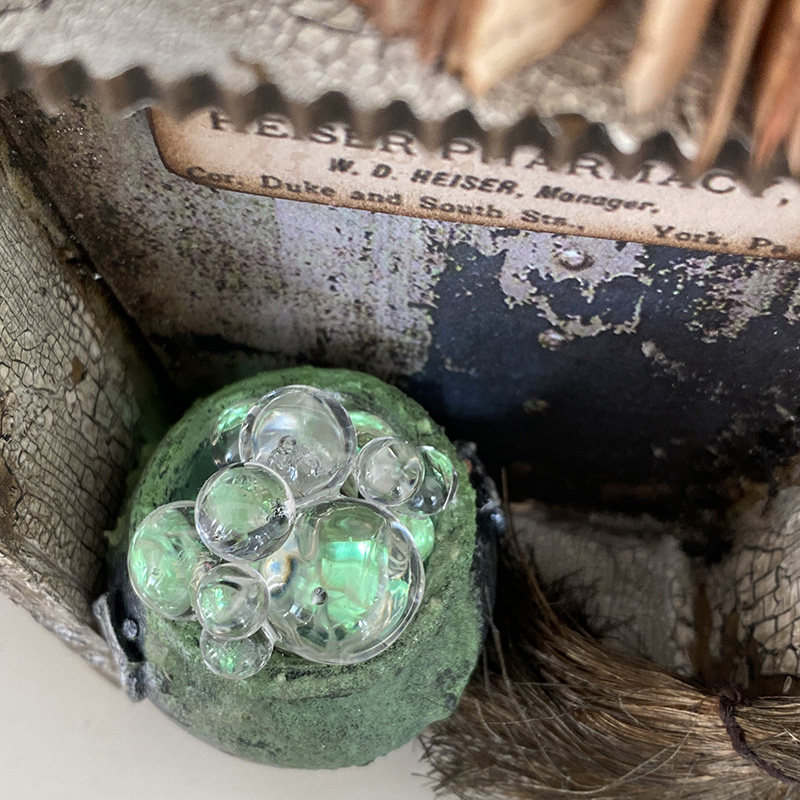
    To light up the cauldron, I drilled a small hole in the side of it using a dremel mirco tool with drill bit attachment. I also drilled a hole in the back of the vignette coffin where I wanted to thread the lights in from the back and into the base of the cauldron to up light the bubbles.

    igirlzoe: tim holtz idea-ology halloween 2021 witch
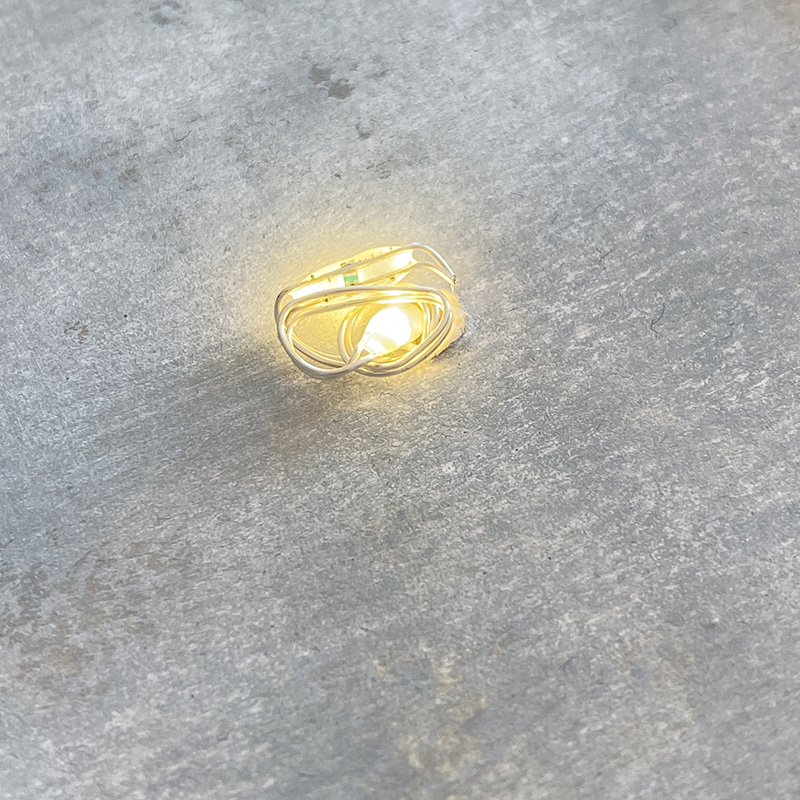
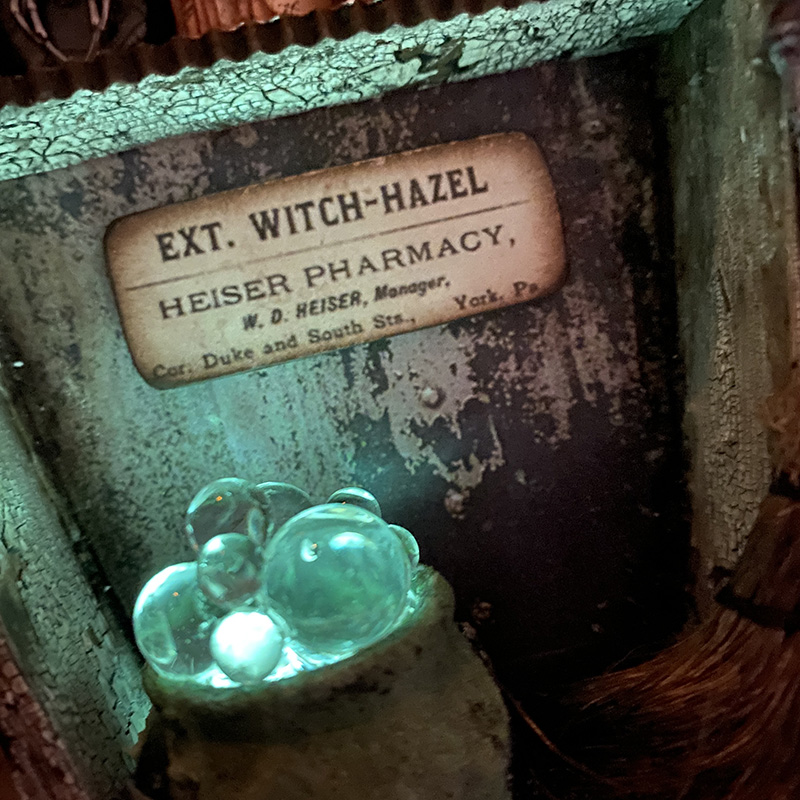
    I added distress grit-paste to the cauldron and once dry, painted with mowed lawn distress paint and dirtied up by rubbing in black soot distress crayon. I glued the green set of halloween tiny lights into the base of the cauldron and added bubbles over the top, gluing them to each other with glossy accents and not collage medium. The collage medium is matt and will make the bubbles matt too, so glossy accents for the clear bubbles.

    igirlzoe: tim holtz idea-ology halloween 2021 witch
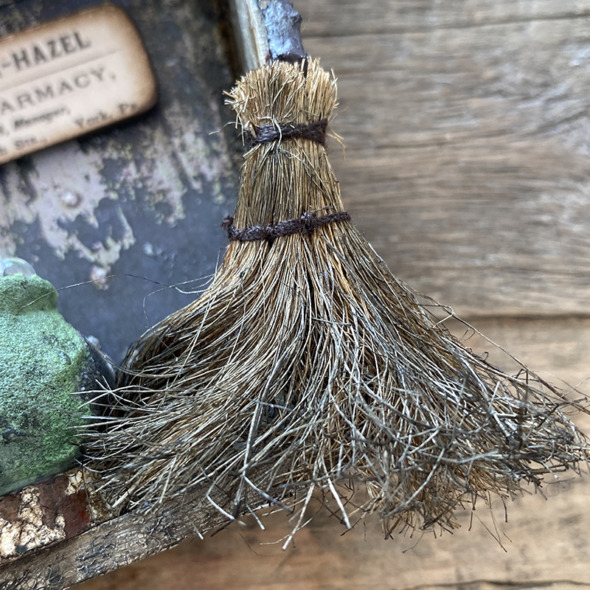
    I didn’t want the distress collage medium to feel pushed out, so I used some on this broom and then smashed it on my media mat to make it all gnarly. The collage medium sets and the brush stays in place. This was inspired by a broom that the awesome Stacy Hutchinson did a couple of Halloween moons ago.

    igirlzoe: tim holtz idea-ology halloween 2021 witch
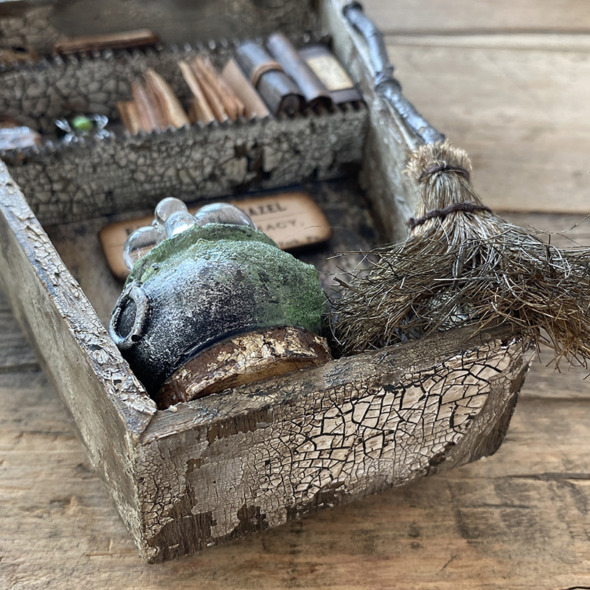
    I used a wood slice from the idea-ology Christmas line to raise the cauldron a little, purely for aesthetic reasons.

    igirlzoe: tim holtz idea-ology halloween 2021 witch
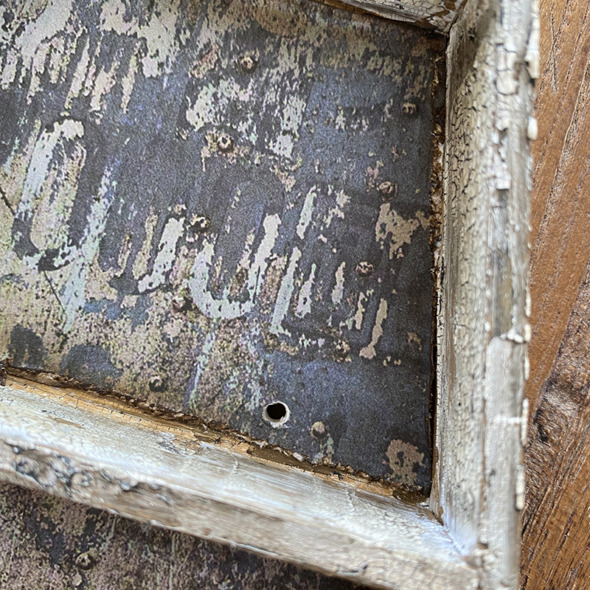
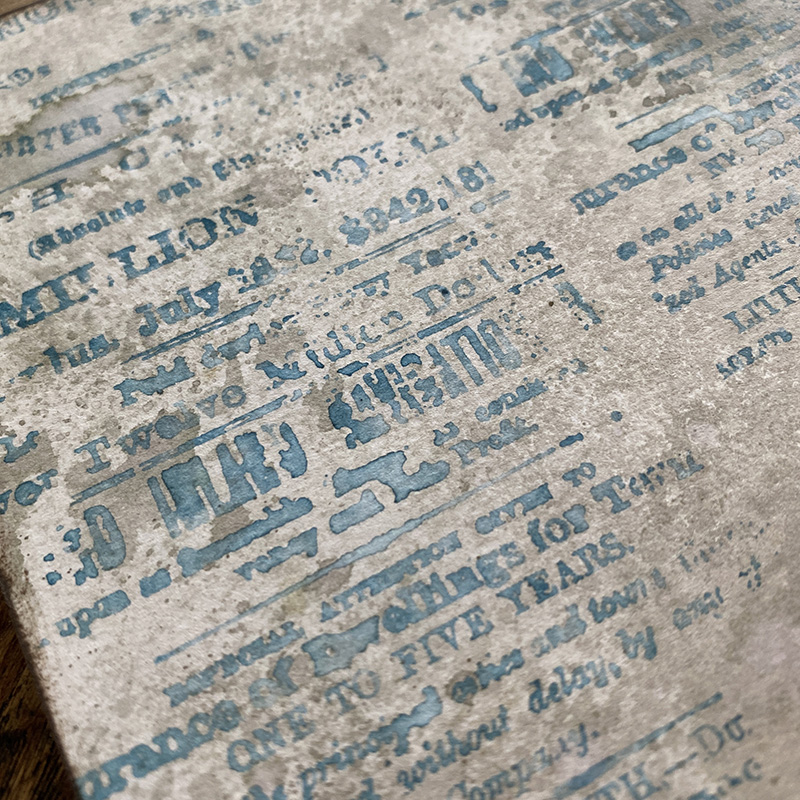
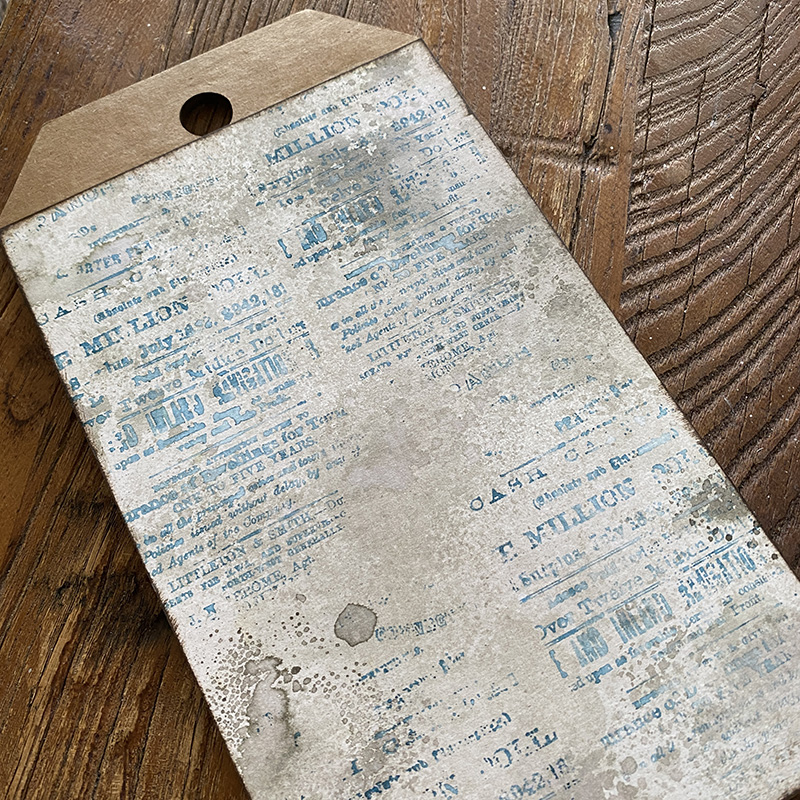
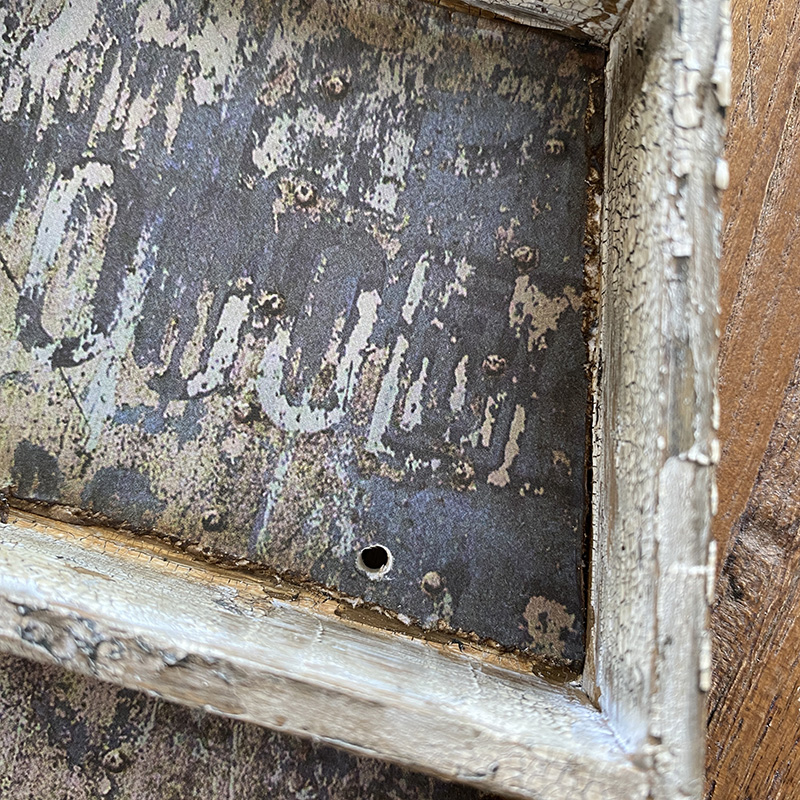
    I drilled another hole in the coffin, this time in the top, just above the fixed shelf. I thread white tiny lights through the back and glued in place in the corner. That gorgeous grungy paper is from the Halloween backdrops. I LOVE this new paper format and the paper designs are SO freaking awesome.

    igirlzoe: tim holtz idea-ology halloween 2021 witch
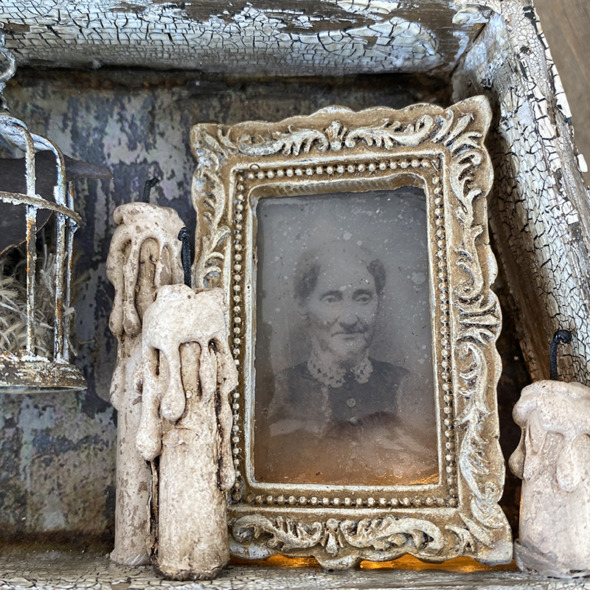
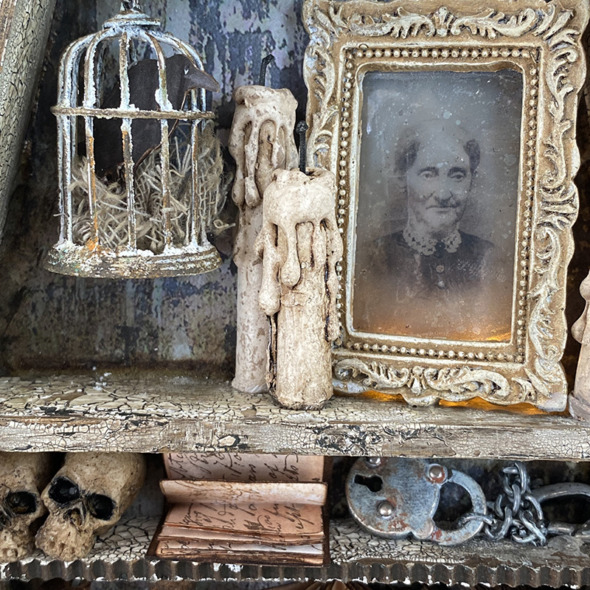
    I altered one of the new gothic frames by covering with white gesso and once dry, covering with vignette photo distress paint and wiping the paint off the raised molding of the frame. I rubbed a little distress crayon in when it was dry.

    I used one of the photo stickers from the curiosities sticker book to create a ghostly backdrop to the gothic frame. I covered the photo sticker with a piece of clear packing tape. You need to burnish it, which means rub the tape firmly with your finger so the tape has full contact with the photo sticker. This is because you are going to remove the paper part of the sticker with water.

    Turn the photo over and spritz the back with water and start gently rubbing the back of the photo with your finger, adding more water as required. The paper will pill and come away as you rub. Eventually you rub away all the paper and are left with the ink on the clear tape. I added a little collage medium to the back to give a smokey effect.

    igirlzoe: tim holtz idea-ology halloween 2021 witch
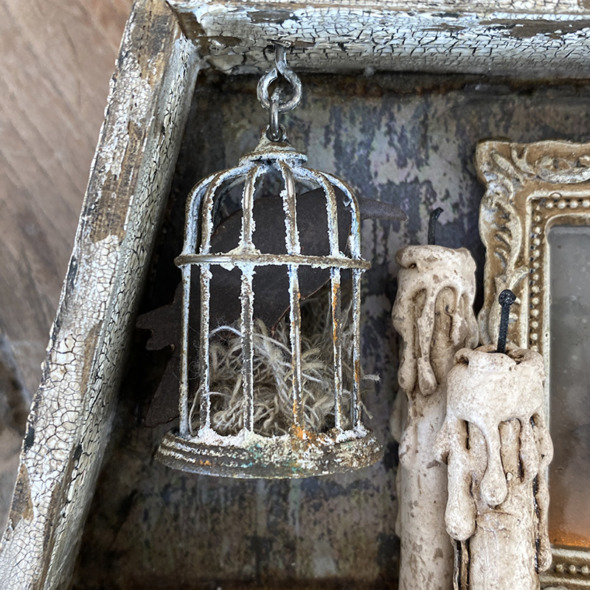
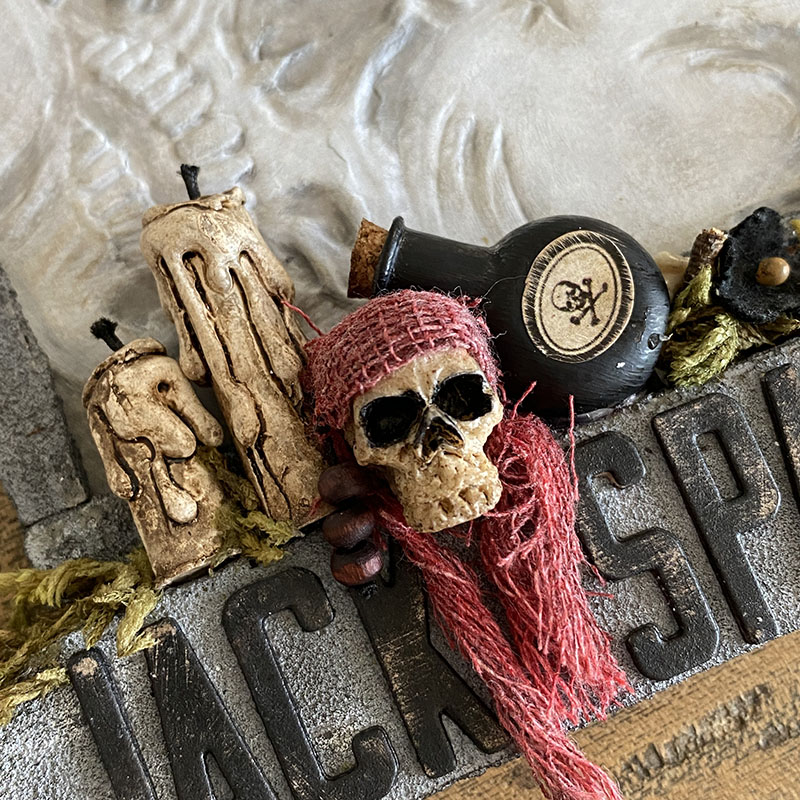
    I LOVE the new birdcage. I covered this one with distress grit-paste, added a little distress paint here and there, some distress crayon and slid in some mummy cloth and a black crow from the ephemera pack. You have to look carefully to see the crow, but he’s there. I added his eye with a dot from a white posca pen. The drippy candles are as they came. They need nothing doing to them at all, they are simply awesome out of the packet!

    igirlzoe: tim holtz idea-ology halloween 2021 witch
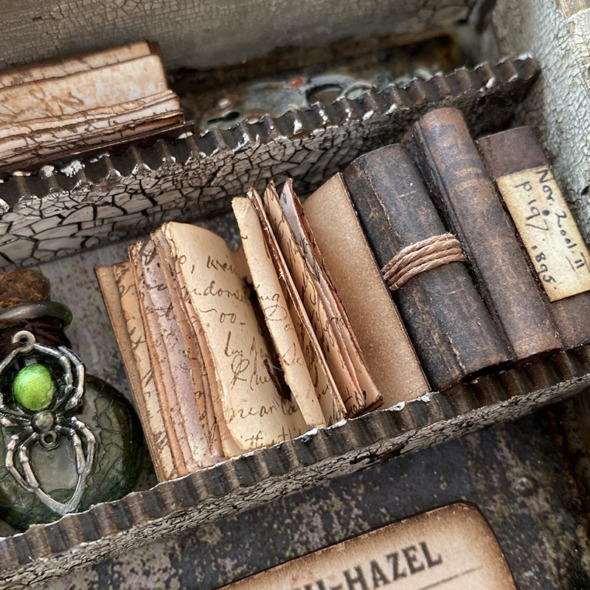
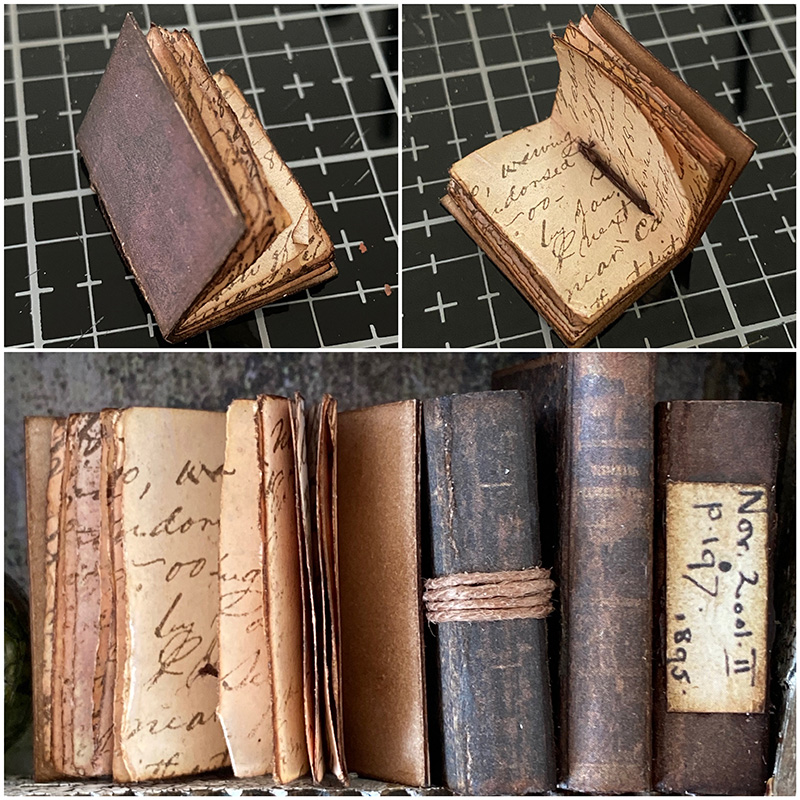
    One of my favourite things from the halloween idea-ology release (and there were many) were these book covers that come in the ephemera pack! Oh my!! I would LOVE LOVE LOVE to have a pack of just book covers… Dear Santa… that would be worth being good for!

    igirlzoe: tim holtz idea-ology halloween 2021 witch
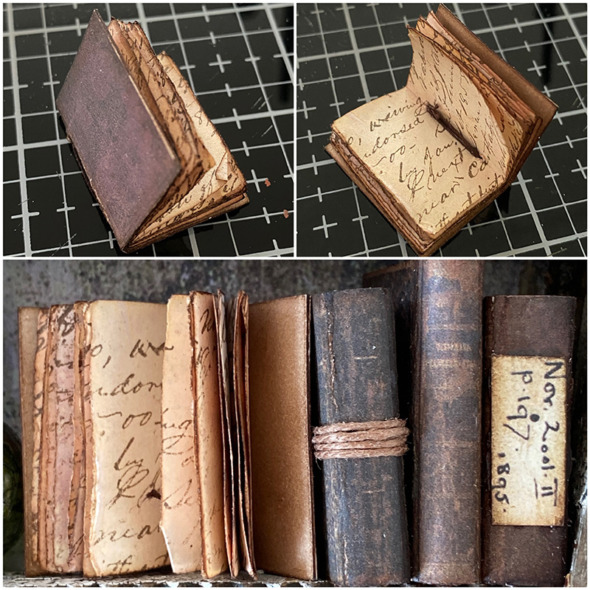
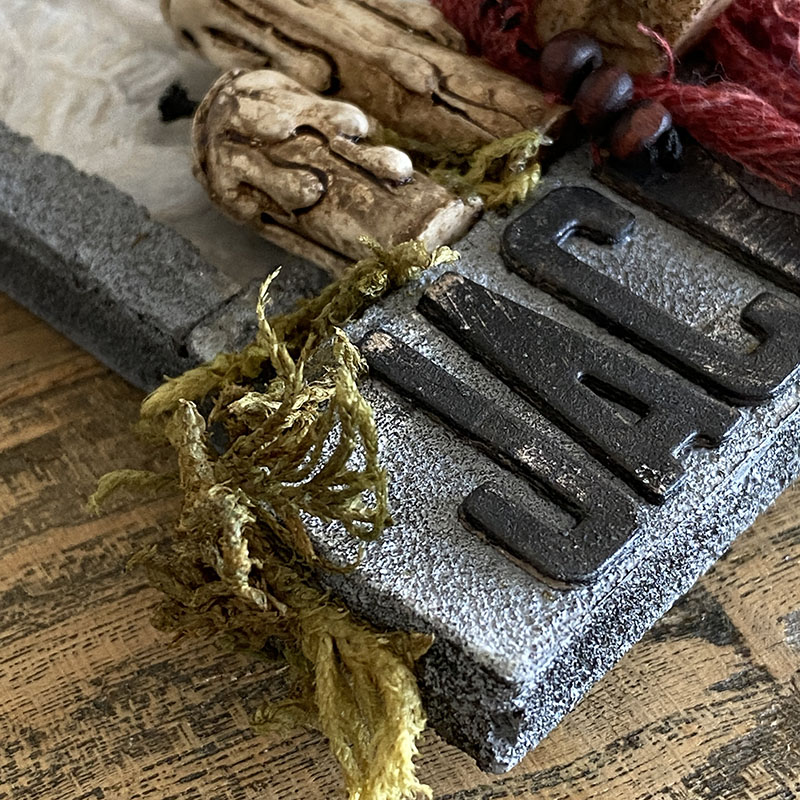
    I sprayed some inexpensive printer paper with tea dye distress spray and water and dried with a heat tool. Cut to fit the book cover and folded in half, pierced 2 holes in the center with a pokey tool and sewed with thick thread. I folded the book cover in half and glued the stitched pages into the spine of the book cover. I used pieces from the ephemera pack on the spine of one of the books and wrapped another with twine. I LOVE them so much.

    igirlzoe: tim holtz idea-ology halloween 2021 witch
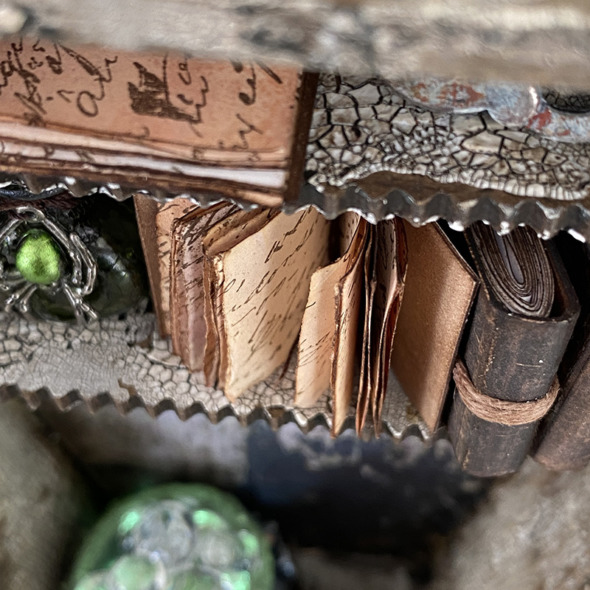
    I added a couple of extra shelves by cutting scallop edged etcetera thickboard trims to size. Adding distress crackle texture paste and gluing into place.

    igirlzoe: tim holtz idea-ology halloween 2021 witch
    I used sublime alcohol pearl colour on the back of the spider adornment. You need to give the alcohol pearl bottle a really good shake. I lightly tap the side of the bottle on my desk between shaking to help release the mixing ball which does get stuck to the bottom, especially if your bottle has been sat for a while. Keep tapping lightly and shaking until the mixing ball is released (you’ll hear when it happens) and then shake until the bottom of the bottle is clear of settled pearl as above.

    igirlzoe: tim holtz idea-ology halloween 2021 witch
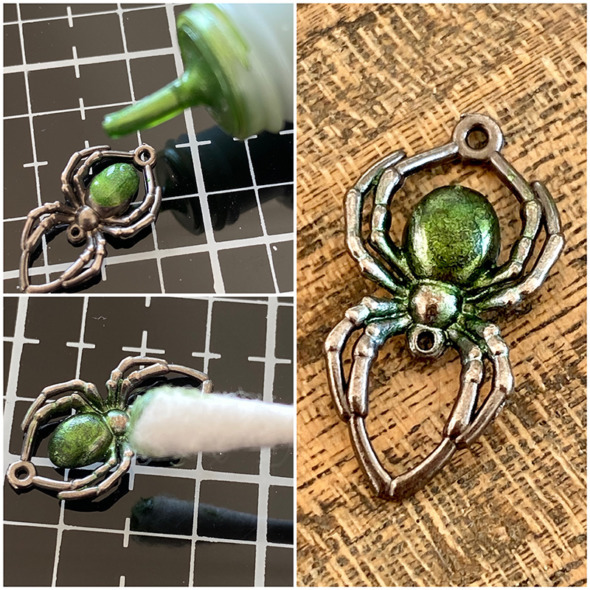
    Drop a single drop of sublime** alcohol pearl onto an adornment spider from the skull and spider adornments pack. If you cover any other part of the spider, add a drop of alcohol blending solution to a cotton bud and wipe away.

    ** the alcohol pearl shown above is “envy” the pearl shown below and on the actual make is “sublime” I chose the wrong pearl when I was recreating the step out for someone in the Tim Holtz Addicts group.

    igirlzoe: tim holtz idea-ology halloween 2021 witch
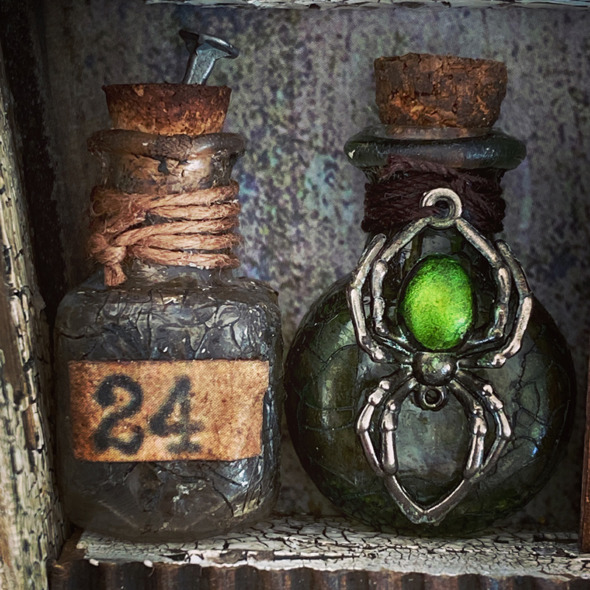
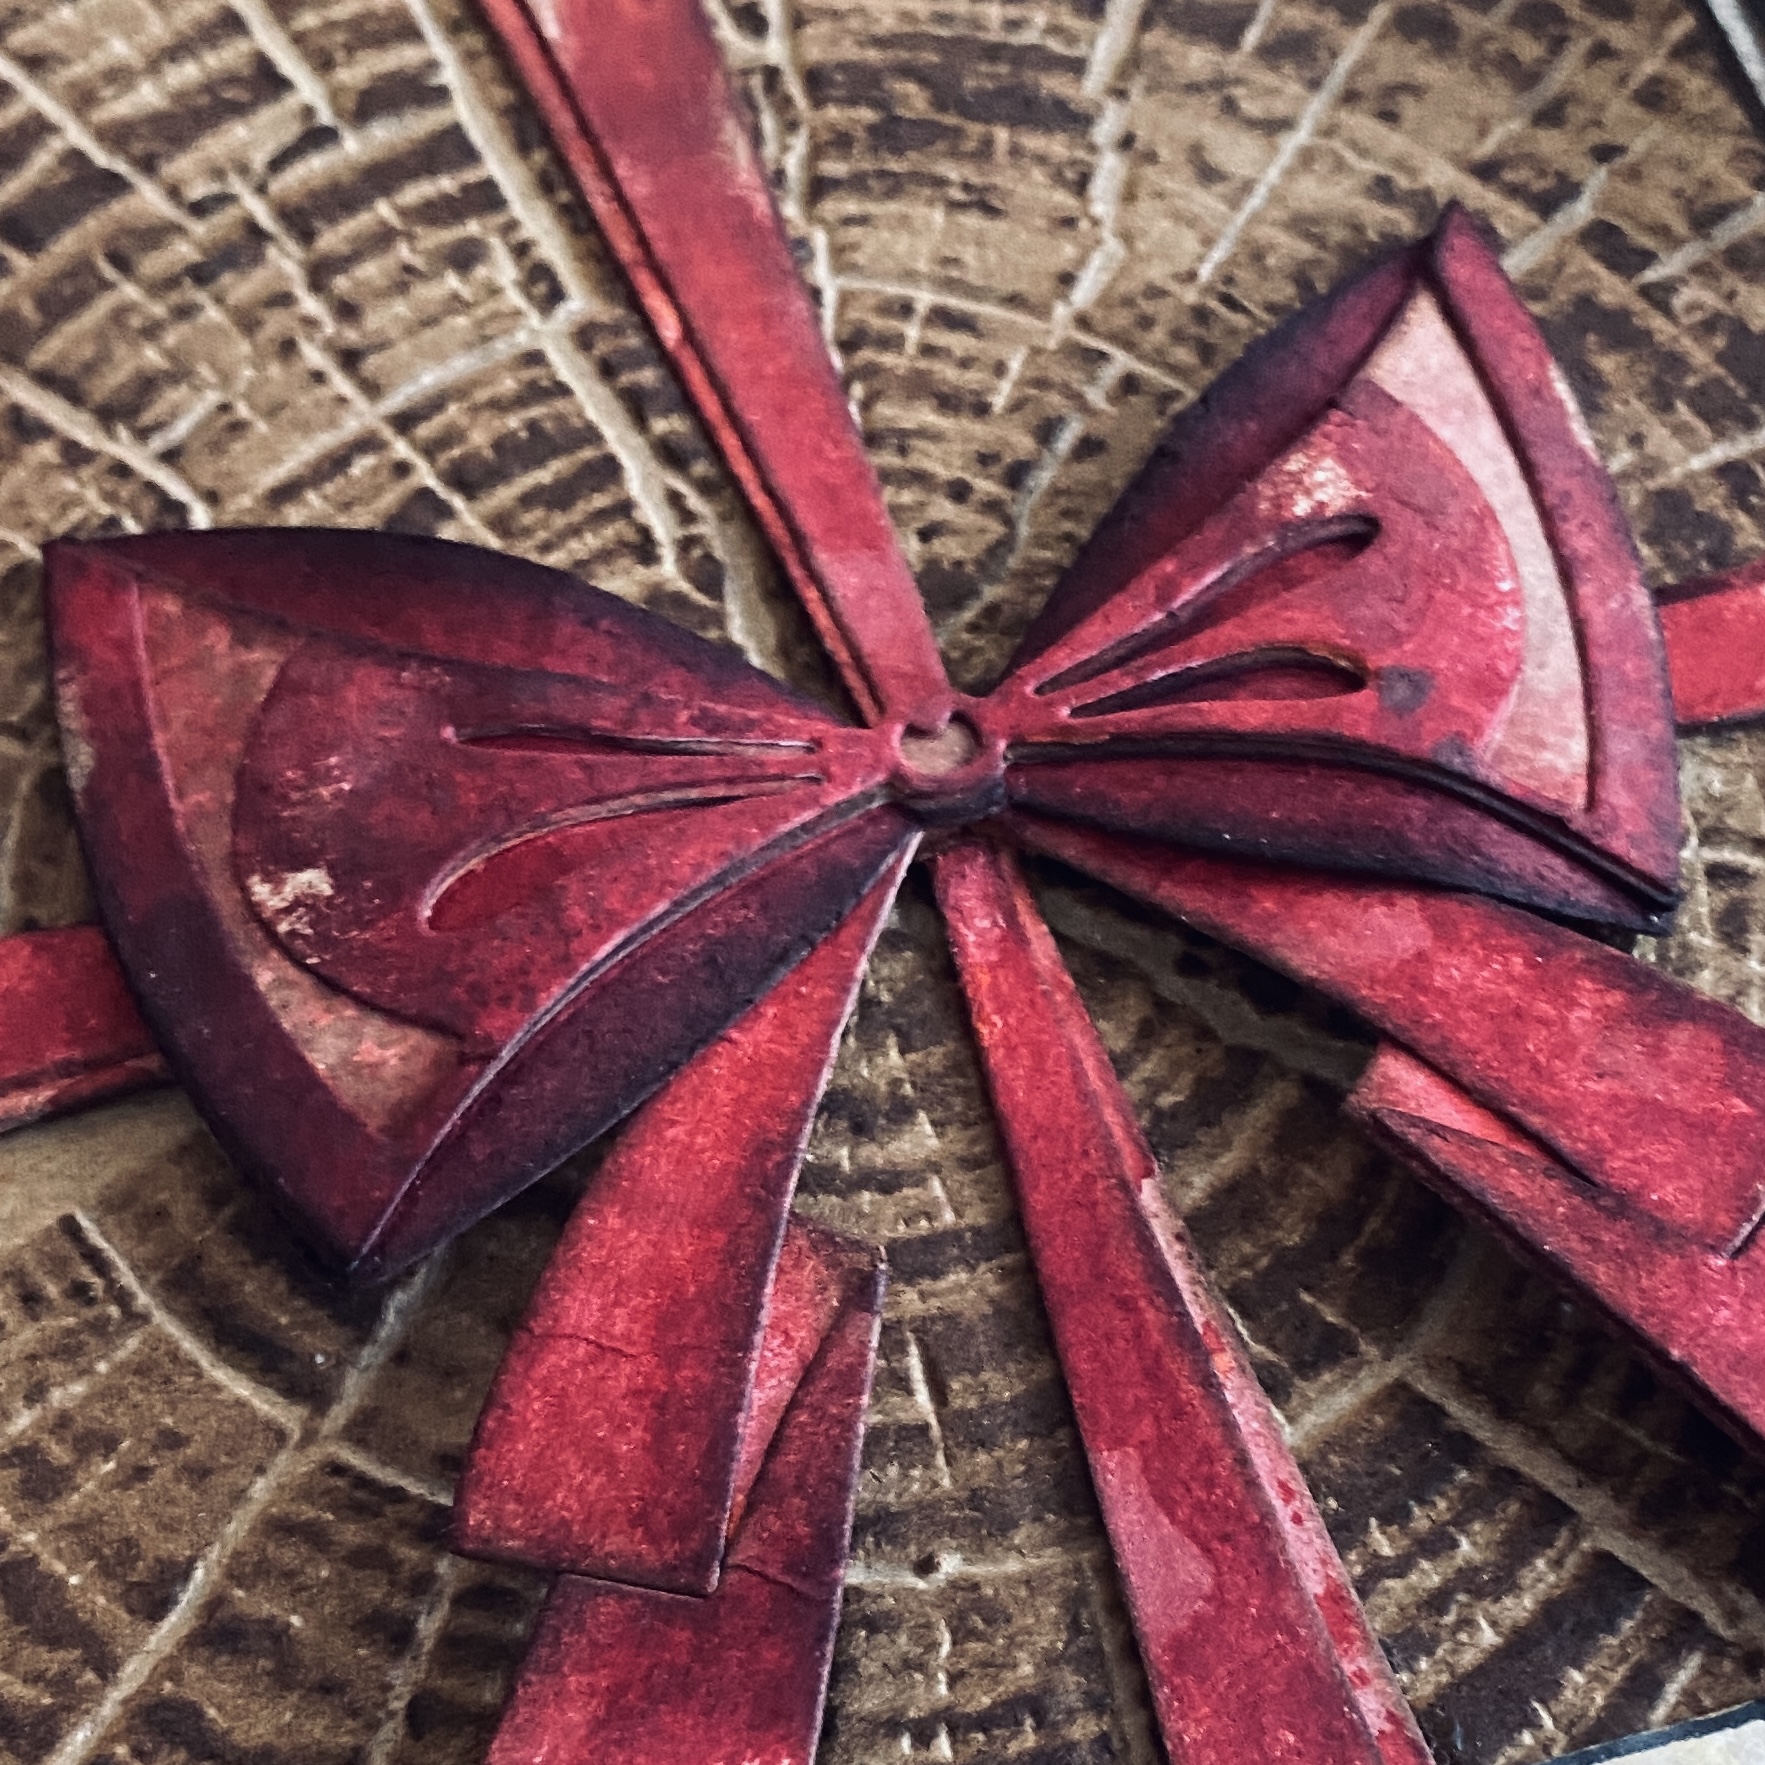
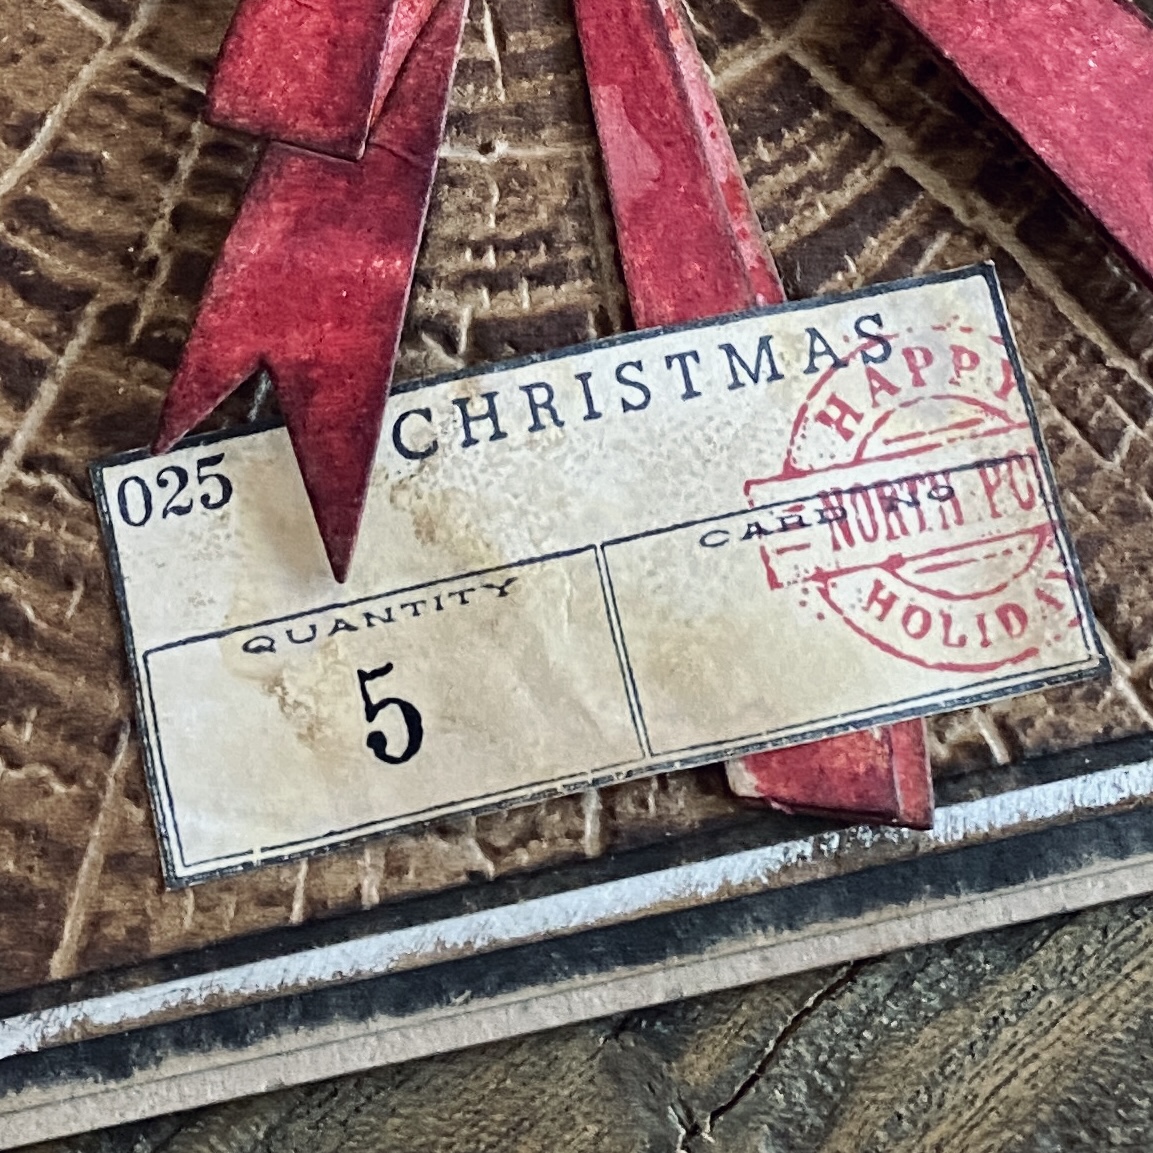
    I have not used any filter or editing for that spider. The sublime alcohol pearl is really that vibrant! It’s wicked right?! I added a couple of tiny corked vials and a label from the ephemera pack. I added a stake from the vignette hardware pack. I LOVE these, they’re so vampire! The bottles are covered in distress rock candy crackle paint. You can see how on my pumpkin pumpkin post.

    igirlzoe: tim holtz idea-ology halloween 2021 witch
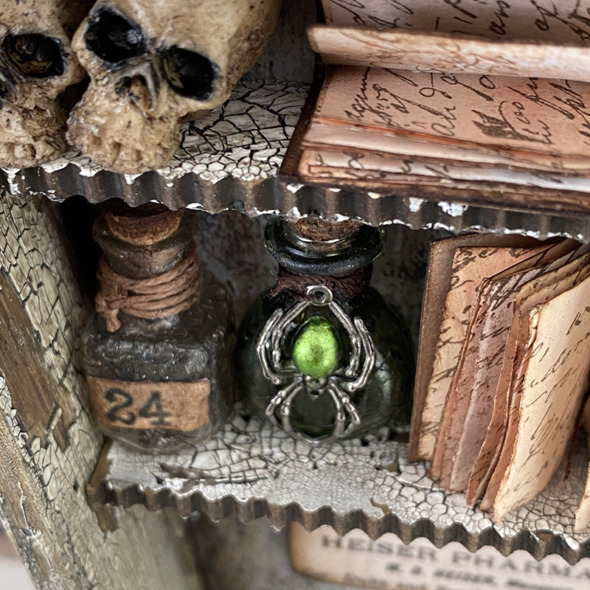
    I love these shelves to add trinkets to, and of course a couple of skulls from the skull and pumpkin pack, with a little black soot distress paint brushed into the eye sockets.

    igirlzoe: tim holtz idea-ology halloween 2021 witch
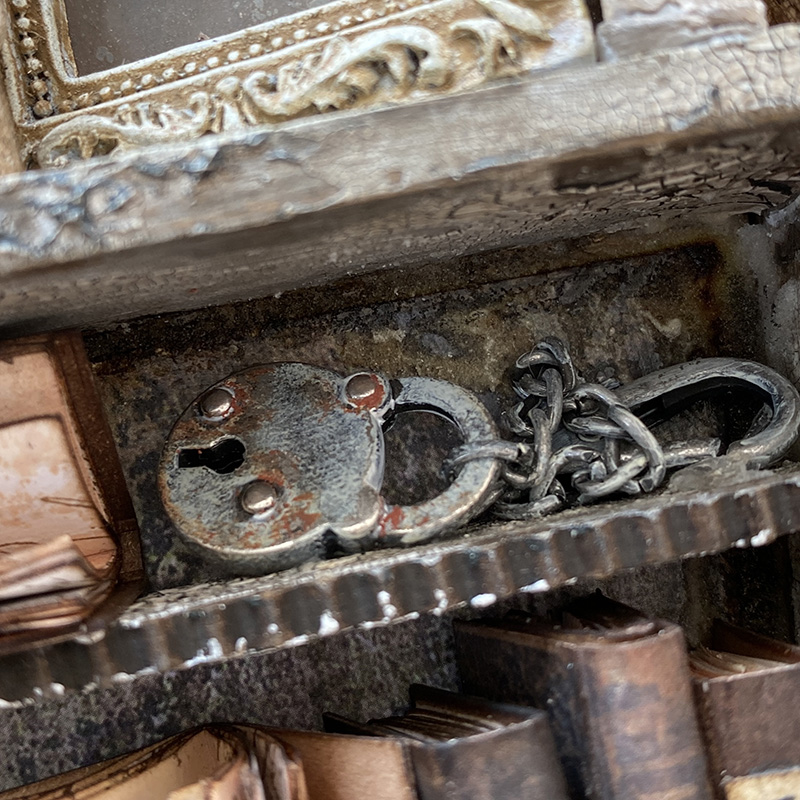
    I grunged up a lock from the lock and keys adornments pack by adding distress grit paste and crackling campfire distress paint and a little white gesso. Attached to the chain of a hook clasp, glued to the shelf.

    igirlzoe: tim holtz idea-ology halloween 2021 witch
    igirlzoe: tim holtz idea-ology halloween 2021 witch
    igirlzoe: tim holtz idea-ology halloween 2021 witch
    igirlzoe: tim holtz idea-ology halloween 2021 witch
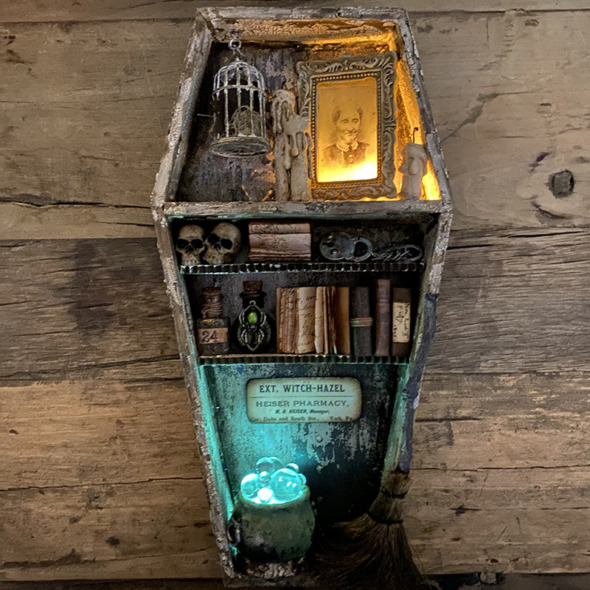
    I hope you’ve enjoyed this walk through of my witchy vignette coffin. I think you’ll agree that Tim designed the most EPIC idea-ology Halloween line. A huge thanks to Tim, Mario and Paula for all their support and encouragement. It was a lot of fun making this and they gave me some great tips and advice and you couldn’t ask for a better cheer squad.

    Thanks so much to you for joining me this week and I hope you are enjoying making in whichever season your heart desires.

    If you haven’t seen, Tim has announced his Holiday 2021 demo series. Join Tim on his YouTube channel every Saturday in November! I can’t wait.

    Zoe


    affiliate links used at no cost to you