Hello friends. Happy FriYAY! Nearly weekend and I’ve got plans to spend this weekend making and I’m excited about that. I’m also excited about the new Distress. Did you meet the newest member of the Tim Holtz distress family, Uncharted Mariner? If you missed the new distress launch, you can catch the replay and maker inspiration over on Tim’s blog.
I LOVE LOVE LOVE Uncharted Mariner. When I opened the box I gasped and swooned and I knew it was going into my favorites tin alongside my other desert island distress inks. I love the names that Tim comes up with and I wanted to celebrate the name and the color. Let’s get into some of the details…
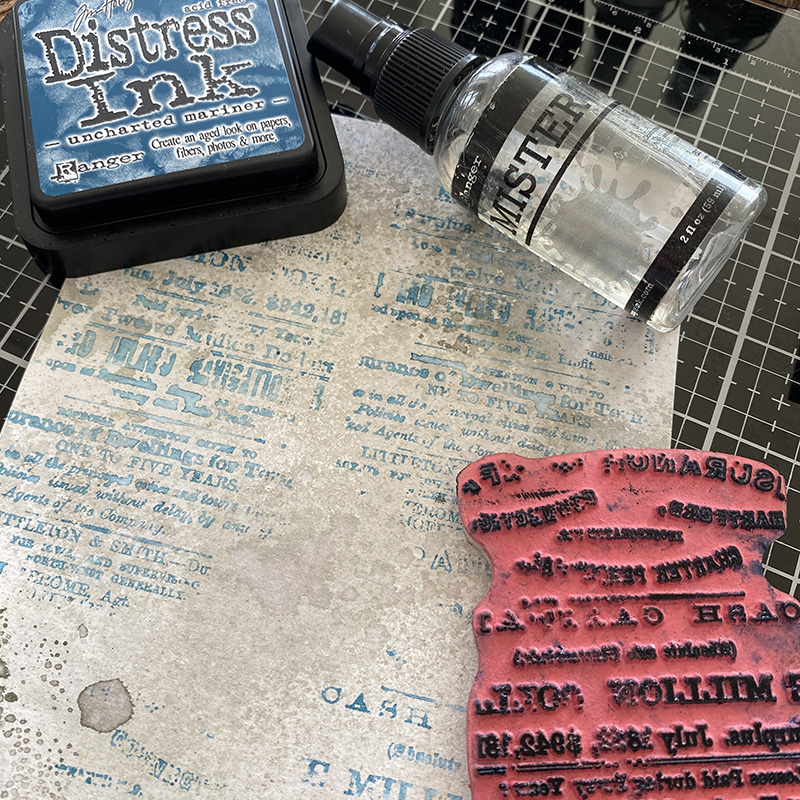
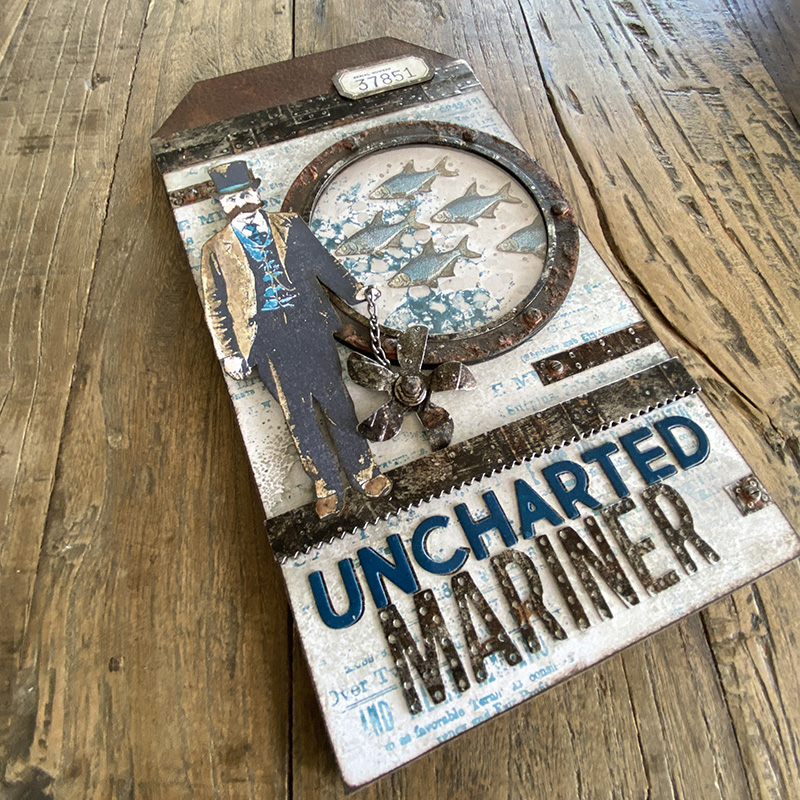
Using the Uncharted Mariner distress ink pad, I inked up a background stamp from the The Professor 2 (CMS395) stamp set, misted the stamp with water and lightly stamped onto a piece of distress watercolor cardstock (smooth side) cut to fit a small etcetera thickboard tag, which I had swiped in a pumice stone distress ink wash.
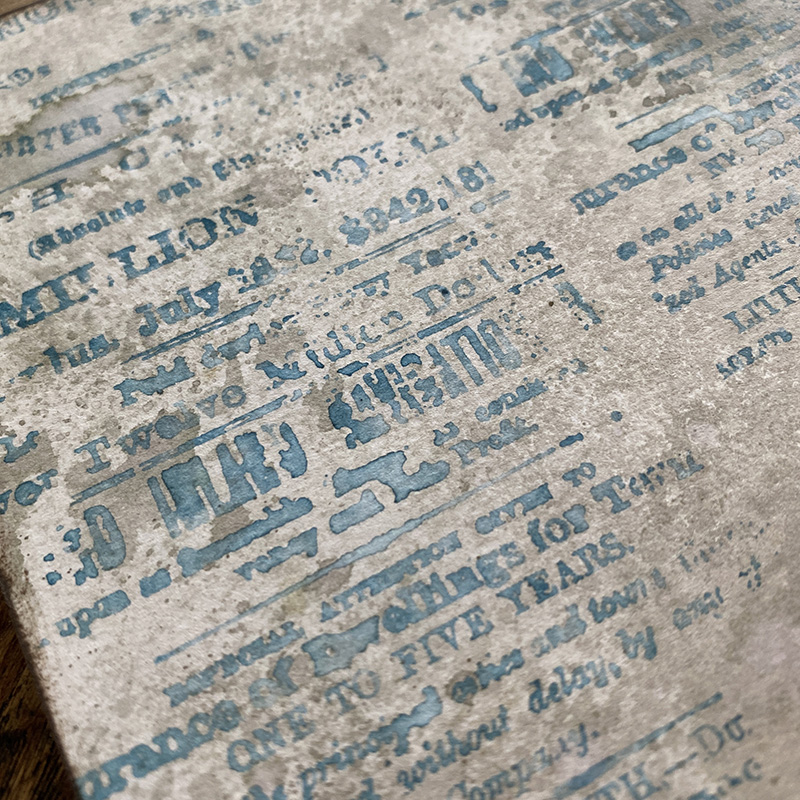
By misting the stamp with water after inking and before stamping, you will get a smudged image, but that’s what I was going for so the background would be out of focus and subtle.
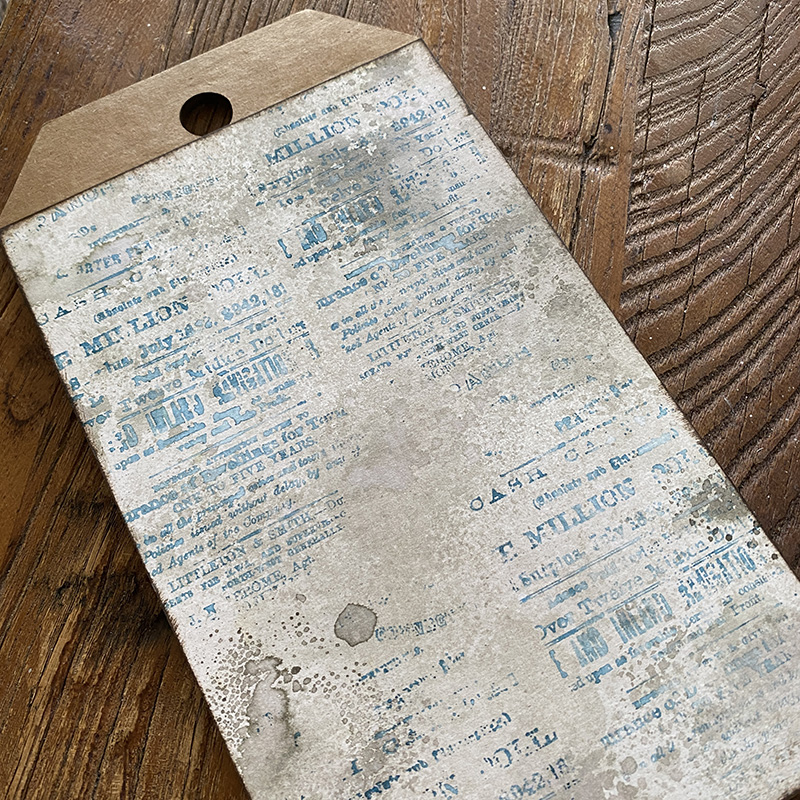
Ok, not going to lie… I over-trimmed the background, said some bad words and decided to make it work by adding a panel of cracked leather cardstock to the top. This however caused another problem… I glued the cracked leather cardstock over the distress watercolor cardstock and there was a ridge. By the time I noticed the ridge it was too late to pull them up, so the next idea was born out of total necessity…
So onto the solution to cover “the ridge of cardstock doom”…
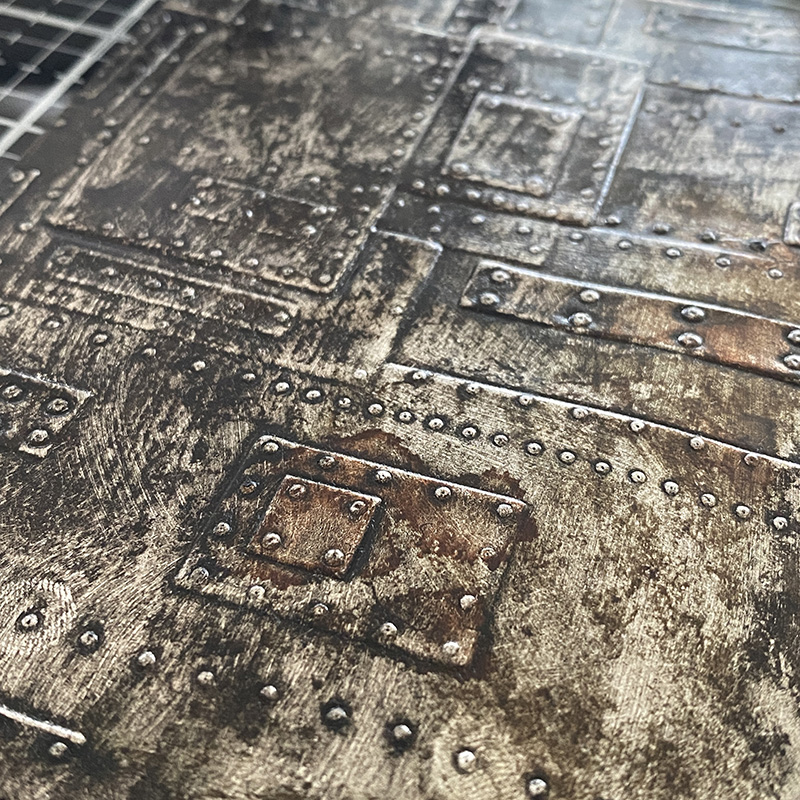
I needed something with some height or texture and the Foundry 3D embossing folder was perfect. I embossed a piece of idea-ology metallic kraftstock, covered with a layer of ground espresso distress paint. Because the metallic kraftstock is shiny, there’s nothing for the paint to cling to, no “tooth”, so you may need to run your paintbrush over the background a couple of times to get coverage and wipe the excess away with a clean cloth. I also added mushroom and rust alcohol inks to portions of the background.
What ridge? What wrongly trimmed cardstock? This is exactly to plan! 😉
And this is how I make most of the time. It’s a series of corrected missteps and happy accidents. I just want you to know that I have no idea what I’m doing, but I have fun messing it up and fixing it up, and that’s what really matters.
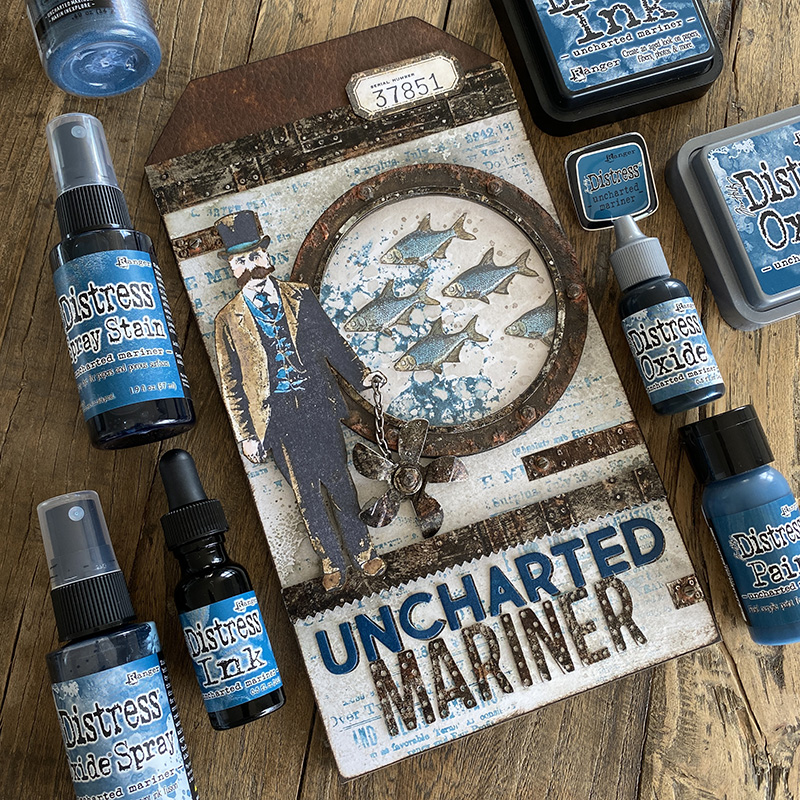
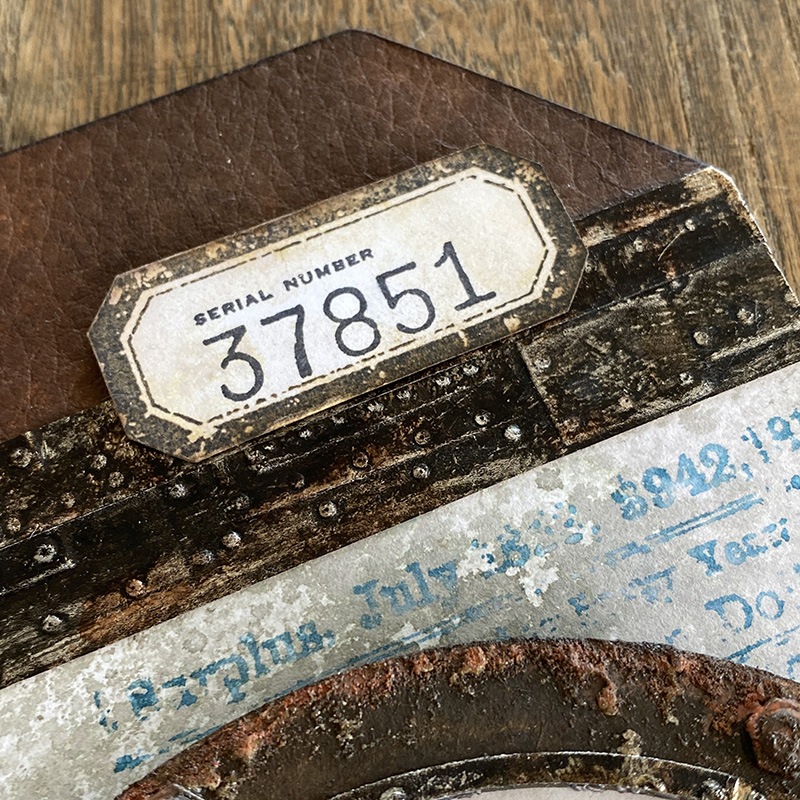
I added a label I stamped with the Apothecary stamp set (CMS138). I have a few stamp sets that I keep out all the time and this is one. I LOVE these labels! I added a stamp from the new Eccentric stamp set (CMS448) inside the label.
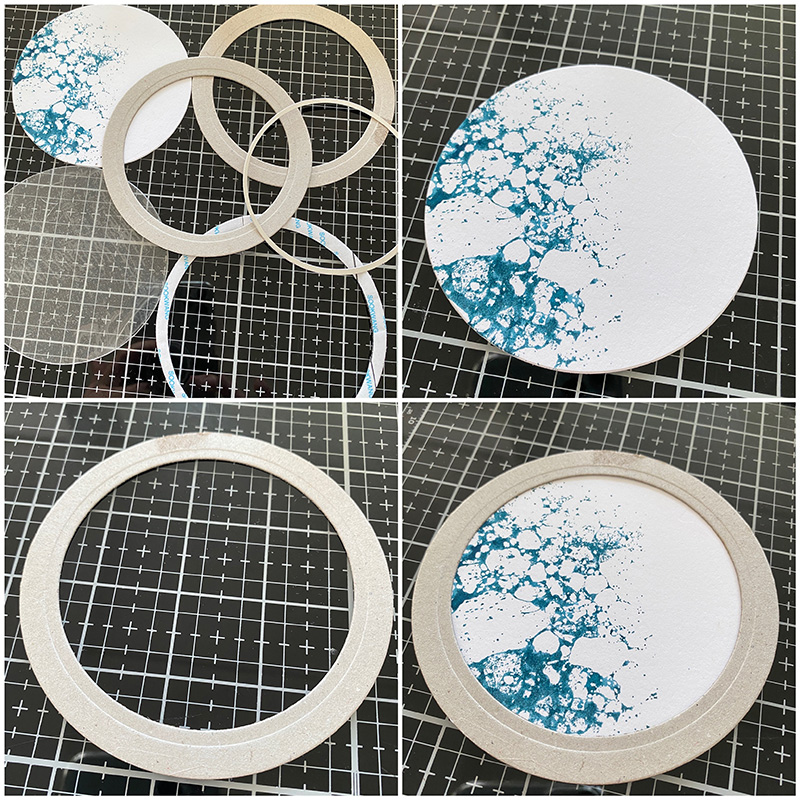
For the porthole I used circle thin frame dies from Simon Says Stamp to create the porthole frame. The base layer is distress watercolor cardstock stamped with the new Bubble stamp (CMS449) with Uncharted Mariner distress ink. This stamp and this ink is a match made in heaven!! I added a chipboard circle over the top.
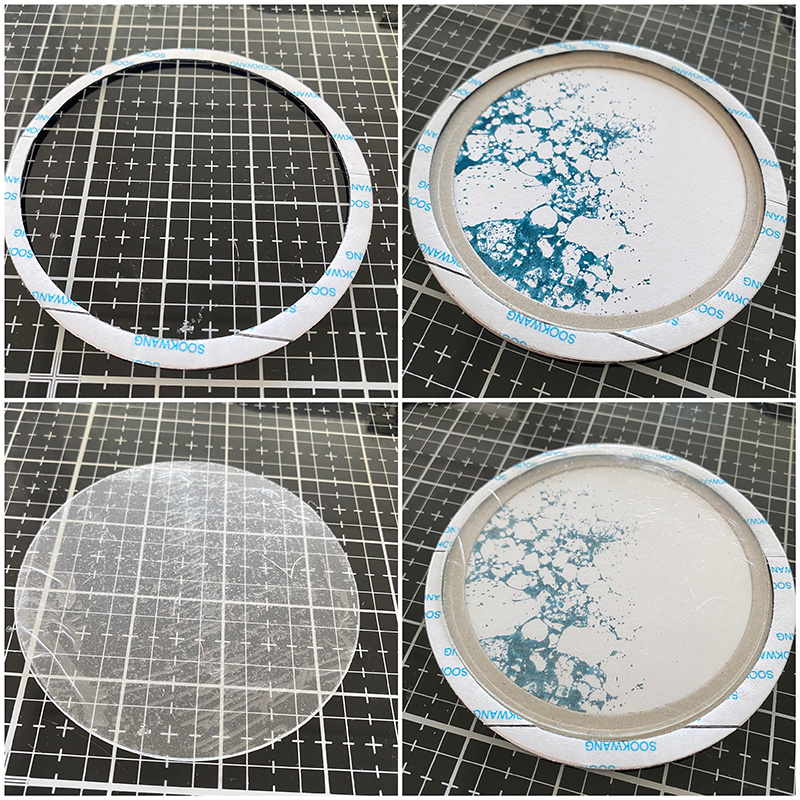
I added a thin circle of adhesive foam so the acetate circle would sit away from the background.
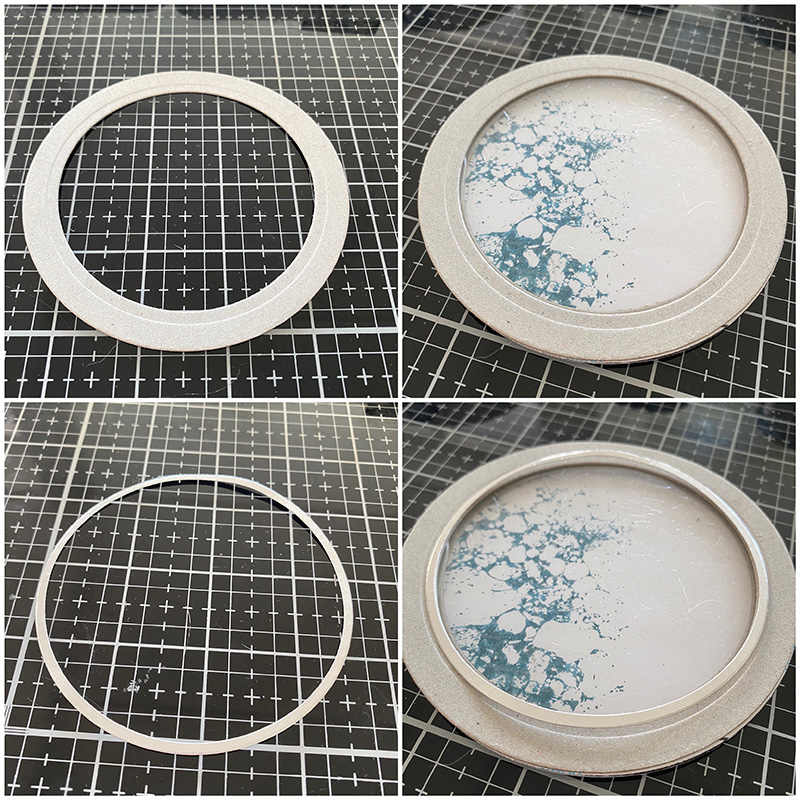
Then added the top layer and the inner circle which I cut from the embossed foundry sheet that I showed earlier in the post.
Please note the above photos were to show the layers. I decorated the top of the porthole and added the fish before assembling. Here’s how…
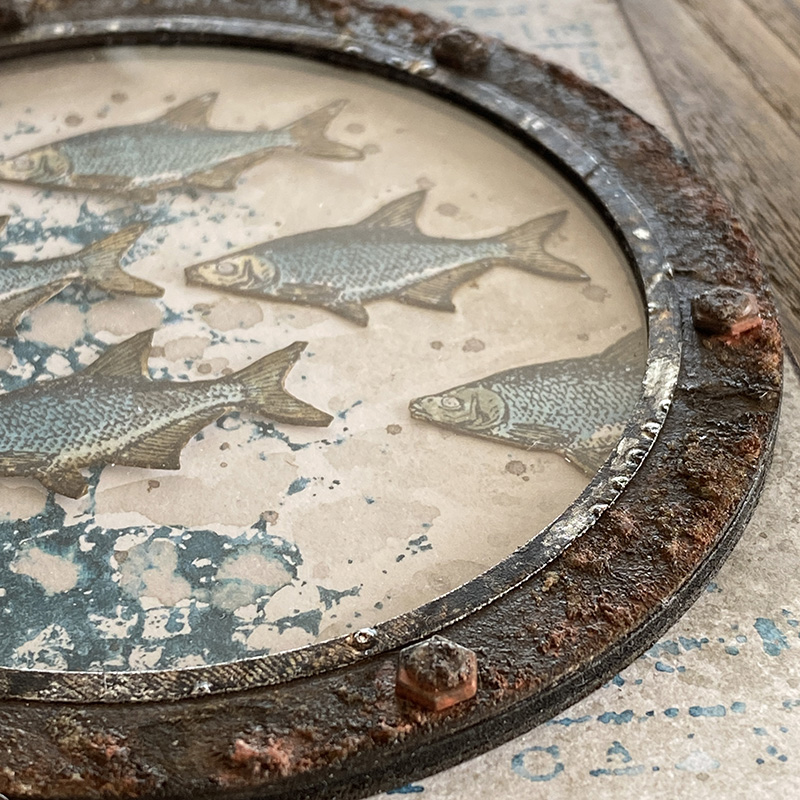
I covered the porthole frame with distress translucent grit-paste, once dry, covered with ground espresso distress paint. I used crackling campfire distress paint brushed over the grit-paste and idea-ology hardware heads to imitate rust.
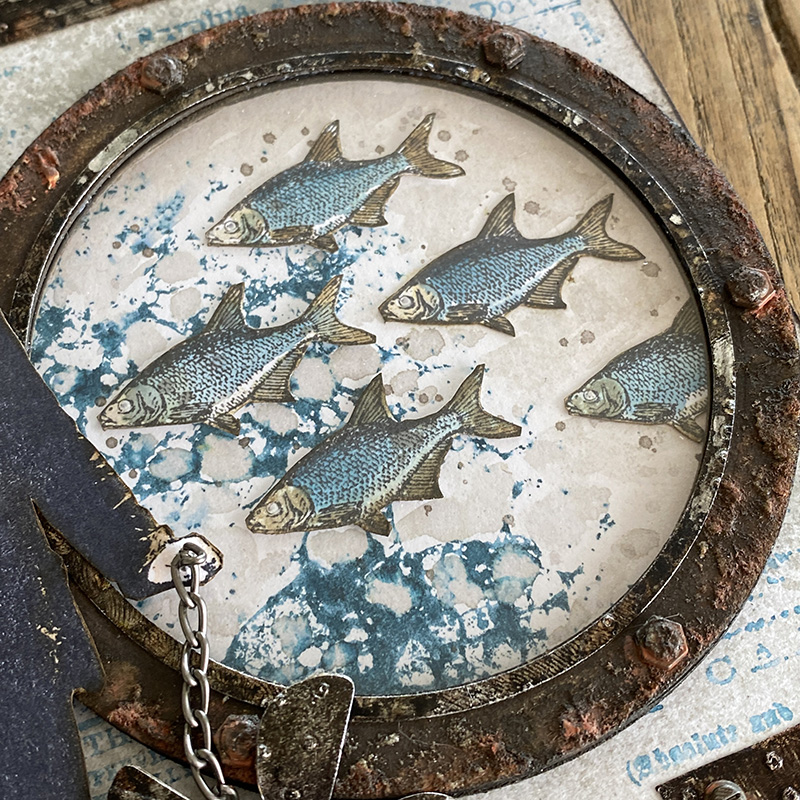
I stamped and fussy cut fish from the Tiny Things stamp set (CMS164). I used Uncharted Mariner distress oxide reinker to watercolor them and added to the inside of the porthole before assembling.
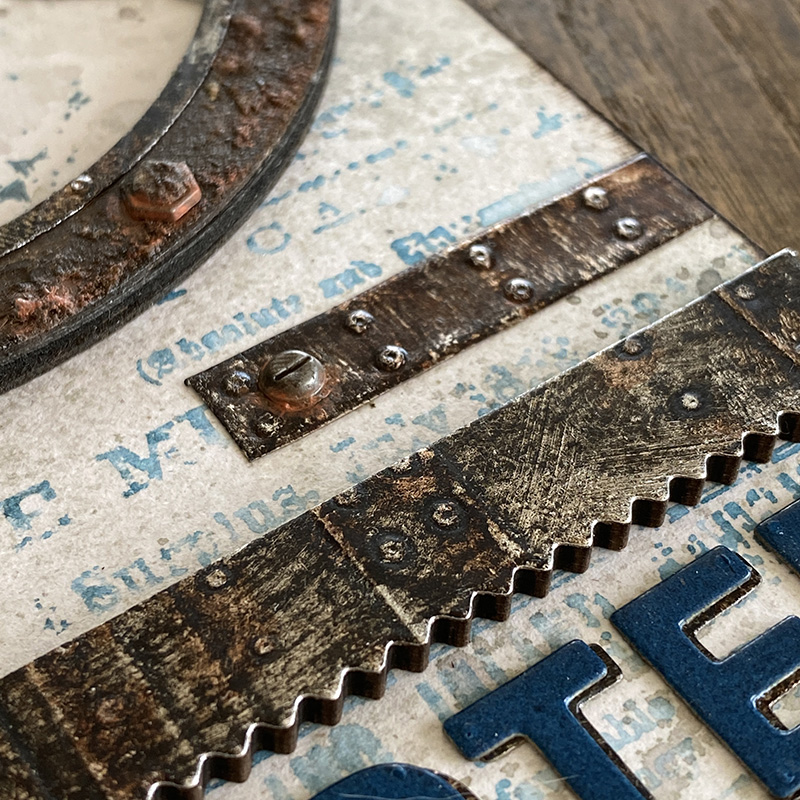
Using more of that foundry embossed 3D metallic cardstock, I die cut using the decorative trims thinlits die set and added it to a thickboard etcetera pinked trim. I added a few fussy cut pieces to the edges of my tag. This is a cool design idea I picked up from the very talented Emma Williams.

Using the Uncharted Mariner distress reinker, I watercolored this Dapper Uncharted Mariner from the Paris Memoirs stamp set (CMS159). I used walnut stain distress ink to watercolor his coat.
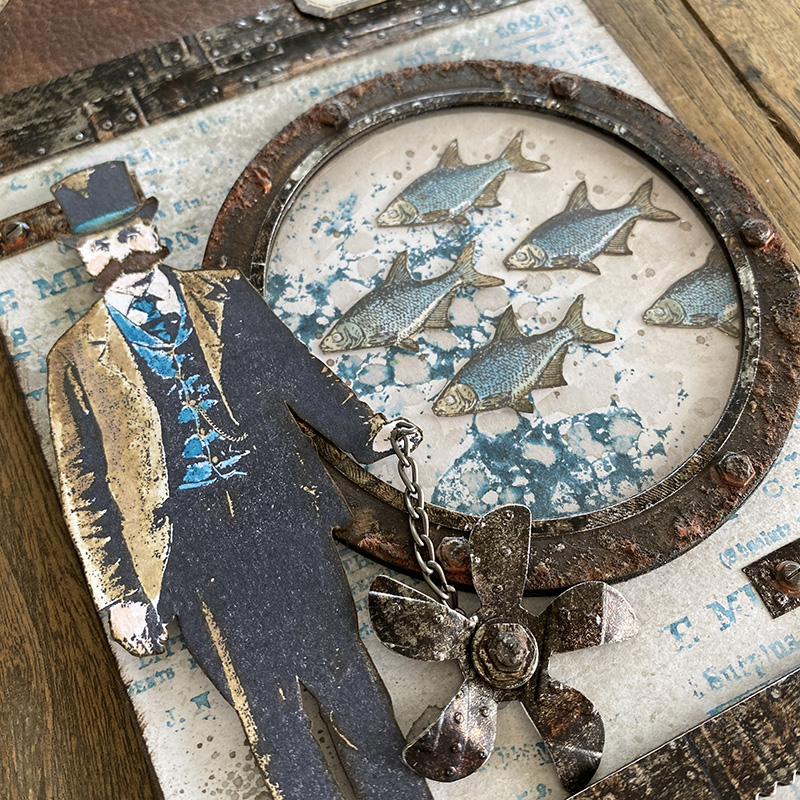
I fussy cut, mounted some adhesive foam on the back and added him to the decorative trim ledge.
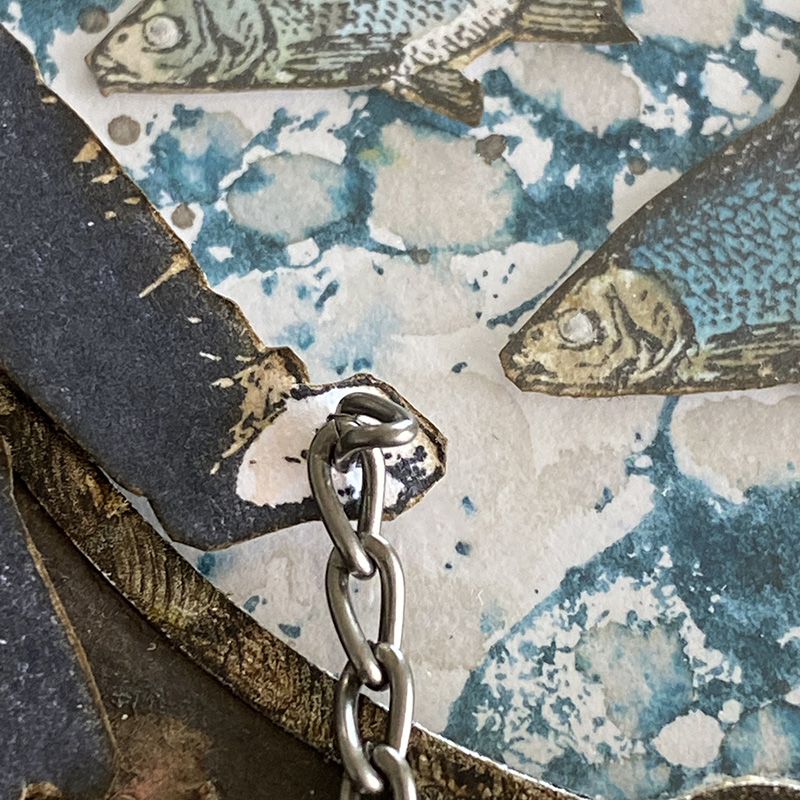
I pushed a link of the idea-ology hook clasp through the hand and glued at the back to hold in place.
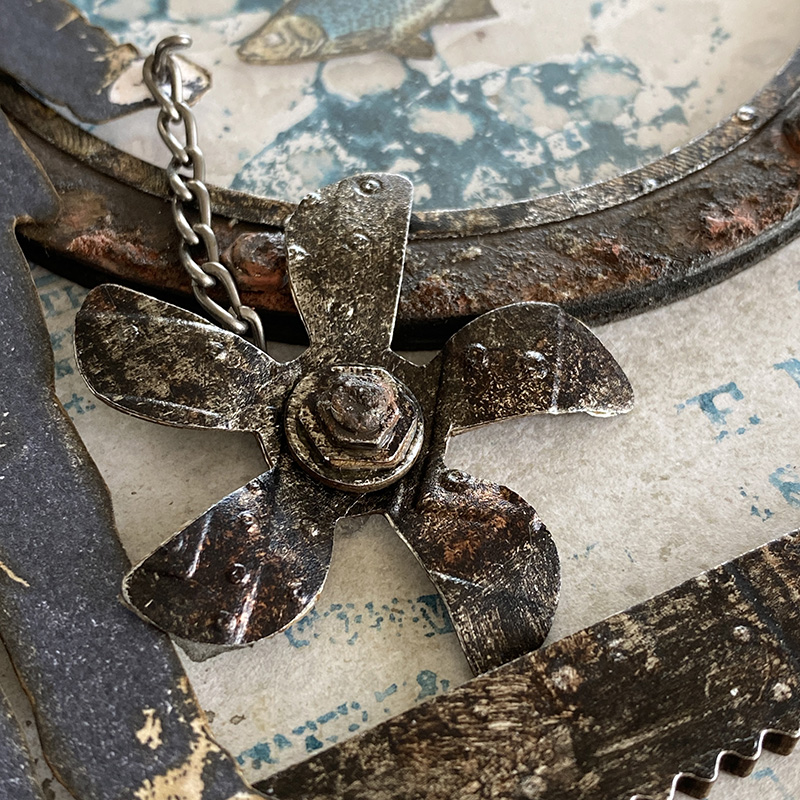
I added a die cut a piece from the steampunk parts bigz die, again cut from the piece of foundry 3D embossed metallic kraftstock. I added a hardwear head to the top and curled the blades slightly.
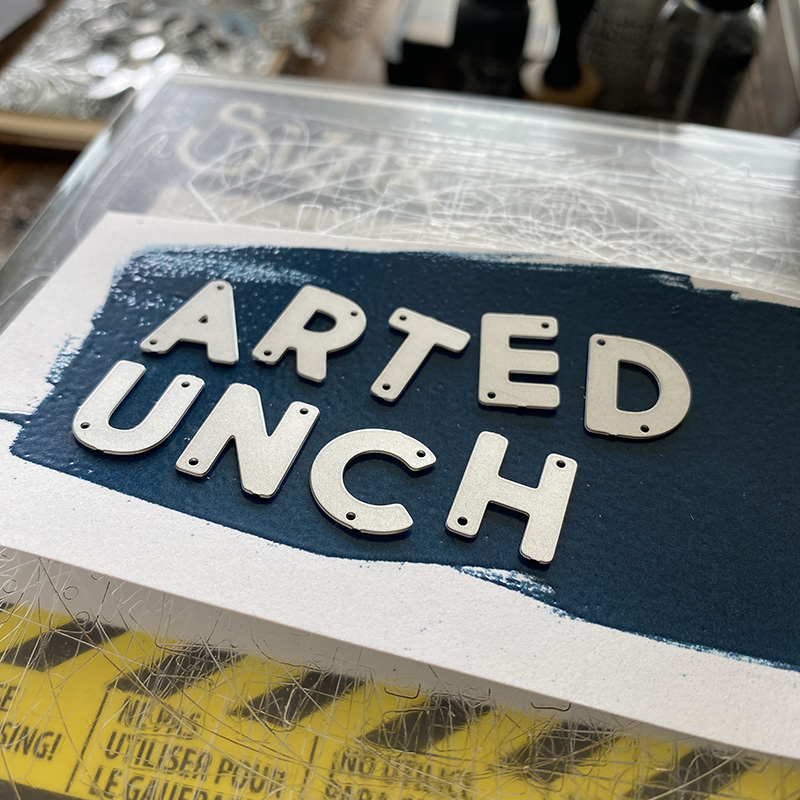
I melted Uncharted Mariner distress embossing glaze over Uncharted Mariner distress oxide ink, rubbed directly onto a piece of distress white heavystock. I love how dark and glossy it looks. I placed the alphanumeric bold thinlits dies onto the glazed background and die cut.
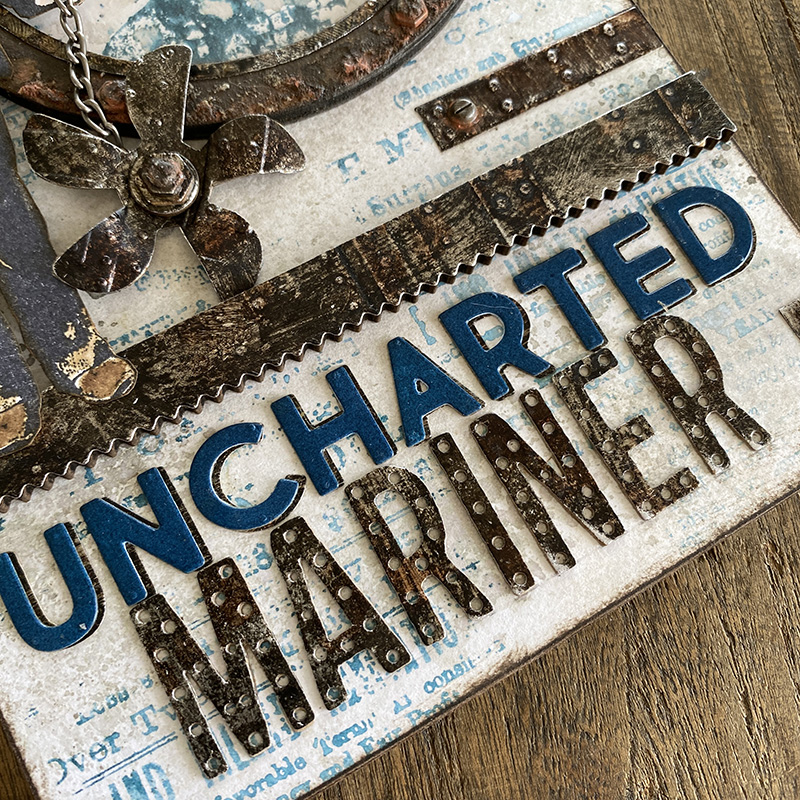
I mounted the glazed letters over letters die cut from idea-ology black kraftstock. Using the alphanumeric marquis thinlits dies I added “Mariner” to the tag, die cut from the foundry 3D embossed cardstock.
I’m not someone who uses a lot of color in my makes or uses it in a bold way. It’s usually an accent and support act to the browns that I love. Uncharted Mariner works so beautifully with the brown distress palette and I know this is going to be a forever favorite of mine.
Thanks for stopping by and let me know if you have any questions.
Zoe
…
affiliate links used at no cost to you


This is a superb piece of art! It’s great to see how you turned something you didn’t really like into something amazing. I dream Of getting my hands on a set of those alpha numeric marquise similats. Thanks for sharing Zoe!
Absolutely fantastic!
Zoe, what a great make! Even the “ridge of cardstock doom”, you figured it out and made an awesome make! Lots of great ideas on how to achieve this look! I love it with the new color Uncharted Mariner! Well done my friend!
This colour will be in my desert island pack too! I can’t wait to get my hands on it.
Love this project Zoe, I do love it when accidents turn into “meant to happen” things. I do love this tag!!! Great work!
that is so cool, I love how you added the “rust” to this and such a great background too!
I am so inspired by you! What a beautifully done piece. Thank you for sharing your creative process, even with the “mess ups”.
Awesome make! Thank you for sharing all these techniques.
Wow! Thanks for breaking this into steps. You make it seem possible for me to give this type of make a try. Always love your work.
Wow! Wow Wow! That is awesome! So many amazing techniques to try! Thank you!
one of my favorite makes of yours and I love them all.A lot of steps to create this magic! thanks for sharing all your hard work.It’s truly inspiring!
Your work is such an inspiration! I absolutely love the new colour and thankyou so much for sharing these fantastic makes ❤️
Really Amazing!!! I agree, Uncharted Mariner looks fantastic with browns!!!
The Uncharted Mariner found his way to my home too and what a amazing colour, I thought so when Tim revealed the colour but in real live it’s even more amazing.
Your make is stunning Zoe, love how you made this and fabulous how you covered up your little accident, if you didn’t tell us, no one would have guessed it.
Thank you so much for your stunning inspiration and step by step tutorial. Stay safe and have a wonderful day.