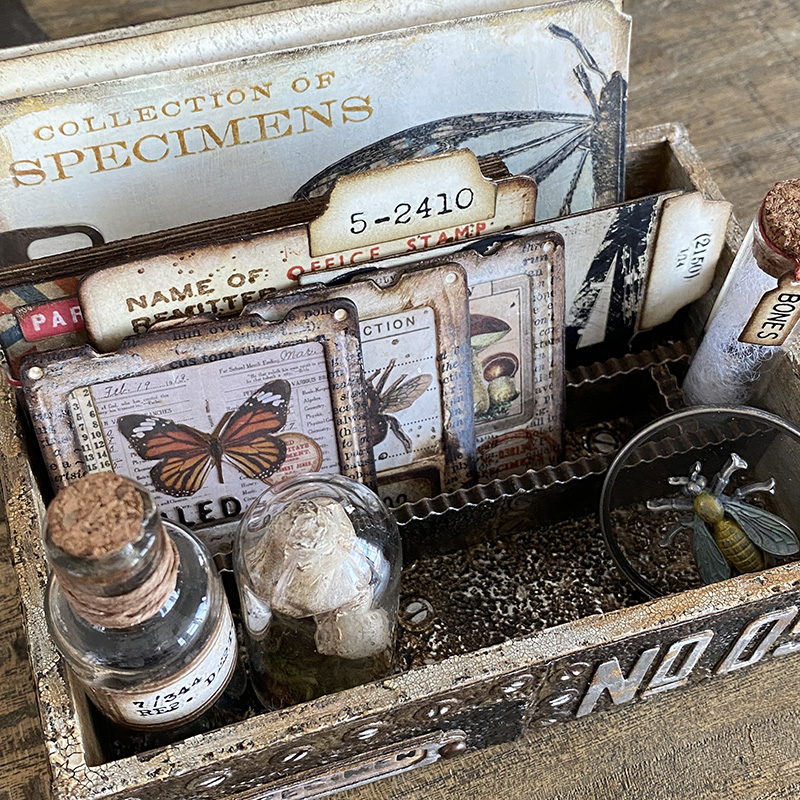
Happy Friday friends. Today I’m sharing the contents of the specimen box I made for the Tim Holtz Chapter 3 LIVE launch which I shared in a separate post. You can see the LIVE launch replay and maker inspiration over on Tim’s blog.
The specimen set was certainly my favorite and I do love them all and have to have them all, but the file folder and the specimen slide stole my heart. I’ve been so excited at the thought of a social media world flooded with specimen slides and file folders and I’m waiting on pins for your dies to arrive and see what you make. For today, I’m going to share some details of the contents of my specimen box…
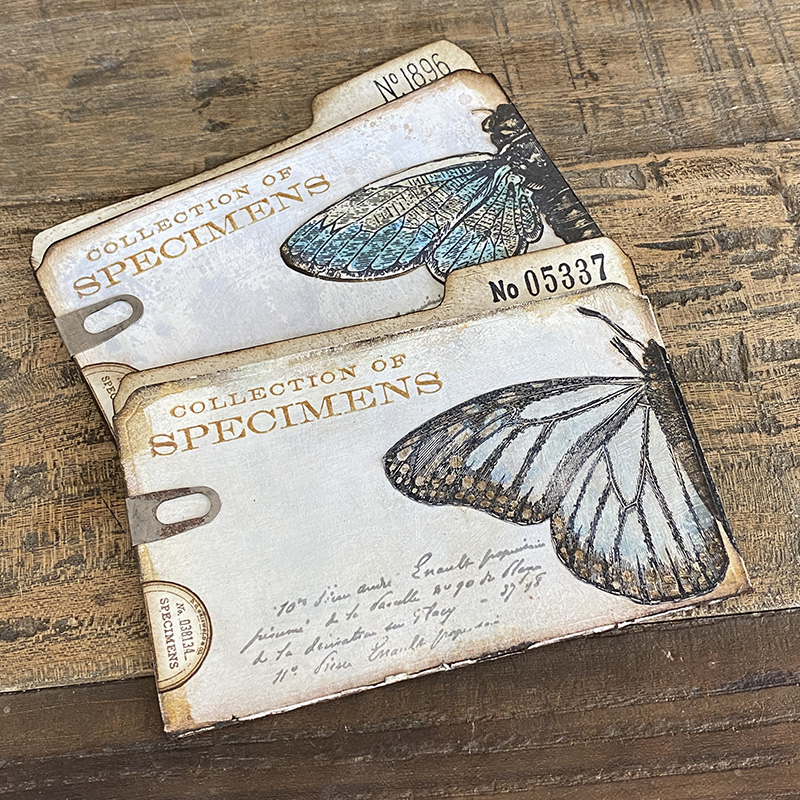
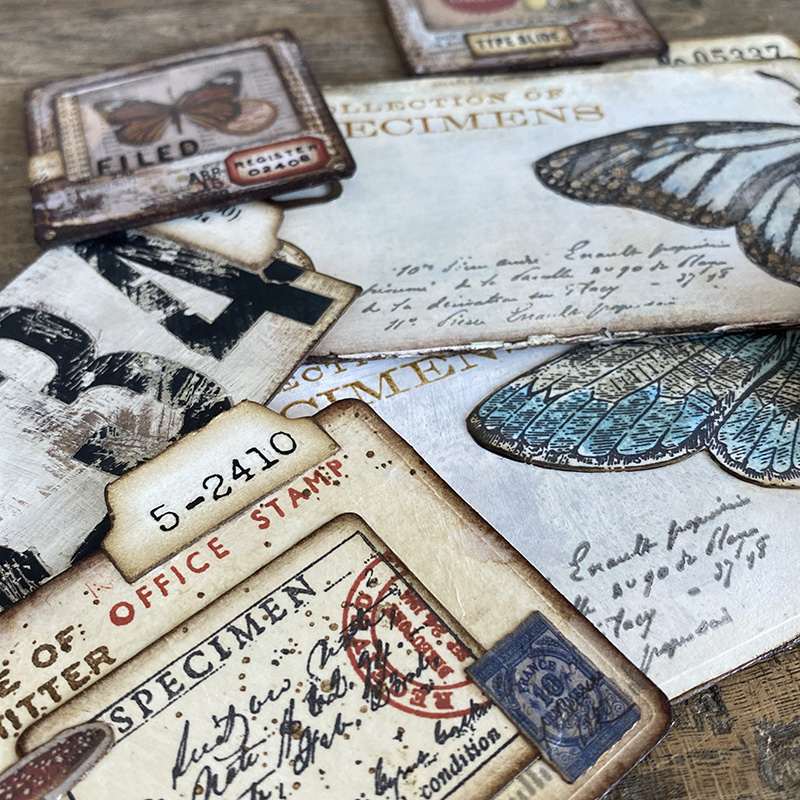
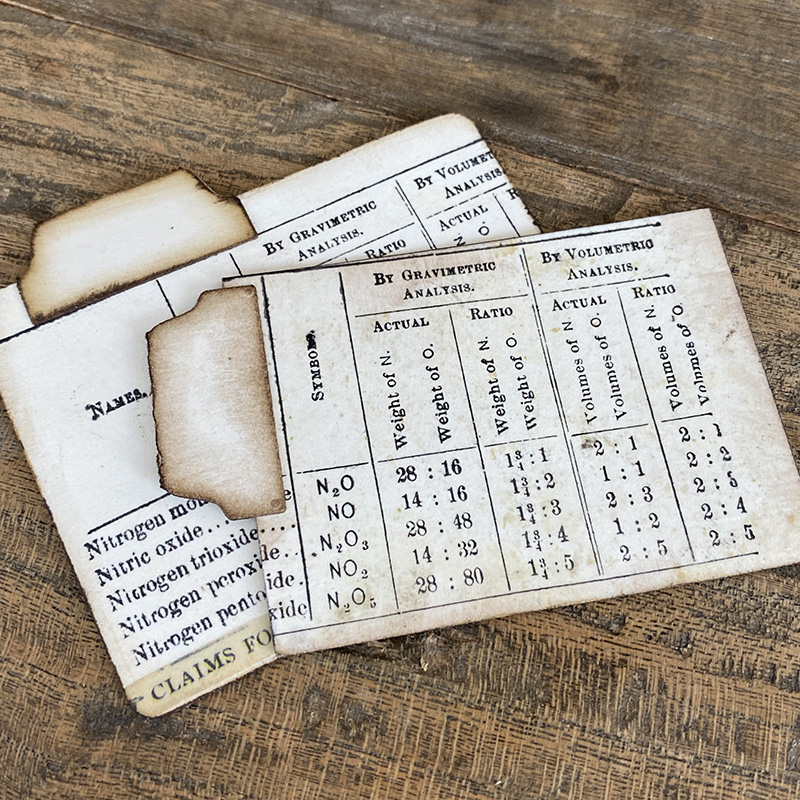
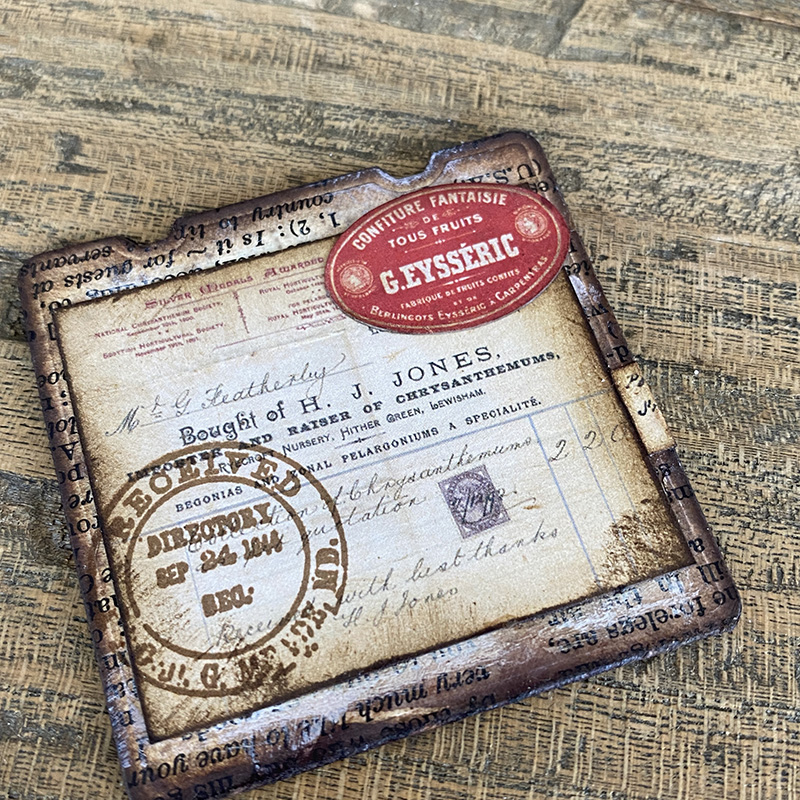
I die cut file folders from the specimen set from distress mixed media heavystock. Painted with a light layer of white gesso mixed with a little water. I brayered a watered down layer of speckled egg distress paint over the top and stamped using distress archival ink and stamps. Here I used insects from the specimen stamp set and added index clips to hold the folders closed.
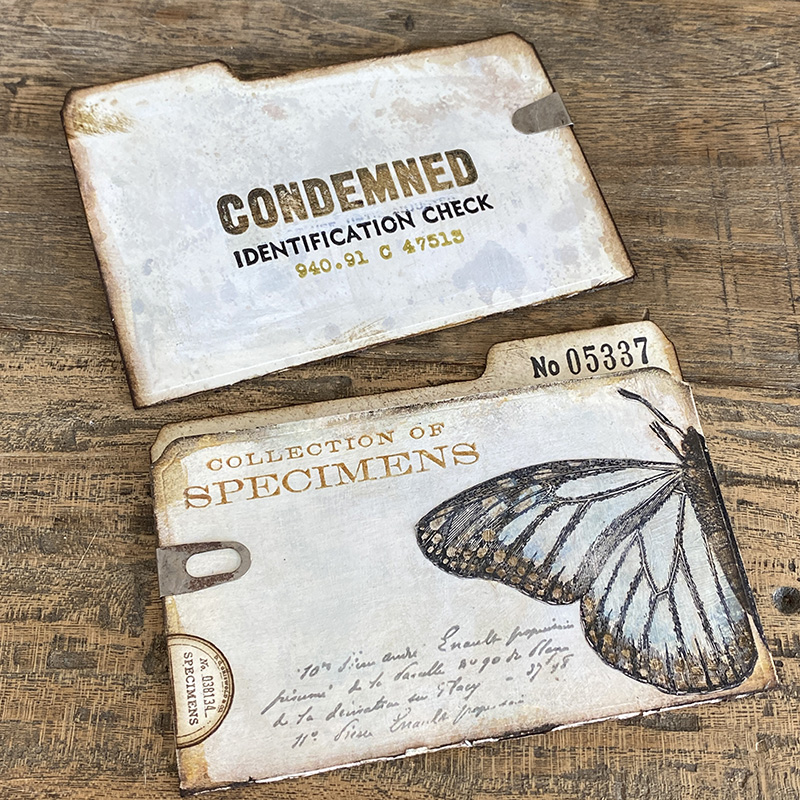
I stamped on the back of the file folders with stamps from the new Eccentric stamp set in distress archival ink.
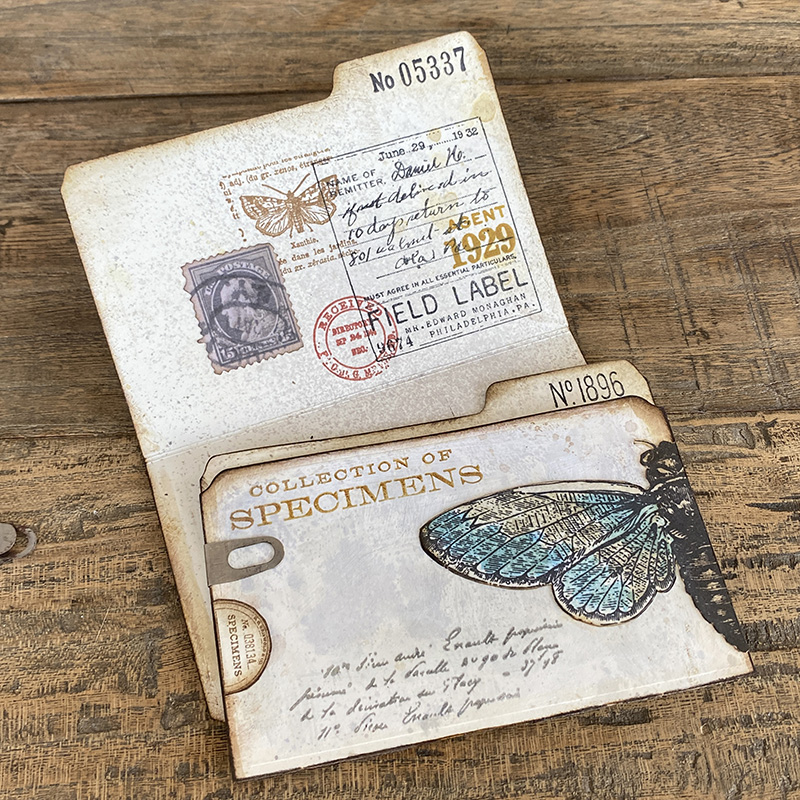
I used stamps from field notes stamp set to stamp the inside of the file folders in different distress archival inks and added a stamp from the idea-ology field notes ephemera set. It reminds me of how they would validate some documents when I lived in Geneva, by using a postage stamp. I always think it makes a boring admin document look so pretty.
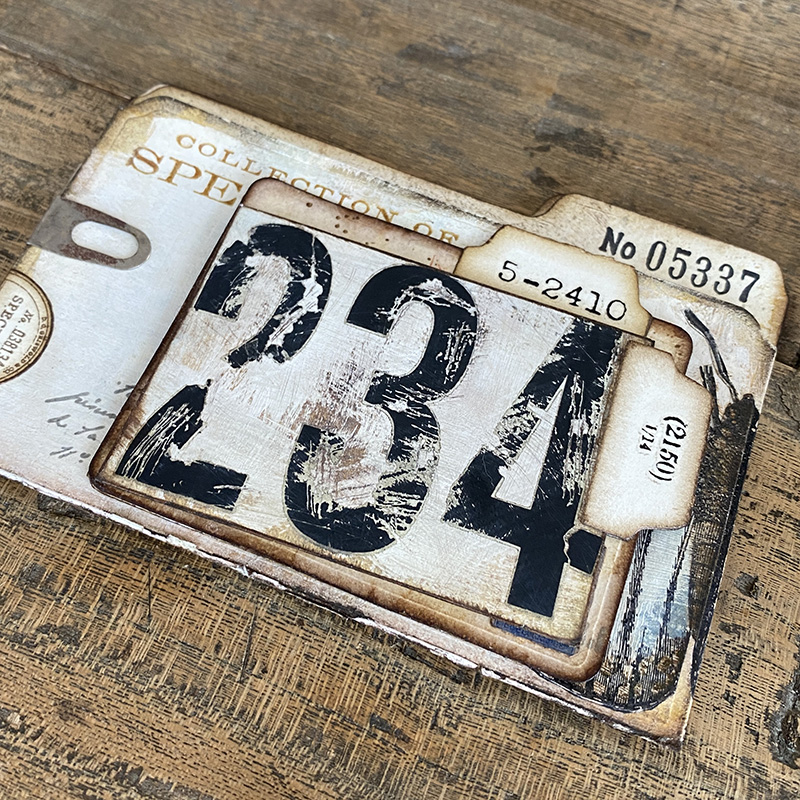
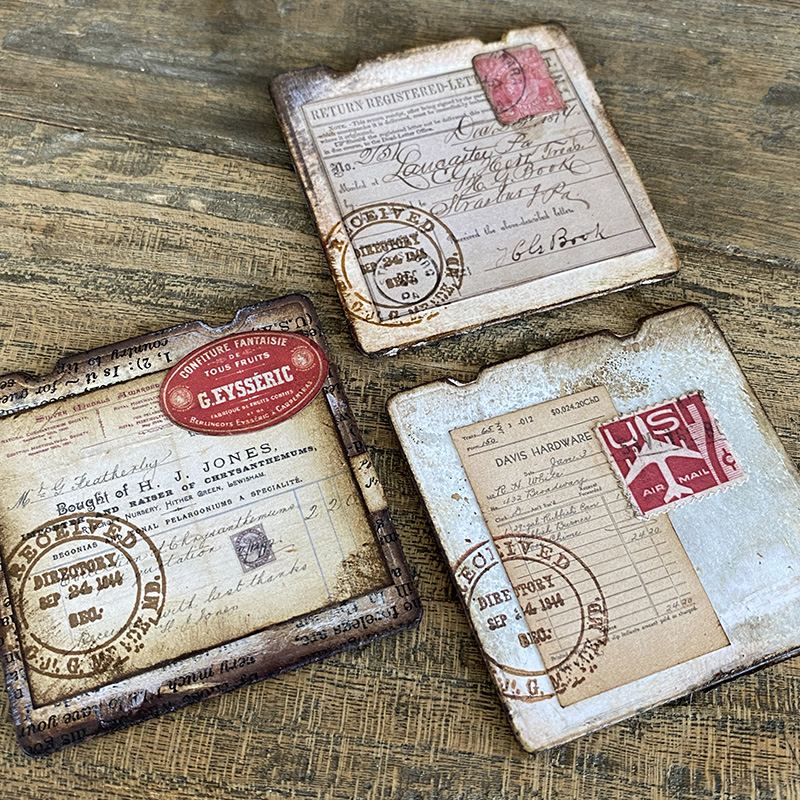
Next I made some insert cards using more of the dies from the specimen set. I used the index tab die (which I LOVE) and several insert dies and cut more distress mixed media heavystock. I used remnant rubs to add numbers to the background and a distress tool to scratch it up. I then blended in walnut stain distress ink and wiped with a damp cloth, removing some of the excess ink.
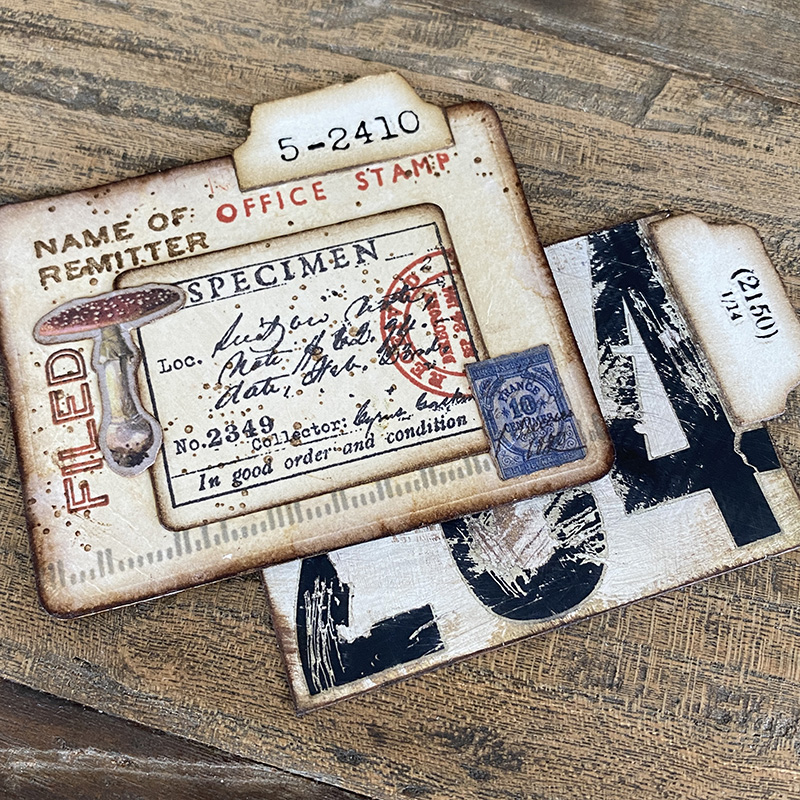
I used stamps from field notes and correspondence, mixed with a little idea-ology ephemera to create this tabbed card. I love having so many different distress archival inks to stamp with too.
I used a stamp from the Laboratorie set on the back of both cards. I tapped each into a distress ink wash.
Beginner Tip: To create a “distress ink wash”, simply squish your ink pad onto a non stick craft mat, spritz with lots of water and mix it all up with your finger. Then tap your card into the ink wash, lift out and dry with a heat tool or use a dry cloth to pick up excess water. Practice until you find the ink to water ratio you like. These things soon become second nature.
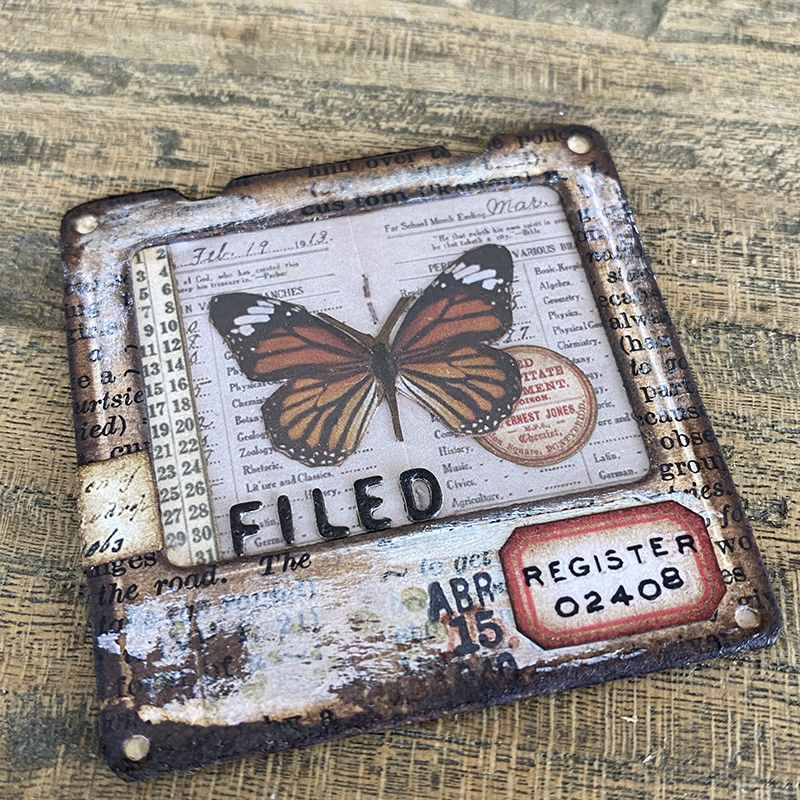
Next to the specimen slides. They are so simple to die cut, ready to be decorated with endless possibilities. I added ephemera to the inside of mine, used a mica tile on top and added “FILED” cut from idea-ology black kraft stock. Because the letters are so tiny I mounted the kraft stock onto double sided adhesive sheets before die cutting. I stuck them onto the outer part of the slide.
I added more idea-ology ephemera to the back of the slides and stamped over top with distress archival ink.
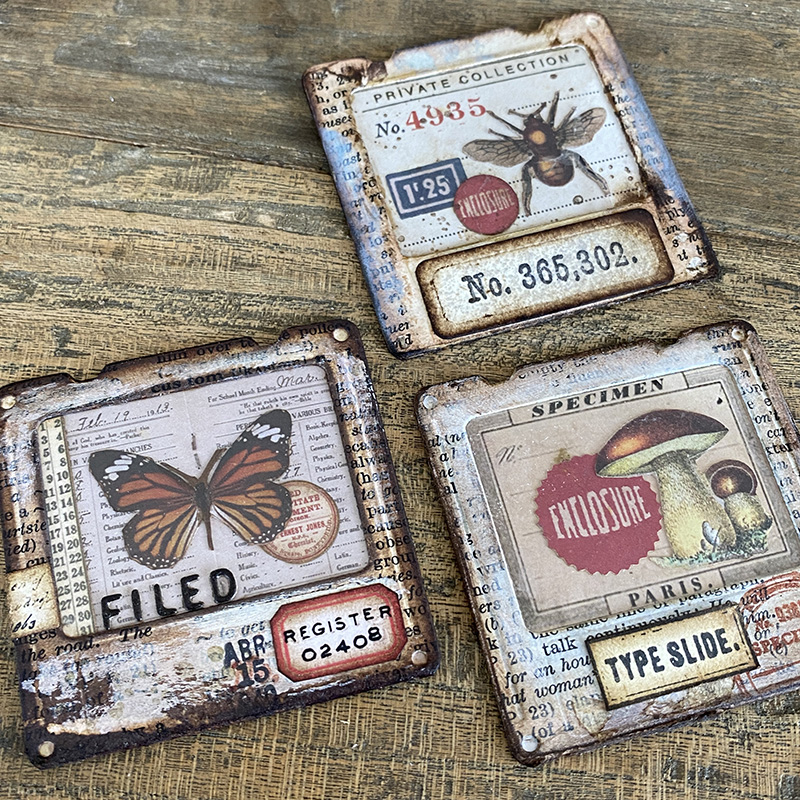
I couldn’t stop making them but I didn’t have time to do step outs so I will be making some more and will share them in the next blog post.
It’s a great way to use your ephemera, I know you’re hoarding it too! 😉
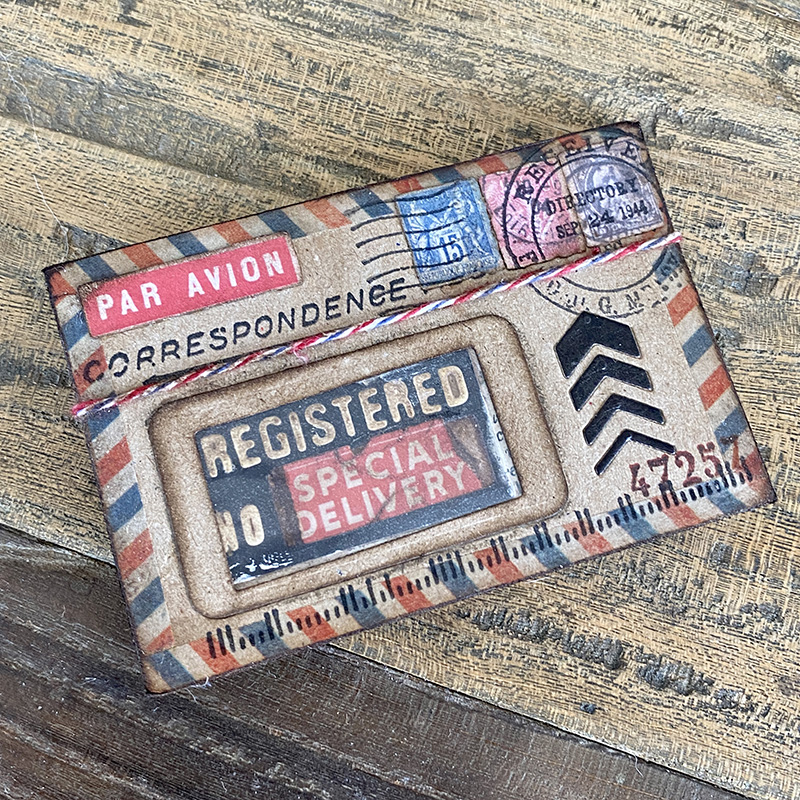
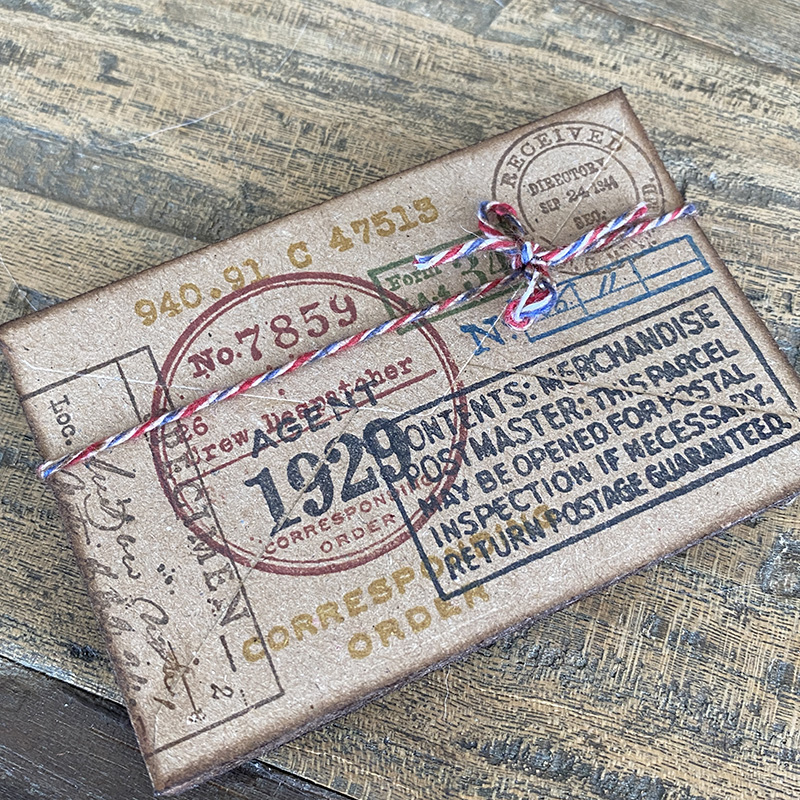
My make concentrated on the specimen set and industrious 3D folder but I couldn’t resist using the postale set to make one tiny envelope. I’m really into airmail themed things so I pulled out some hoarded retired correspondence design tape with that gorgeous airmail striped tape. I die cut my envelope from a recycled envelope. I kept the clear glassine window and reused that too.
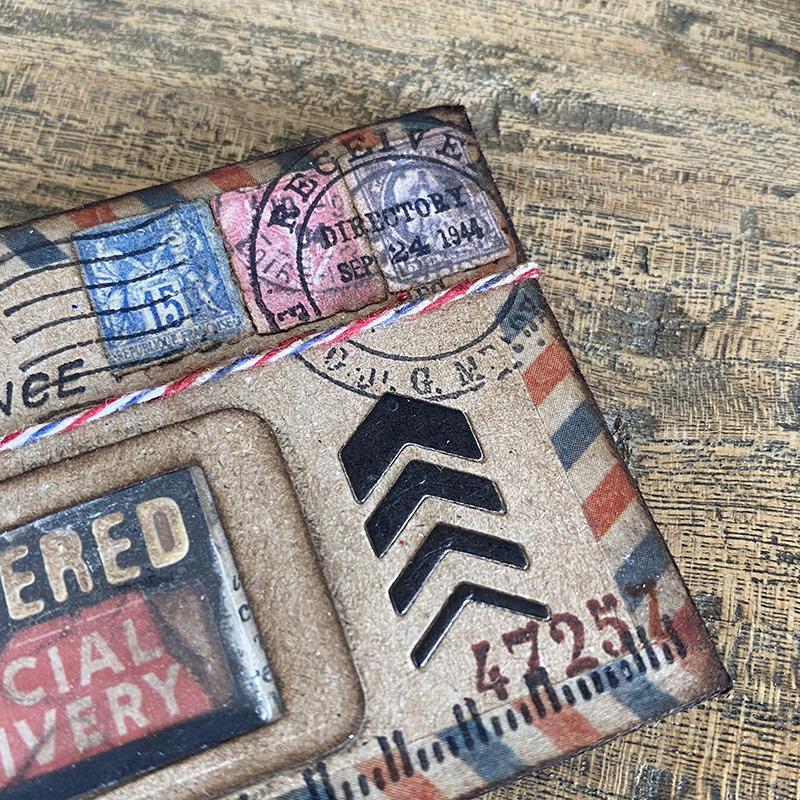
I cut the arrows out of envelope front before mounting idea-ology black kraft stock into the recess. I added stamps from the snippets ephemera set and stamped with stamps from the correspondence set.
I used various colors of distress archival inks and stamps from Eccentric, Field Notes and Correspondence stamp sets to decorate the back of the envelope.
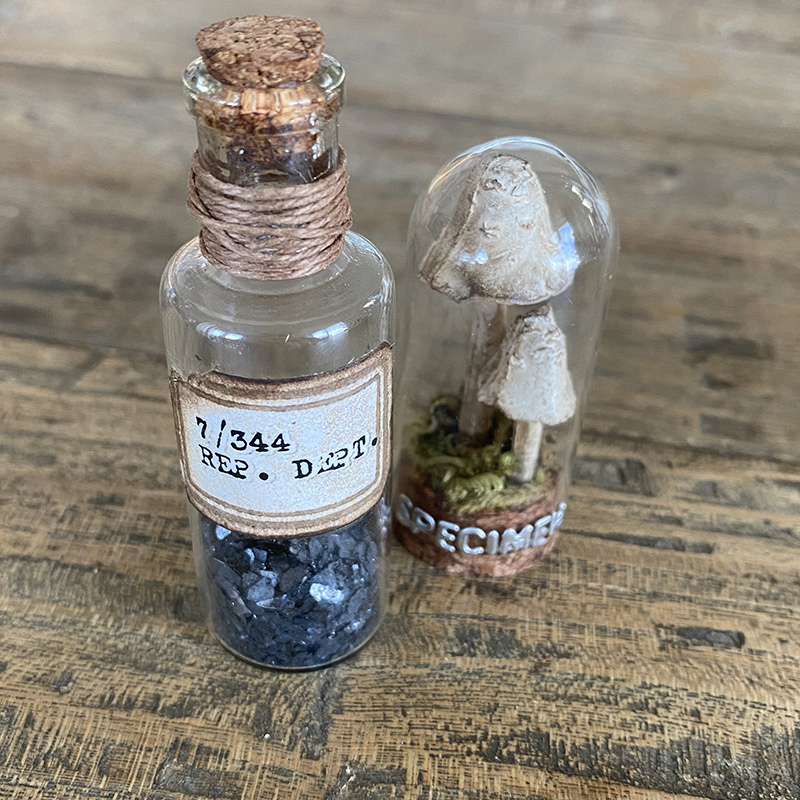
I love to use idea-ology apothecary bottles and domes and love that the Chapter 3 dies work perfectly with my favorite pieces. I added a label from the vintage label thinlits die set to and apothecary bottle with remnant rubs added. I tore a corner off the label for a worn look. You have to check out Tim’s cool demo on how to ink and cut the vintage labels.
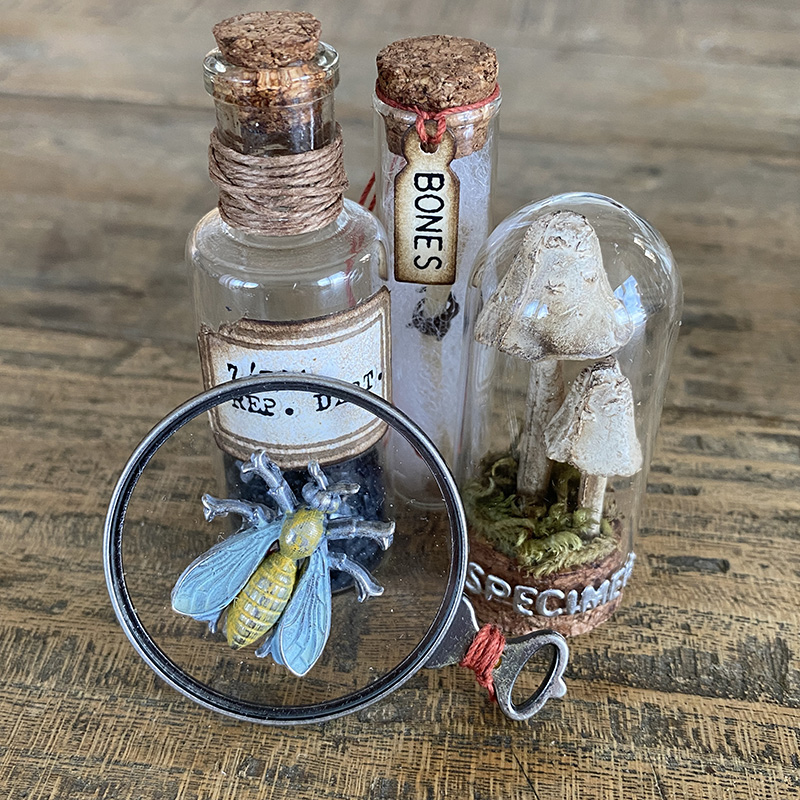
I added “specimen” to the mini dome. I die cut this from idea-ology metallic kraft stock which I had backed with an adhesive sheet before die cutting. This is a much easier way to add the tiny letters to glass. I added an insect to the optical lens and wrapped with a piece of twine.
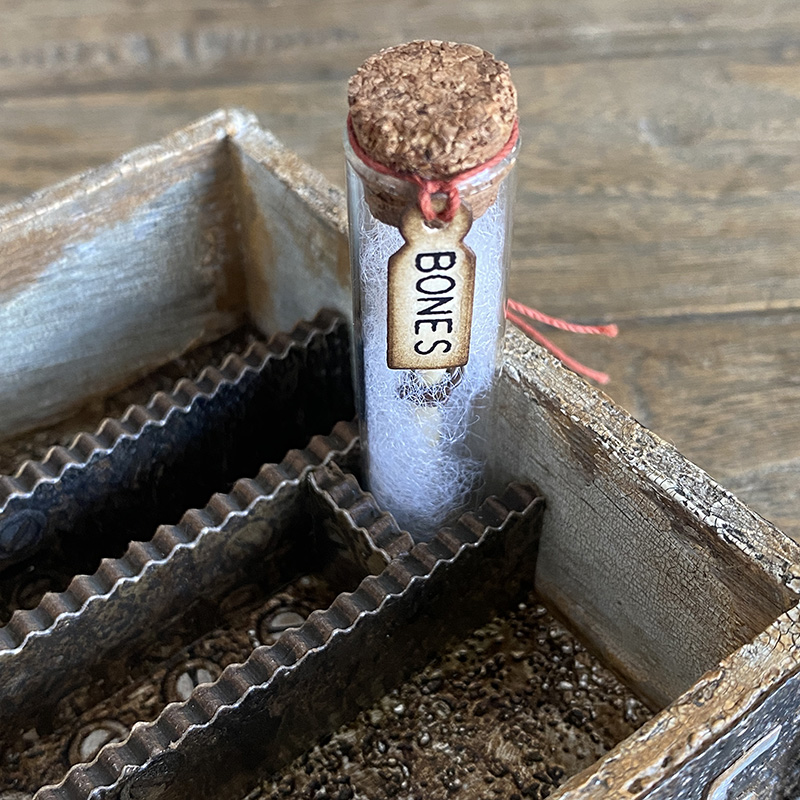
I added wadding and an idea-ology bone to a test tube and added a tiny label from the collector set with “bones” rubbed on from the halloween remnant rubs set. I like to do “Halloween” all year round so I always stock up on Halloween idea-ology when it comes around. Speaking of Halloween… I’ve got a busy weekend making ahead… 😉
Thanks for stopping by, I hope you’ve enjoyed this tour around my specimen box. Let me know if you have any questions in comments and I’ll do my best to answer them.
Have a great weekend.
Zoe
…
affiliate links used at no cost to you


Such incredible details Zoe, I love it all 🤎🤗🤎
Great to see this post. I missed the live but cought the replay amazing makes and your piles and slides were awesome Love all you have done with them and I cant wait to get my dies and start making. You are so right about the hording of TH stuff! But as Tim says “use your products” its what they are for and as ever you are an inspiration to do it. Thanks xox
Hoarding “Tim” products??? Who? Us? hahahahaha…if only you could see!!! Hey Zoe, if you are going to do another blog post about the making of the slides….would you give some details of how you acheived that grungy deliciousness of the Butterfly “Filed” slide? Please and thank you! It is all amazing, but that one slide had me drooling…LOL.
Ya what scrappergirl56 said~ lol I loved this piece on the live and I love it more seeing it on here! Great project Zoe! Love the specimen slides.
I love all the detail that you have put into these slides and how easy and fun to put together! I love these newbie tricks that you are providing! Very helpful! Thanks so much for sharing with us! Blog posts are a lot of work! We appreciate you!
Love every little detail in each and every one of your file folders and slides!! Can’t wait to get my hands on these die sets. Thanks so much for sharing your techniques!! ❤️
Beautiful work!
Such an amazing project! And great details… love it all!
Thank you so much for posting the details of the contents. I love and appreciate both posts. I’m so excited about this release. I love the file folder and the slide frame dies so much. Well, truth be told, I love (and bought) the whole release! I just received my order and have just barely started to play and it’s so fun!! Thank you so much for the amazing inspiration 💕💕💕
Wow, wow, wow!!!! I always love your amazing creations, but this one I adore. Like you I love all things specimen slides etc, so this release is my idea of craftin heaven. Would like to say as well, thank you SO much for all the time and huge amount of effort you put in, not just the makes, but the way you document each stage, it is so helpful and wonderful to read about your thought process, so inspirational. ❤️🏴❤️
Wow these are all amazing, I just love everyone of your examples, thanks for sharing tips and ideas!! They are all on my wish list!
Thank you so much for this tutorial. When I saw it on the Ch 3 Live my jaw dropped. This is amazing, impressive and inspiring.
All those details on your stunning makes Zoe just fabulous!!
Thank you so much for sharing this all with us, stay safe and have a wonderful day.
Love every tiny detail! A stunning make! Thanks heaps for the tutorial.
Hi Zoe well I finally got through reading your blog and loved every minute of it thank you so much for sharing.. Just wanted to say I certainly didn’t mean to offend on your Instagram account when I asked if you made YouTube videos to show your makes I just have trouble with my eyes and reading is difficult
Your work is fascinating, beautiful and fanciful at the same time! I love everything you do! I’m especially fascinated with the specimen box. I really want to try to make one for each of my grandchildren but I’m not sure they would be as enthralled with it as I. They are 12 and 13, girl and boy and they love to do projects with me when they visit so I think they would be interested if I could keep the topics weird enough. What do you think? I was thinking of one for Halloween.
Thank you for your inspiration! It means everything to me and I love getting lost in my own little crazy wor.
Love this make!!
How did you colour the butterflies on the mini file folders?
Brilliant – I’d been trying to avoid buying any of the die sets even though they’ve been calling my name…..don’t need one more new thing to do…..but I succumbed! You have such great ideas here – thanks for helping me jump start my next mixed media project…..