Hello friends. I’m sure by now you’ve seen the incredible new Tim Holtz Chapter 3 dies and 3D folders. This is Tim’s chapter and the best ever chapter! If you missed the LIVE or want to have it on replay all day, you can see it and all the mind blowing maker inspiration over on Tim’s blog.
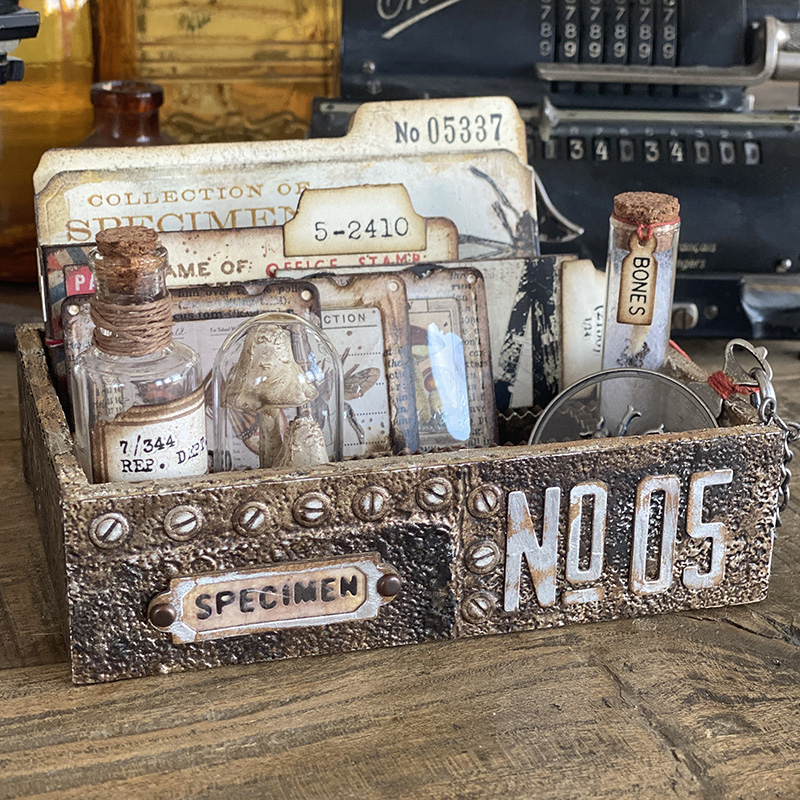
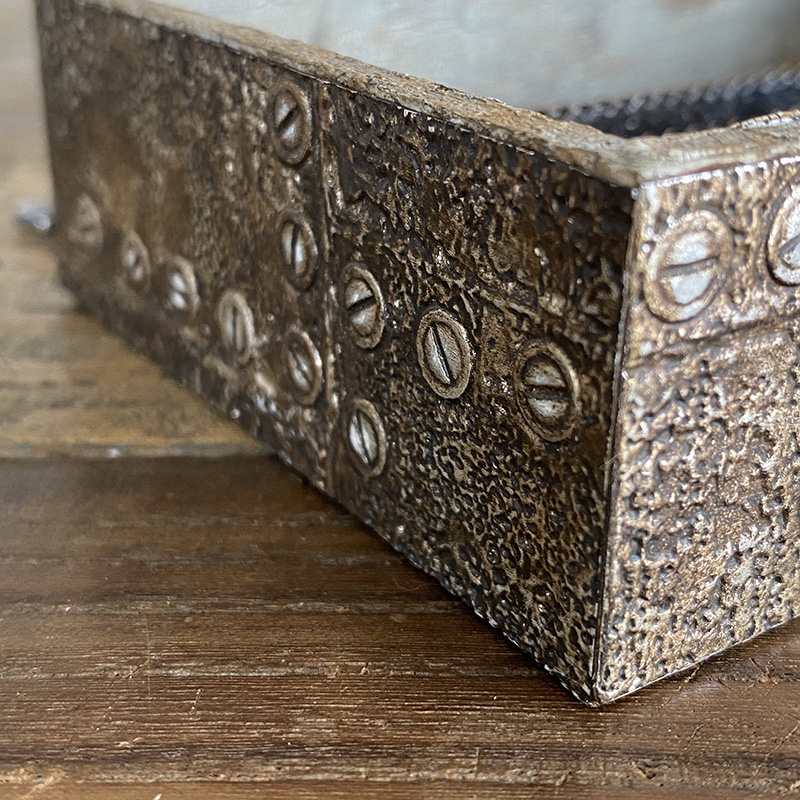
If you know my maker style, I definitely have a love for all things industrial, so the new Industrious 3D folder made my grunge loving heart sing! The detail you get with this folder is incredible and those rivets! WHAAAT!!! The folder was the starting point of my specimen box which I’m going to share details of in this blog post.
The contents of the box will be in a separate post as I’ve added extra detail in the description to hopefully answer some of the questions I’ve had from makers just starting out. Grab yourself some snacks, get comfortable and let’s get into it…
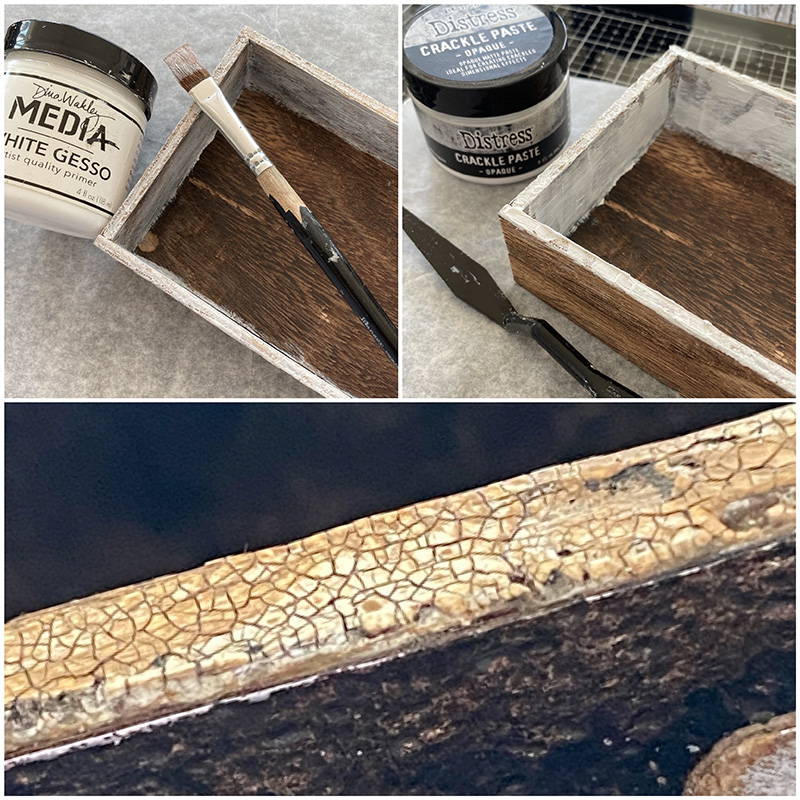
Prime a large idea-ology vignette box with white gesso and once dry, add distress opaque crackle paste to the inside sides and border of the vignette. Dry brush vintage photo distress paint over the crackle and rub in walnut stain distress crayon.
Beginner Tip: Dry brushing is an almost dry paint free brush. Add a little paint to a dry paint brush and remove the excess with a paper towel. Repeat, building the color slowly to add highlight but not a thick layer of paint.
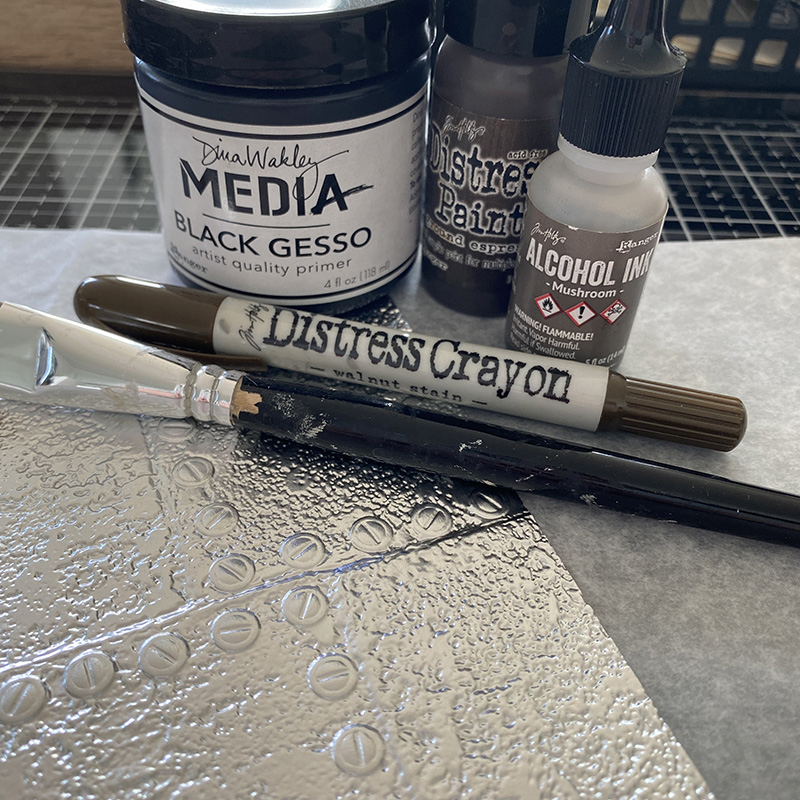
Gather your supplies and using the new industrious 3D embossing folder, emboss idea-ology silver metallic kraft stock. Spritz the kraft side of the metallic kraft stock with a light mist of water and run through your machine inside the 3D folder.
Note: I used the Tim Holtz Big Shot Foldaway machine and the pressure is so good that it only needs one pass.

Add a little mushroom alcohol ink to random parts of the background and allow to air dry.
Note: You can skip this part, I find it adds a little “tooth” to the slick metallic kraft stock which the other mediums cling to, giving a more uneven finish, which I like.
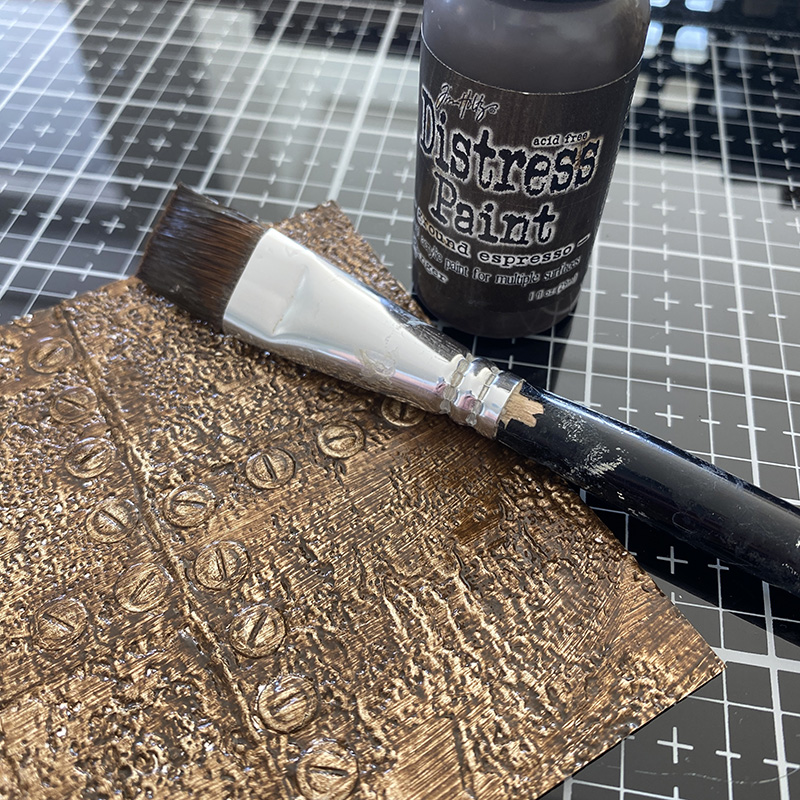
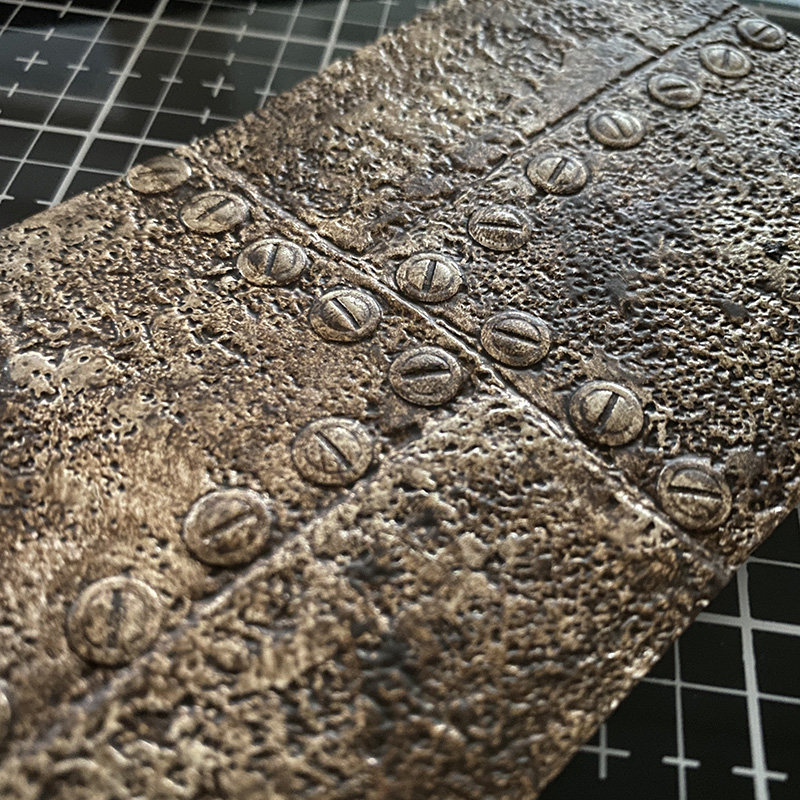
Add a layer of ground espresso distress paint using a paintbrush. Get the paint right into the de-bossed areas. Allow the paint to dry a little and then wipe the excess away with a dry clean cloth.
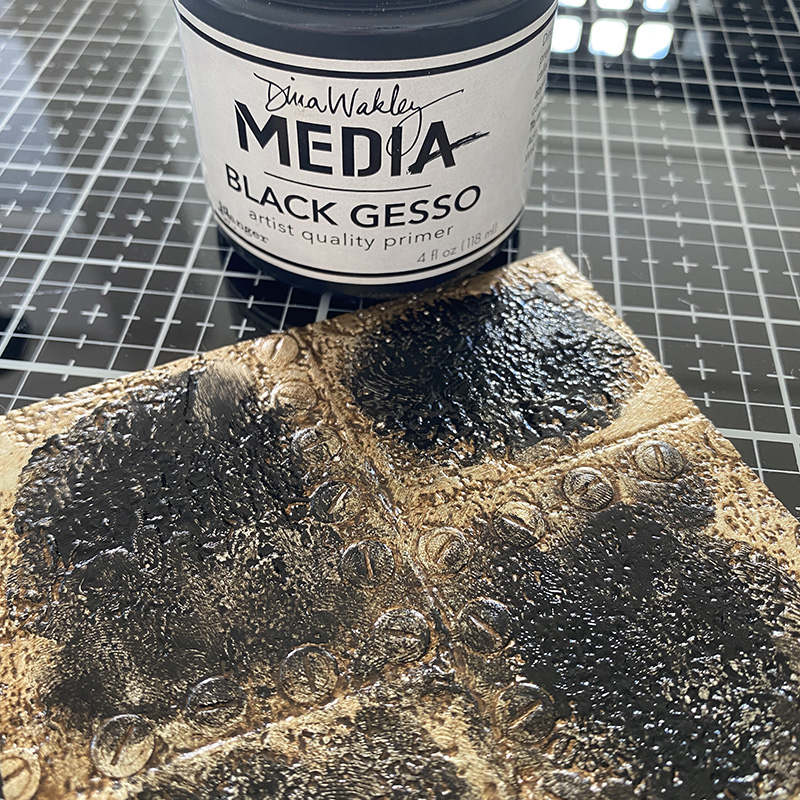
Add a little black gesso with your finger but this time don’t allow to dry.
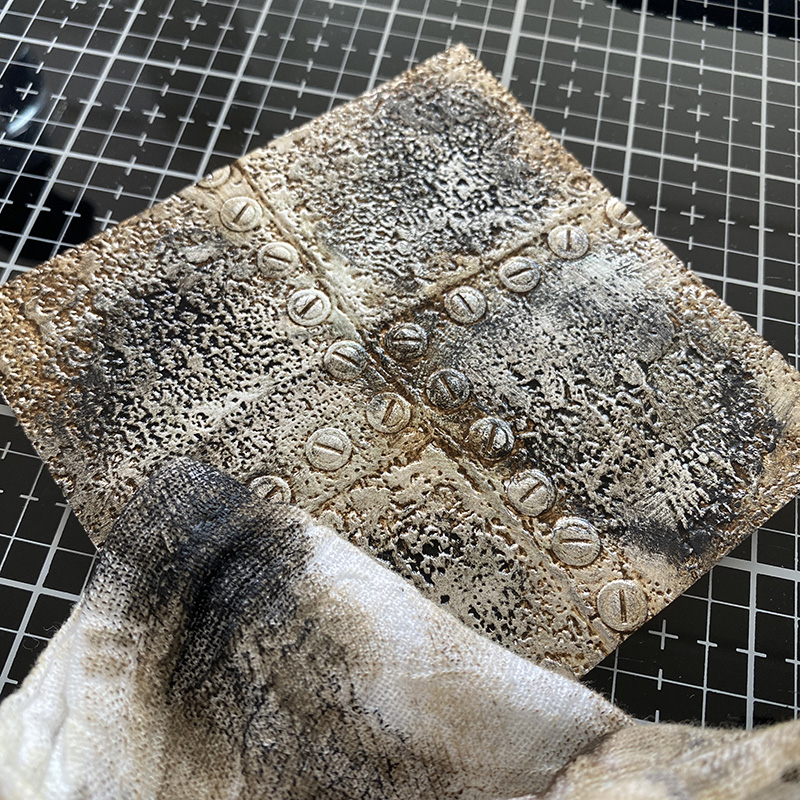
Use a clean dry cloth to wipe away most of the gesso and allow the remaining to dry.
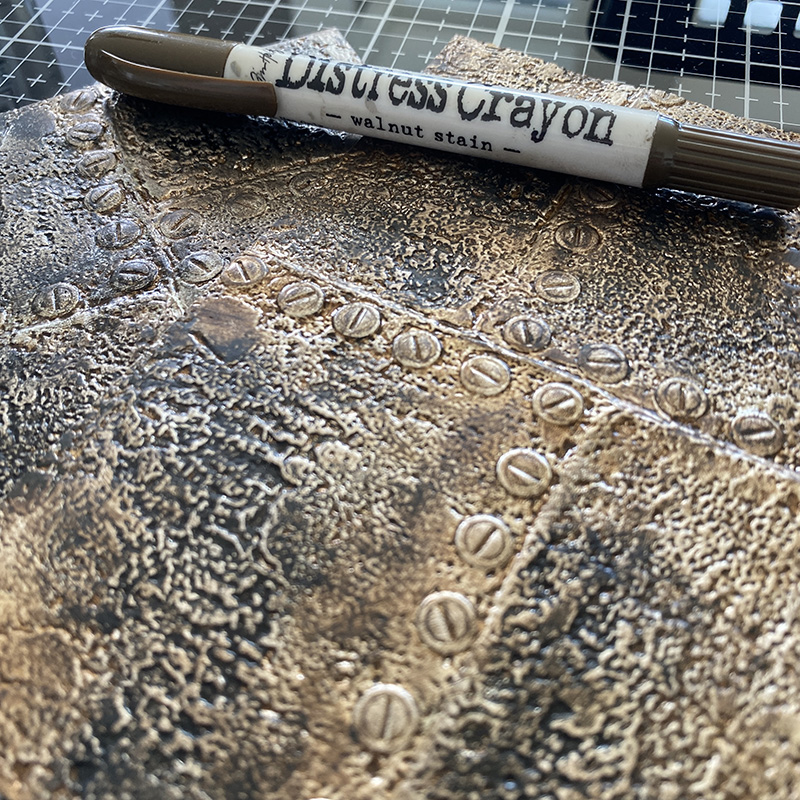
Add walnut stain distress crayon to parts of the metallic kraft stock that you would like to be darker or grungier. Keep tinkering with it until you’re happy.
Measure the parts of the vignette box you intend to cover and cut the embossed kraft stock to size. When cutting, think about where you want the rivets to sit on your panel.
Using distress collage medium, add the embossed panels to the vignette box.
Note: I found it worked best to add a layer of collage medium to the vignette box and to the embossed panel.
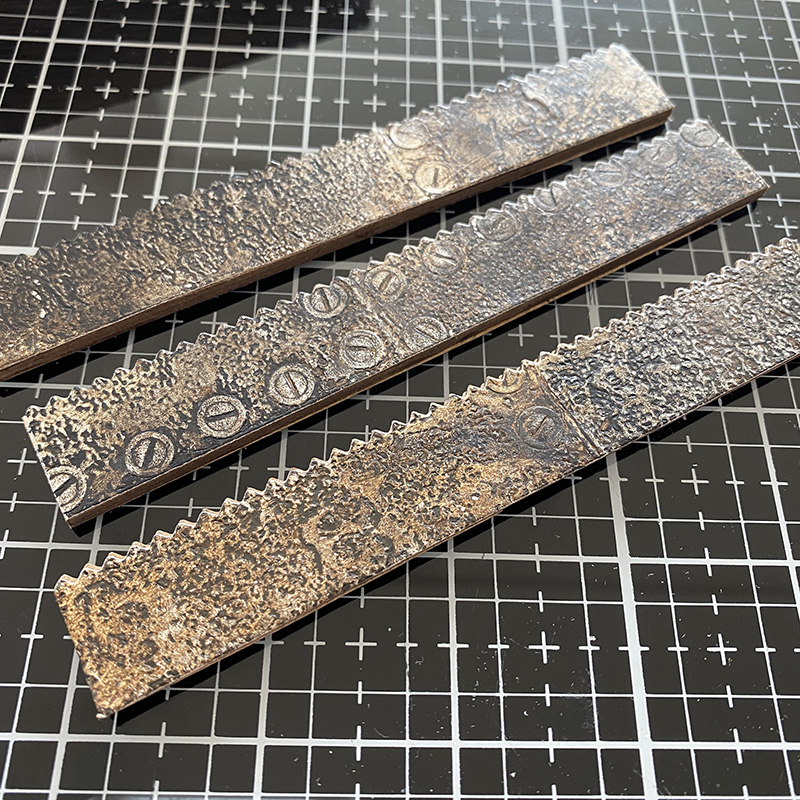
To create the box dividers, use the decorative trims thinlits dies to cut strips from the metallic embossed kraft stock. Using distress collage medium, add them to both sides of etcetera thickboard pinked edge trims.
Beginner Tip: Die cut first and 3D emboss second so you don’t flatten the embossed detail.
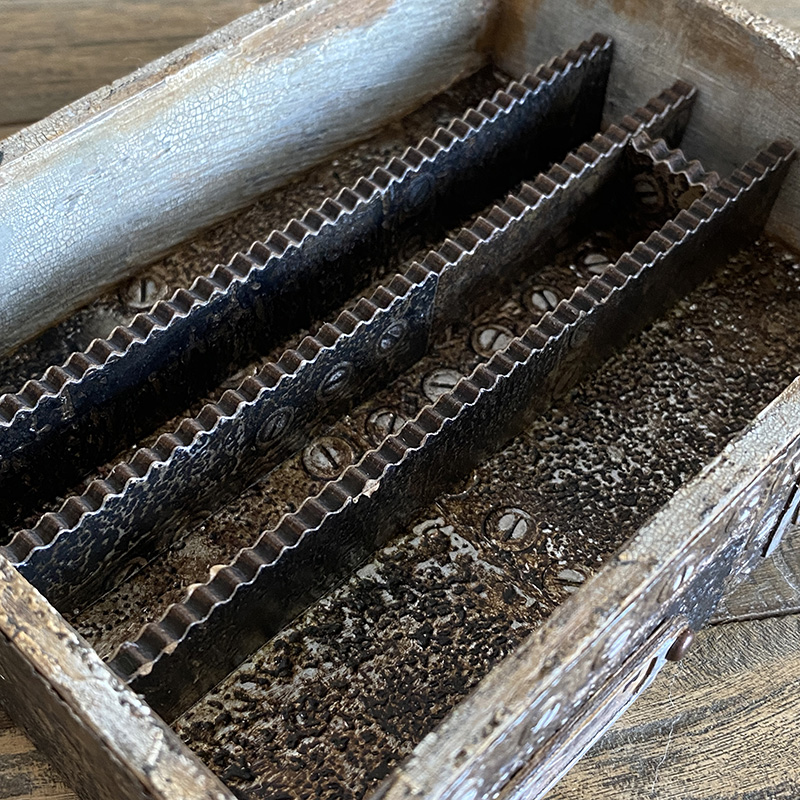
Using Tim’s Tonic scissors, trim the trims to fit inside the vignette box. Add a line of distress collage medium using the precision bottle to the bottom and sides of the trims and push into place. Hold in place for a few moments and then set aside and allow the collage medium to completely dry.
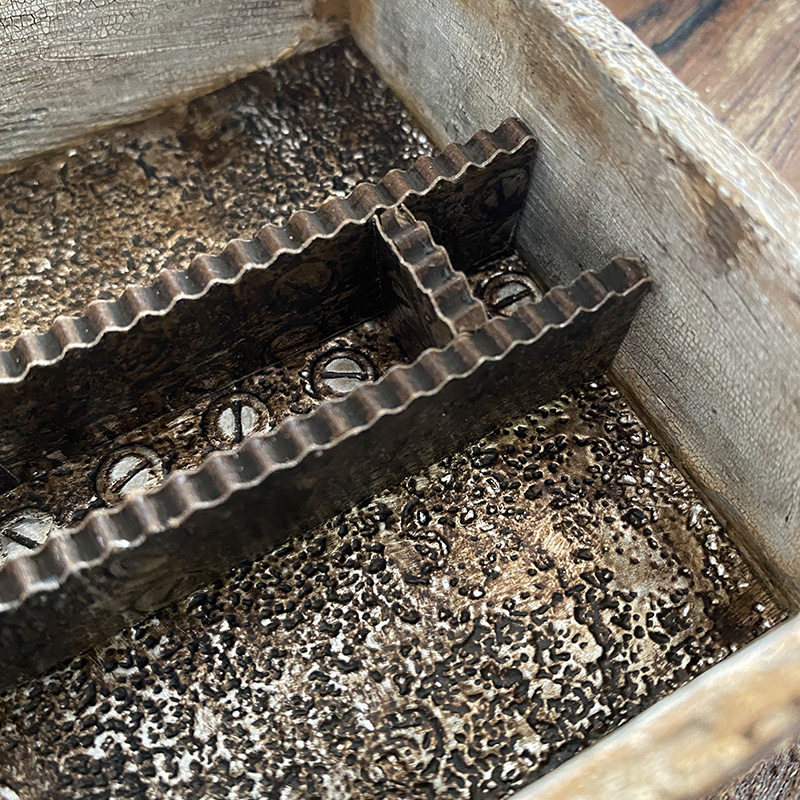
I used an offcut to add a compartment to fit an idea-ology test tube! Cut the trim to size and add the distress collage medium. Hold the test tube in place with one hand and slide the trim into place and then remove the test tube and allow to dry.
Tip: If you need both hands, use a little poster putty/blu-tack to hold the test tube in place while you slide the trim in beside it.
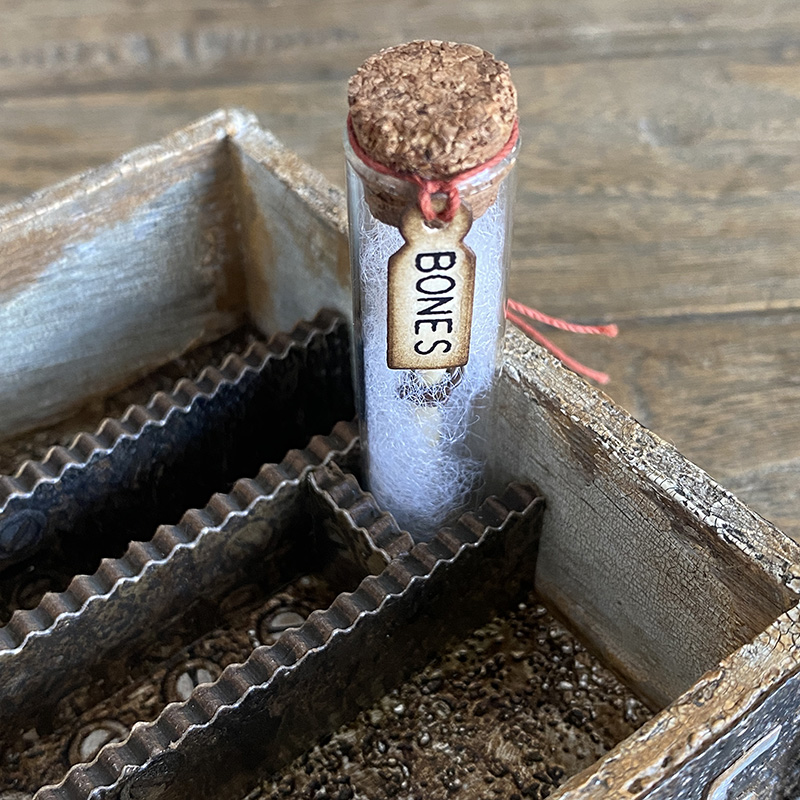
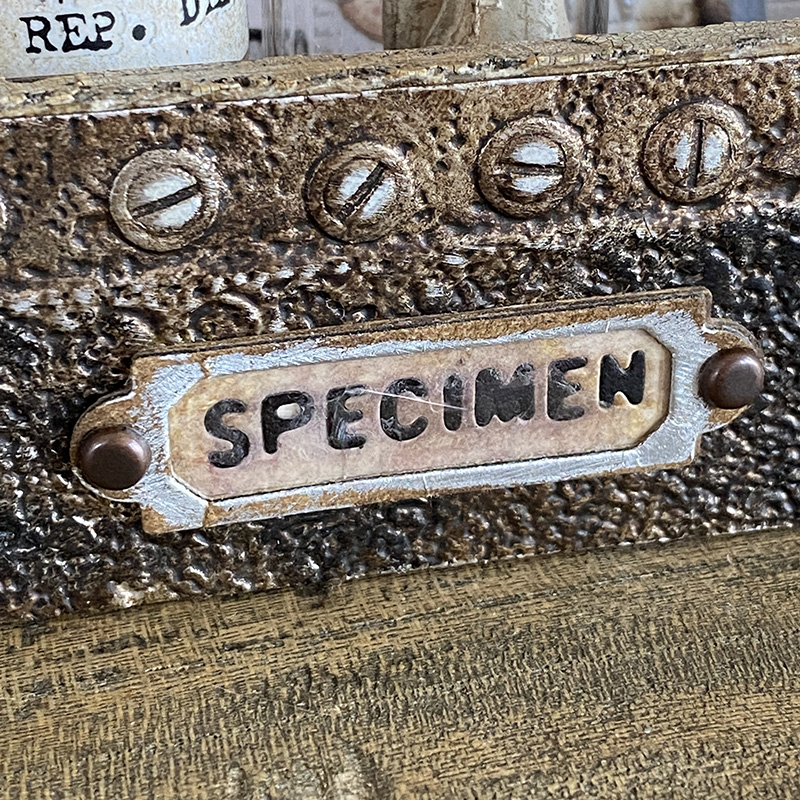
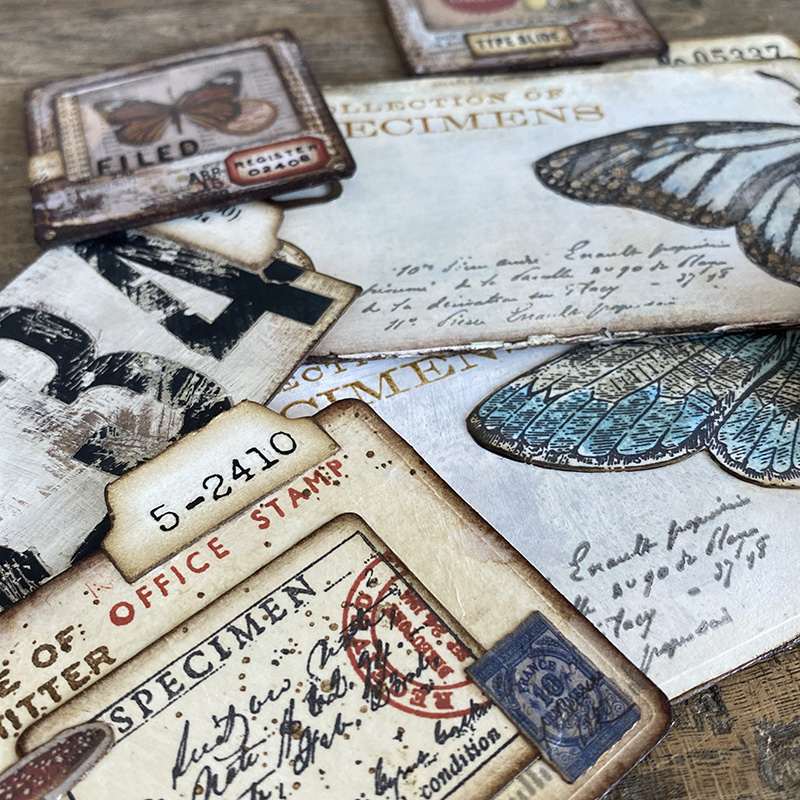
How cute is the tiny label from the Collector set? I have wanted a label this size for so long. Thanks Tim!
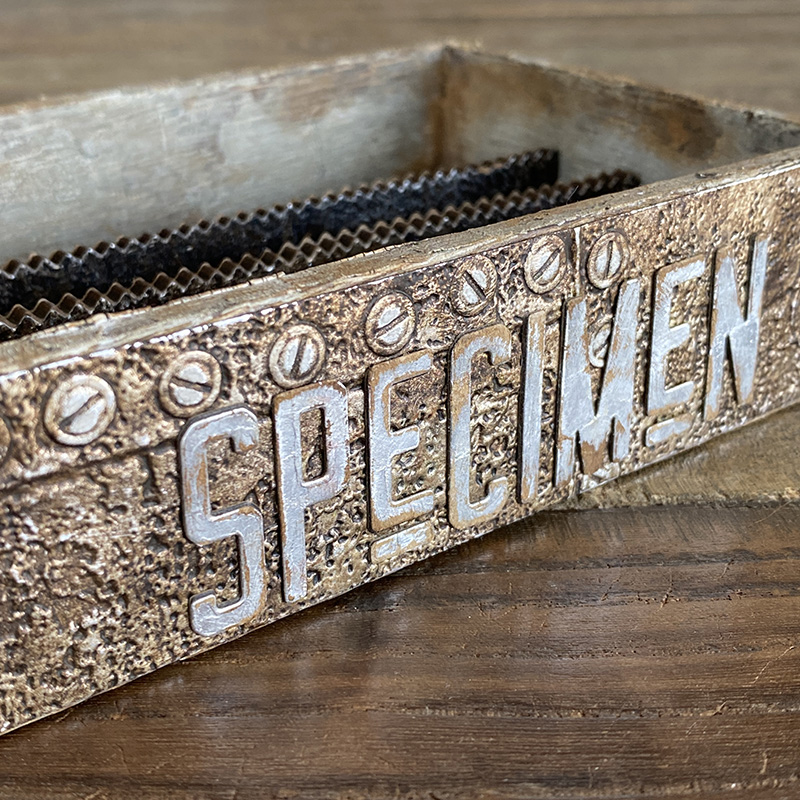
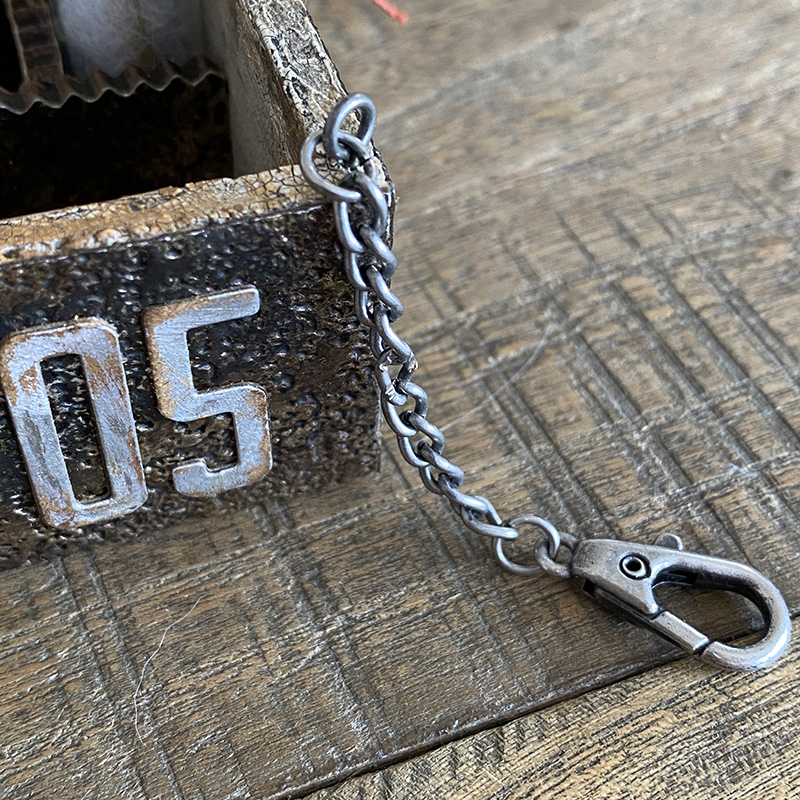
I can see why Tim loves the new Theory Alphanumeric die set! You get 2 sizes of alphas and the blocks that sit under the smaller letters to lift them to the height of the larger set. SO COOL! I used idea-ology silver metallic kraft stock to cut “Specimen”, sanded, blended in a little walnut stain distress ink and added it to the back panel of the vignette box.
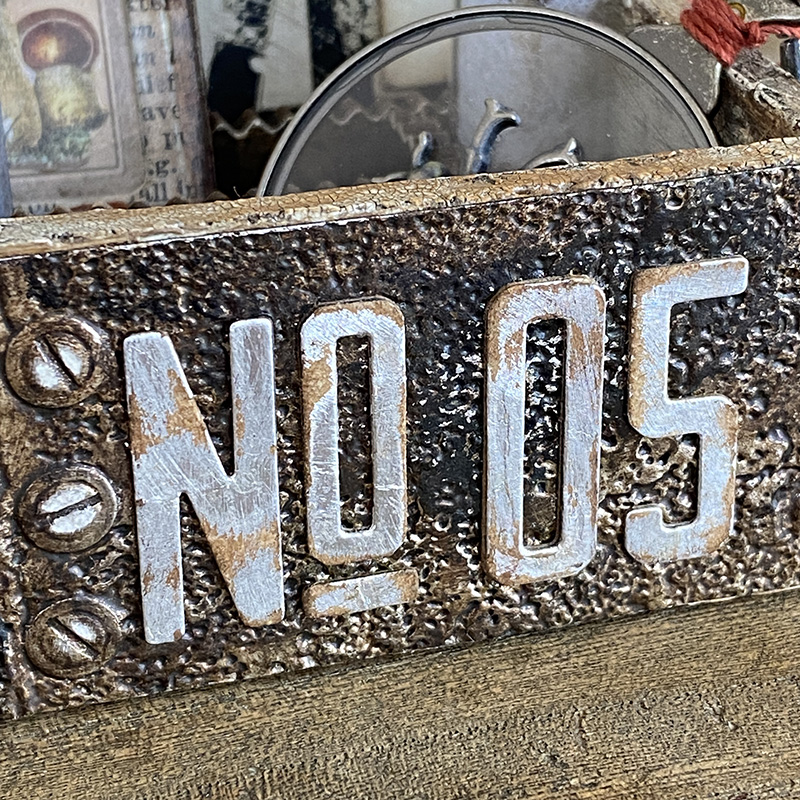
On the front panel I added No 05. Gently sand the rivets to remove a layer of paint and show the metallic kraft stock underneath.
Tip: I found sanding the rivets once the embossed panels were on the vignette box was easier as it’s a rigid surface to sand and you just catch the raised rivets without sanding the rest.
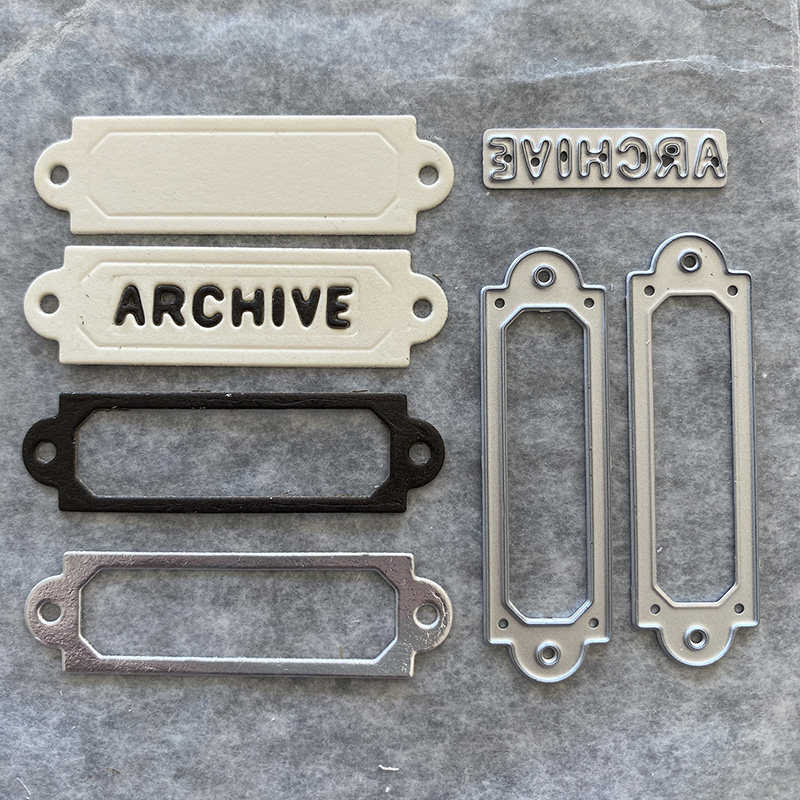
I die cut idea-ology silver metallic kraft stock, black kraft stock and mixed media heavystock using the label frame and tiny word dies from the Specimen set. Layering them up to create a thicker label frame for the front of the specimen box. (ignore the word “Archive,” this was just to show what layers I used).
I added mica tile under the top label piece and used idea-ology long fasteners through the holes and secured at the back and added the label frame to the front panel of the vignette box with distress collage medium.
Using the idea-ology vignette hardware set, I added a hook and an idea-ology hook clasp to the corner of the vignette box.
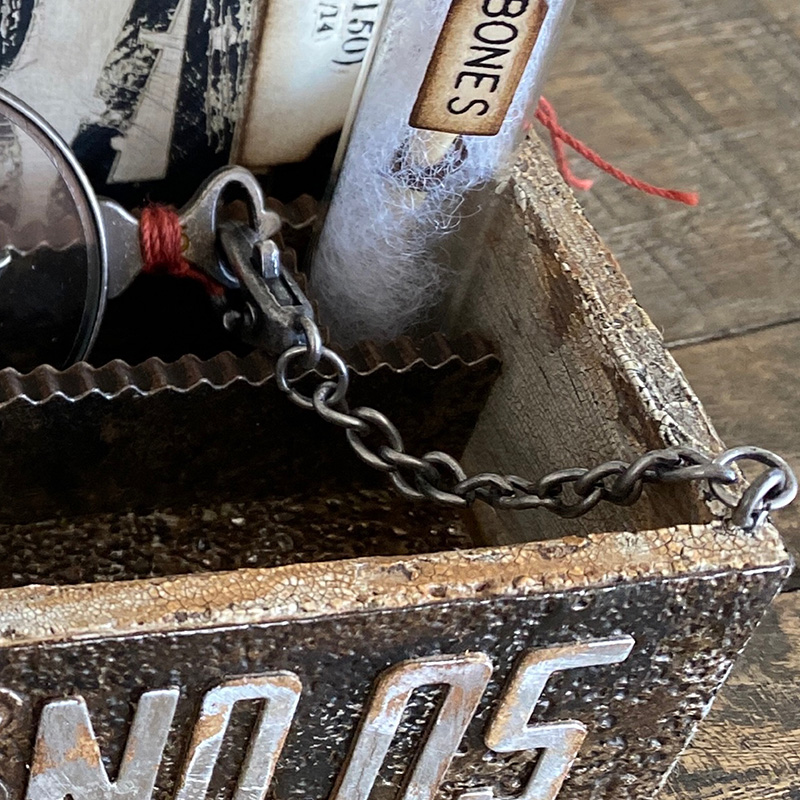
Does anyone remember the tools you would get at the science museum interactive exhibits that would be attached by chain so they wouldn’t be removed? That gave me the idea to use the hook clasp to attach the idea-ology optical lens to the specimen box.
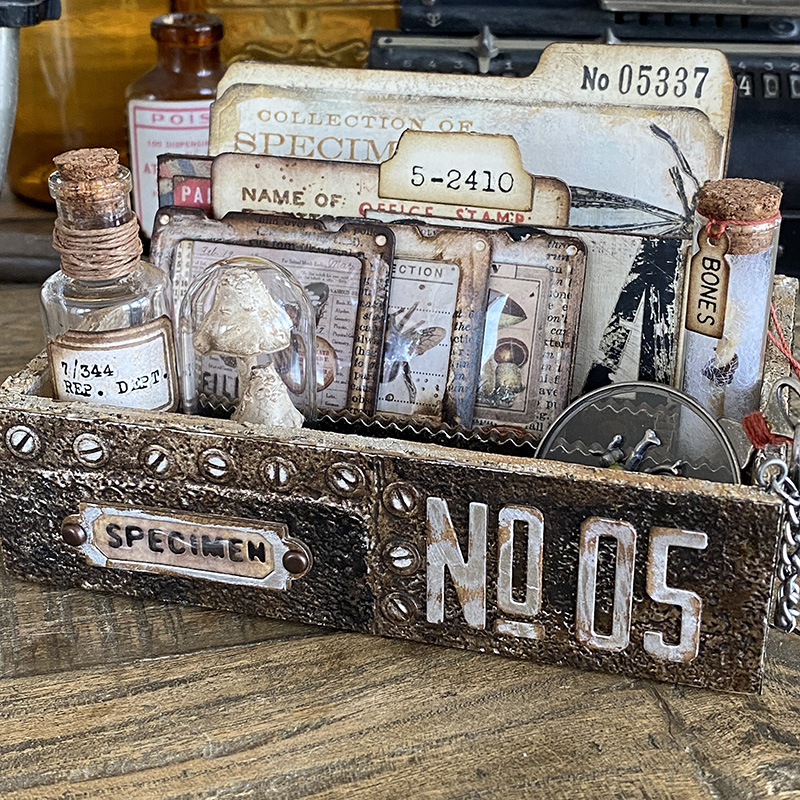
Now your box is ready to fill…
I’ll be sharing the contents of this specimen box on my blog tomorrow, I hope you can stop by and take a look. If you have any questions, leave them in comments and I’ll do my best to reply.
Zoe
…
affiliate links used at no cost to you


This is genius Zoe, looking forward to tomorrow’s blog post (while I’m waiting for my dies 😂)
As always, thanks for sharing
Chris 🤗
Fantastic make and description on how to achieve this beautiful industrial look! I love the tips that you have put in for everyone, so very helpful! Looking forward to more blog posts on this awesome make. Yes, it is my favorite! Well done my friend!
Our store received it’s dies, so I have mine now…yippee!!! Have to squeeze out some time to play…love all the texture from the crackle paste as well and that amazing 3D Folder…Looking forward to all the bits and pieces that make up the inside….
you’re right, best collection ever. works with everything. love you box and how you did the embossing. just received my order so now time to play, will be watching for tomorrow’s post. thanks as always for sharing and all the inspiration.
This is just stunning
What an amazing project! My dies and embossing folders got here yesterday. I cannot wait to try this project. Thank you so much!
Thanks for sharing, great techniques 😎
Love it! Waiting for my dies to arrive and look forward to seeing all the gorgeous makes!
[…] the contents of the specimen box I made for the Tim Holtz Chapter 3 LIVE launch which I shared in a separate post. You can see the LIVE launch replay and maker inspiration over on Tim’s […]
Thanks, Zoe! You always do such a wonderful job with your makes. I got my stuff yesterday and can’t wait to get into making with it. Your posts are so inspirational to me. I appreciate all your effort.
You’re right, that was a mind-blowing release – but one of the most humble items, but most useful for me is the long plates for the Sidekick. I loved your box and will make something similar. I especially like that you used the box horizontally, and the creative use of Etcetera trims. Thank you Zoe.
Oh my goodnes Zoe, I adore everything you do. This is fabulous! I wish I had your creative brain!! 🤩✨💜
So stunning what you made Zoe!
I also think this is the best chapter Tim made.
Thank you so much for your awesome tutorial, stay safe
and have a wonderful day.