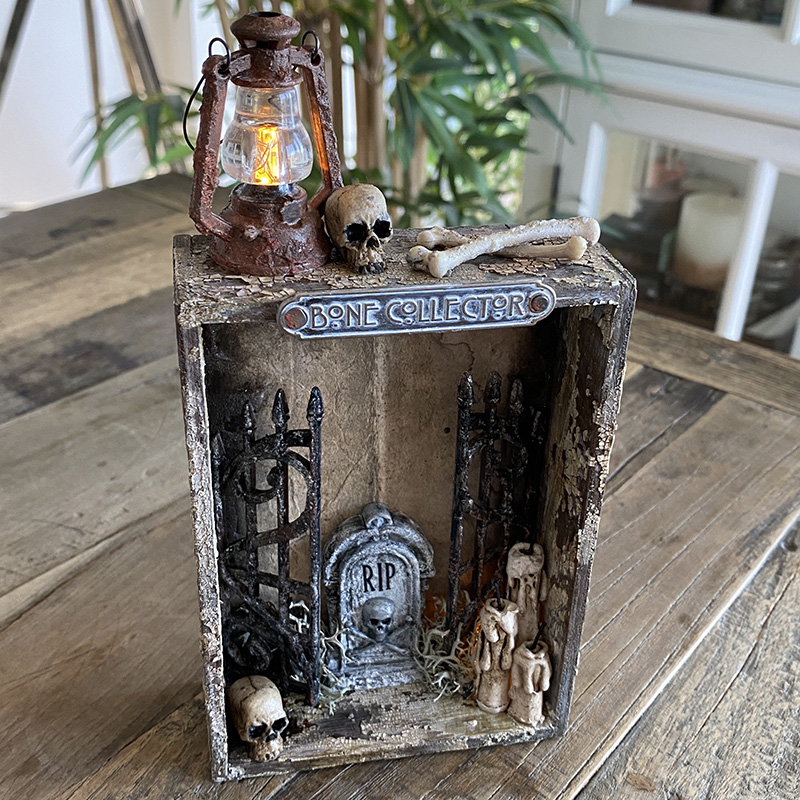
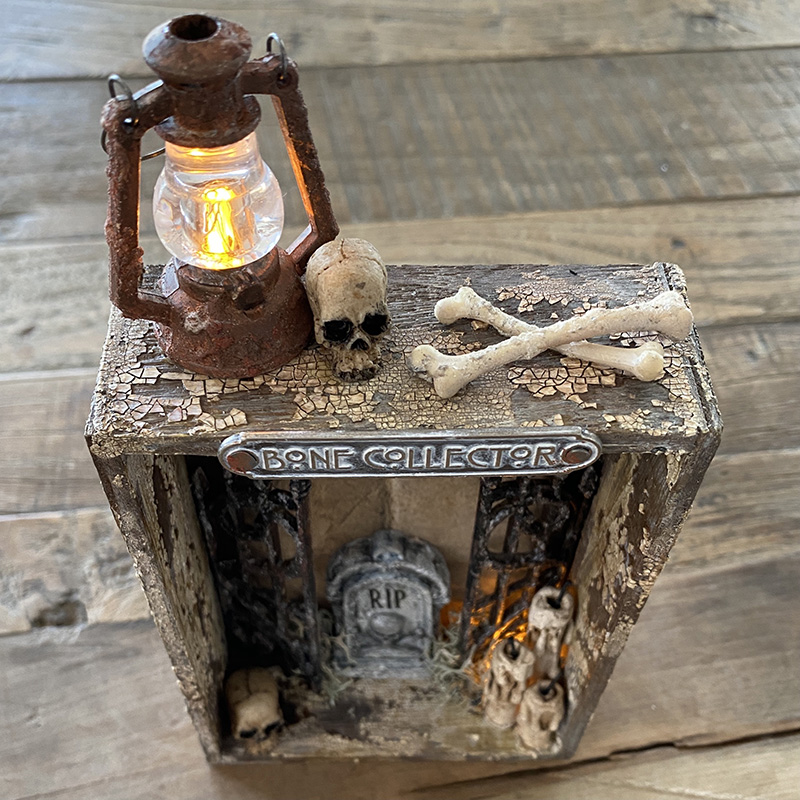
Hello friends. Sill with me on this Halloween train? Day 3 and it’s getting dark… Fortunately the new idea-ology lantern has thrown some light on the situation. If you want to see the AWESOME (I’m still happy dancing over how freaking good it is), Halloween idea-ology, head over to Halloween Town on Tim Holtz Blog… beware the grave digger!
I know that because of the global shipping situation, seasonal products are still arriving. There is no reason for you not to use and enjoy them now, next month, next year! I made this in July when it was 90 degrees and nothing like Halloween outside. Remember, the creativity is in you, not in the season! Makers gonna make! 😉
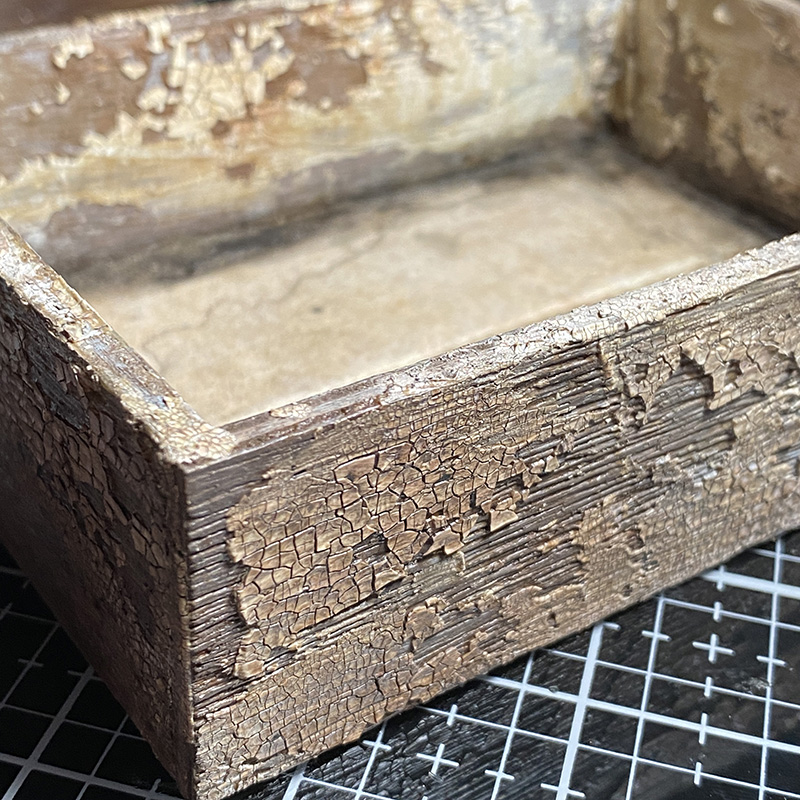
Take the largest vignette box from the idea-ology vignette box pack and cover with a watered down layer of frayed burlap distress paint. Once dry, cover in distress crackle texture paste and set aside to dry and crack. Spray with antique linen and frayed burlap distress oxide sprays and once dry cover with a layer of vintage distress collage medium.
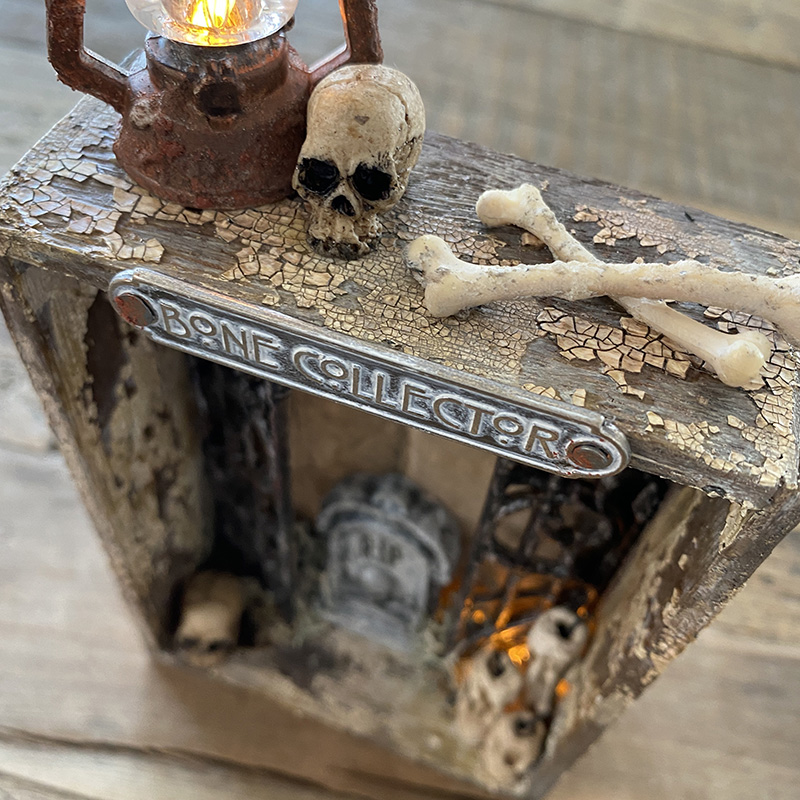
I covered a halloween word plaque with picket fence distress crayon and mounted with stakes from the idea-0l0gy vignette hardware pack which I hammered in! I actually added this last so I was hammering very very carefully!! I LOVE the maker adrenaline rush!
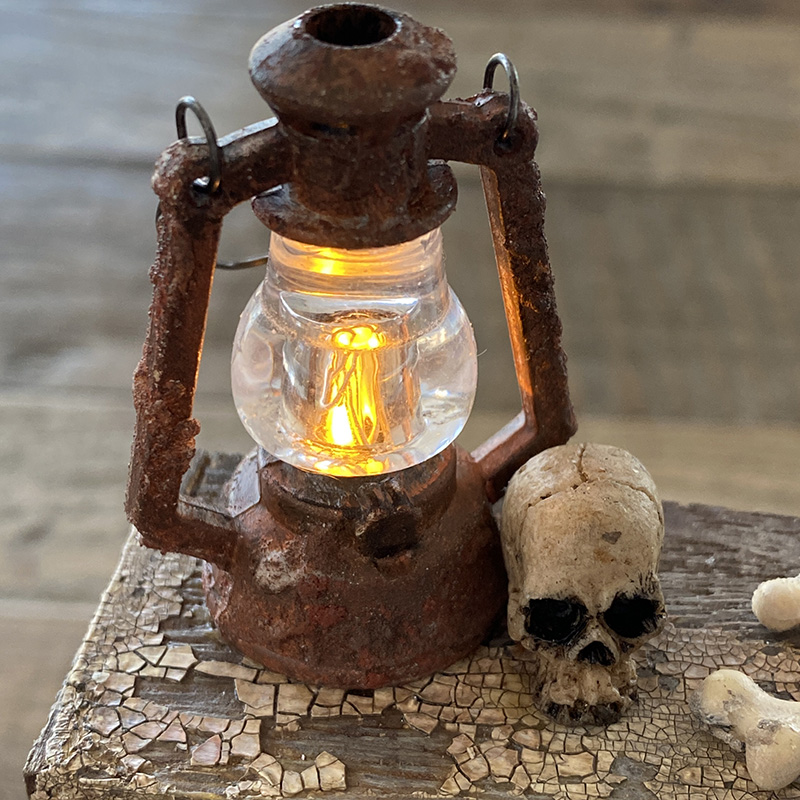
The new idea-ology lantern was one of those products that made me gasp when Tim showed it to us all during the makers call. Of course I had to rust mine up using the usual suspects… distress grit-paste, crackling campfire and ground espresso distress paint and distress crayons.
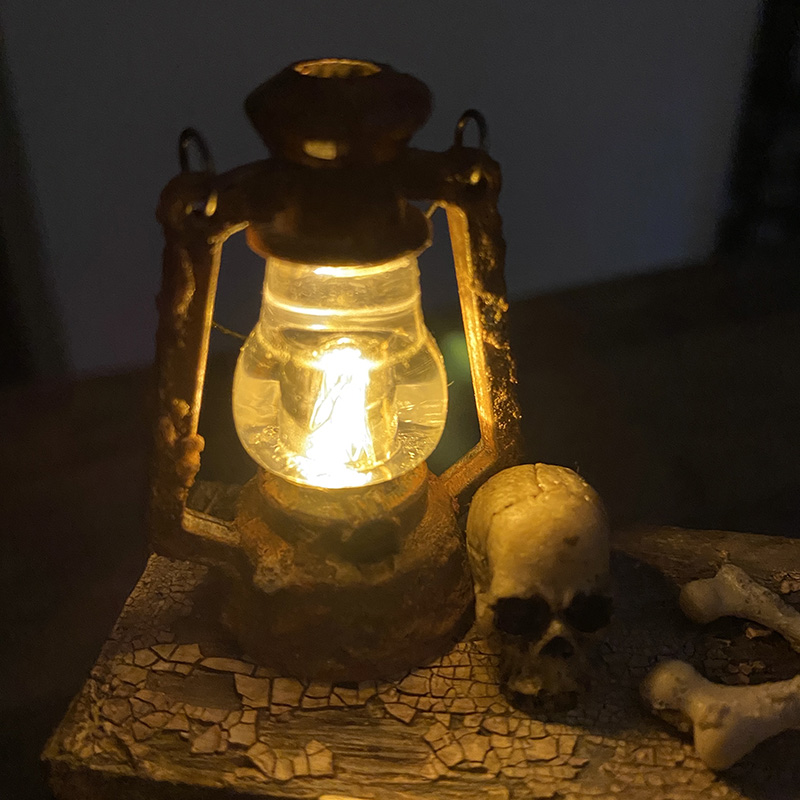
The lantern has a notch in the back for the tiny light wires to fit under. I only used 2 lights in the lantern so ran the lights down the back of the vignette box and in through a hole I drilled in the back near the base to light the inside. Tim showed how to put the tiny lights into the lantern during the LIVE. To see it, skip forward to the 57 minute mark.

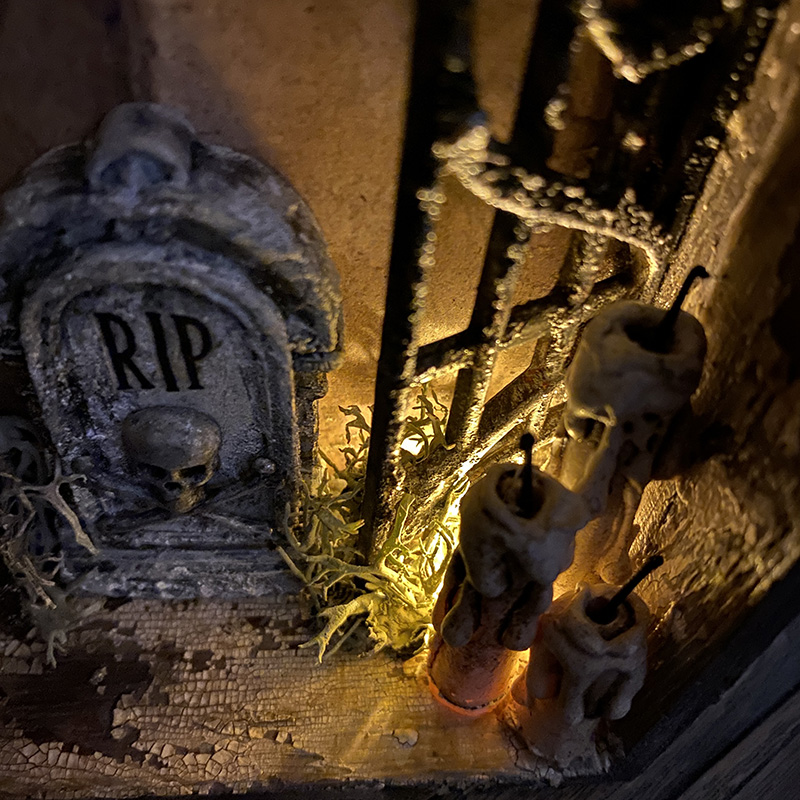
I wanted to grunge up the new halloween ornate metal gates. I covered with a layer of distress grit-paste (not pictured) and once dry, added crackling campfire distress paint and then ground espresso distress paint, drying between layers. Finally I added a little luster wax from Sizzix which they kindly sent me to try. I like it, but I’m going to be honest, they added an orange smell and I hate it, but I wanted to give it a go and it added something to the weathered gate effect. I added a layer of black gesso over the top and rubbed off in places.
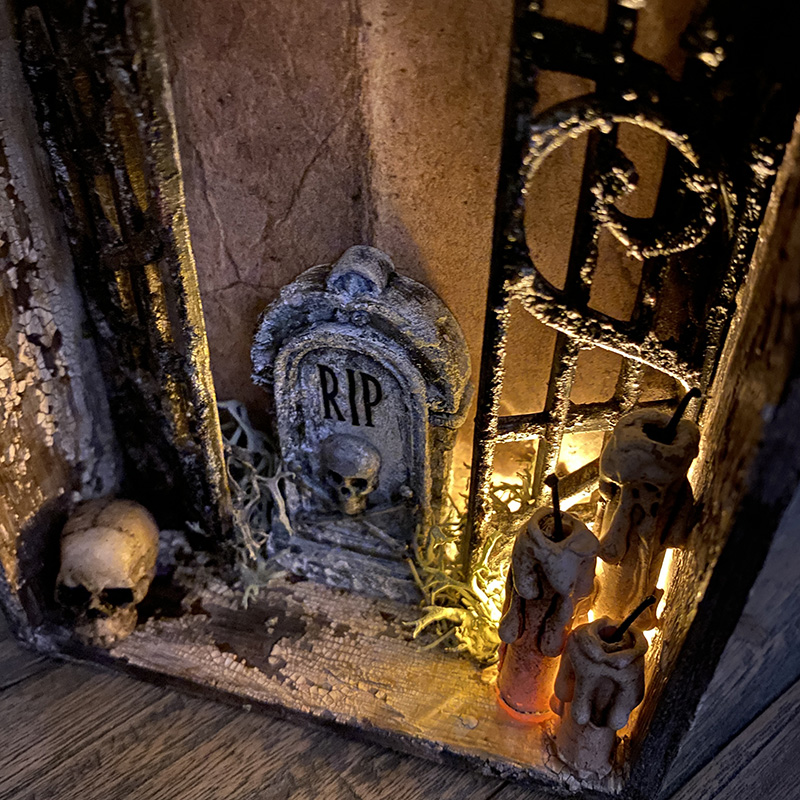
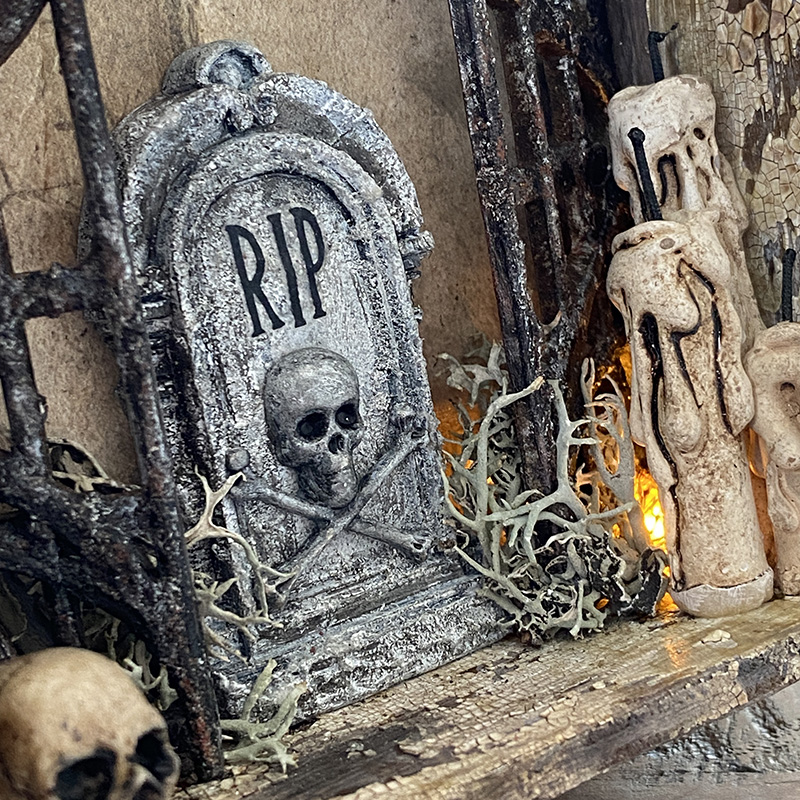
I mounted the gates using distress collage medium. Don’t use too much and walk away and let it dry. DO NOT WIGGLE TO SEE IF IT’S STUCK DOWN! LOL You can see the extra tiny lights that I fed in through the back of the vignette. I used some mummy cloth soaked in frayed burlap distress oxide spray and creepy moss to hide the lights and wire. They gave a nice glow to the idea-ology drippy candles that I added. I LOVE THESE! I desperately hope they come back next year.
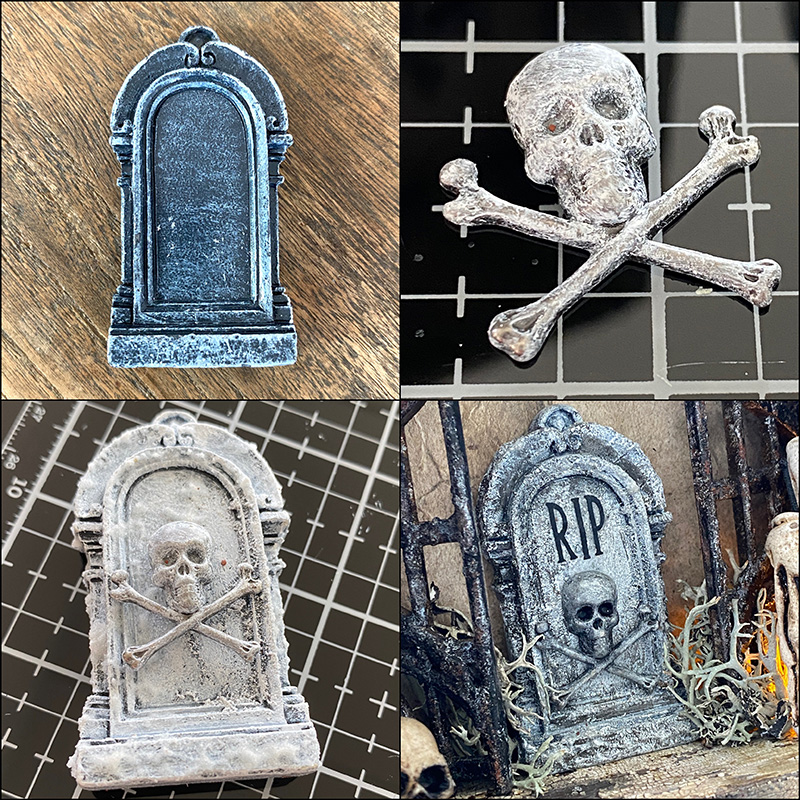
I altered one of the new idea-ology tombstones and I was really pleased with the result. I covered a tombstone and skull from the skulls and spiders adornments kit with white gesso and once dry with distress opaque grit-paste. I glued the skull to the tombstone, it fits like it was made to! So clever Tim!! I painted all over with hickory smoke distress paint. Dried and added cypt paste and dry brushed parts with black gesso. Once dry, I repeated this with white gesso.
Beginner Tip: Dry brushing is an almost dry paint free brush. Add a little paint to a dry paint brush and remove the excess with a paper towel. Repeat, building the colour slowly to add highlight but not a thick layer of paint.
I added black gesso to the skull eye sockets and nose and rubbed on some retired remnant rubs. You could add small die cut letters or cut vinyl and add that. Another option is to stamp on plain collage paper and add with collage medium. If you don’t have something, improvise, that’s always the fun and creative part for me.
Thanks for stopping by and let me know if you have any questions.
Zoe
…
affiliate links used at no cost to you


Thanks Zoe I am loving your mega Halloween week and learning so much.
LOVE LOVE LOVE!!! blown out of the park again!
This is absolutely fantastic Zoe! Thank you so much for showing us.
Keep it going, I am right with you….still making on my Halloween makes and will for a while…still have product coming…like you said…with the way things went with this fabulous release, some product is just now making it into the hands of the #makers gonna make….love Halloween!
You are the queen of grunge Zoe! Love your tutorial especially the Beginner Tip on dry brushing😊
My only question is the remnant rubs in the skull eye sockets – is that the eyeballs I can see in there? I tried to zoom in as much as I could…
The gravedigger is such a cool, scary, grungy make! I absolutely love it!
Still waiting for some of the Halloween ideaology to arrive at my local craft store up here in Canada but some has arrived and it is so cool! I may or may not have bought 3 lanterns! 😉😉
Such a creepy cool project!! Love it and thank you for your creative process tutorial. It really is one of my favourites Zoe!!
Thanks for keeping on with Halloween. I think many of us received our products so late that we still want to play! Keep ’em coming1
Zoe, I have loved all of your projects so much. Halloween is loved by my family. Your projects are so inspiring, thanks so much for sharing your talent.
This is fantastic! I love it! Nicely done!
Thanks for all the inspiration. YES, I am still making Halloween projects, especially because I love Tim’s pieces this year. Made two vignettes for family members and had enough product left for my own (current project.) So much fun. I can’t thank you enough for all the details on creating this spooky look. It’s new to me so I appreciate all your steps.
I would be thrilled to have Halloween makes all year 🤣! Love your makes so much! Thanks for sharing ❤️
You are awesome! Beautiful make, so much detail and inspiration, thank you thank you thank you 😍
Another stunning Haloween piece Zoe.
Thank you so much for sharing,
stay safe and have a wonderful day.
Wonderful! Spooky & grungy!
I LOVE your mini drippy candles! Did you make them, or buy them? If you made them, how did you do it? They are awesome.
Couldn’t agree with you more about making when the inspiration and time allow and not waiting on the “season”. Now that is “top shelf” gungy, peeling away, paint on the box. WOWZERS!!! Love it!