Hello Friends! I’ve finally got myself organized and have a walk through of the brickwork backgrounds I’ve been using for my makes recently.
The Tim Holtz Sizzix Brickwork 3D embossing folder is incredibly detailed and does all of the heavy lifting when creating brickwork from paper. It’s the brick pitting detail that makes it look like it should be rough to the touch when it’s not.
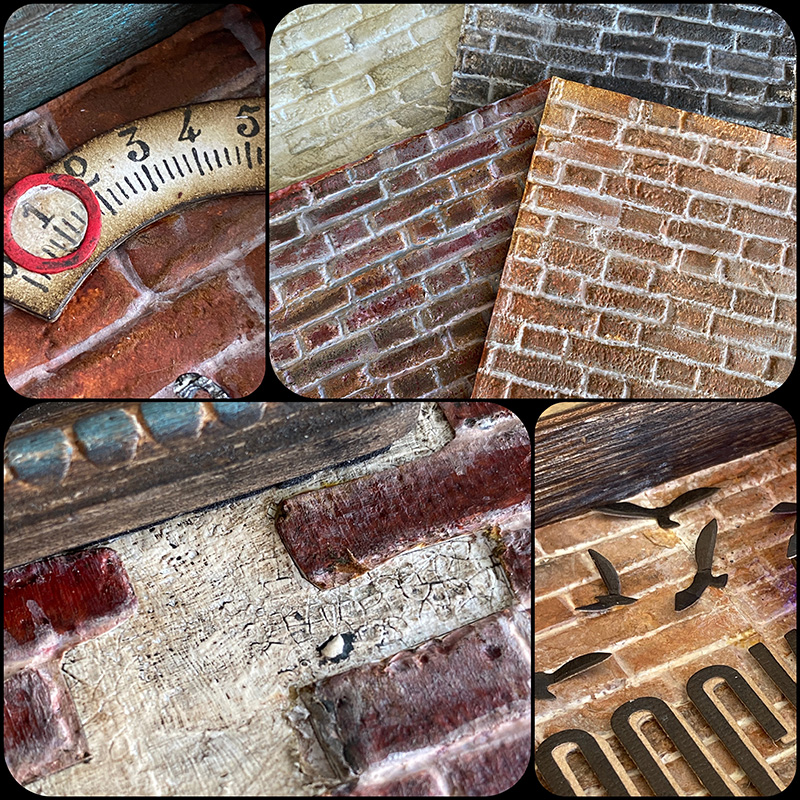
Above are a few examples of brickwork used in my makes. For the walk through I haven’t listed specific colours, but if you scroll down there are some different brickwork combinations with colours listed to get you started, but first, let’s get into how to make your own…
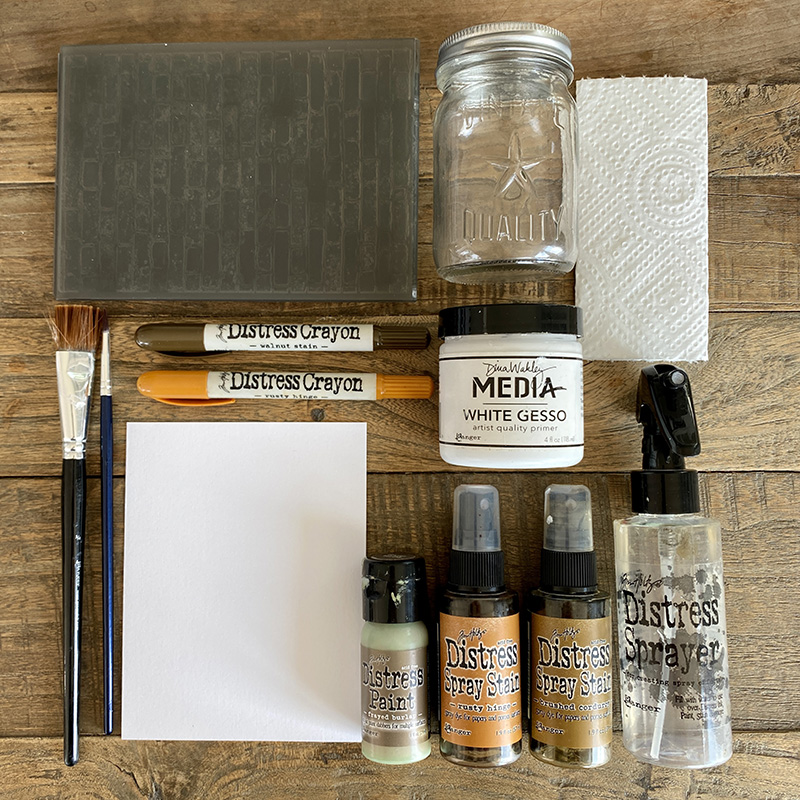
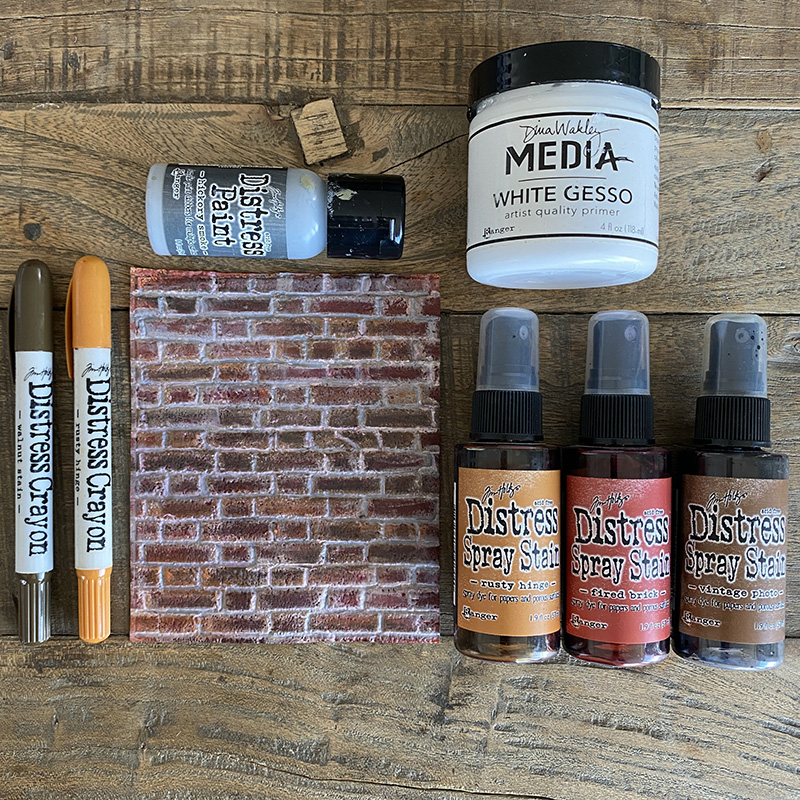
Gather these supplies: distress watercolor cardstock, brickwork 3D embossing folder, jar of water, paper towel, white gesso, distress water sprayer bottle, large and detail paint brushes, distress crayons, distress paint and distress sprays.
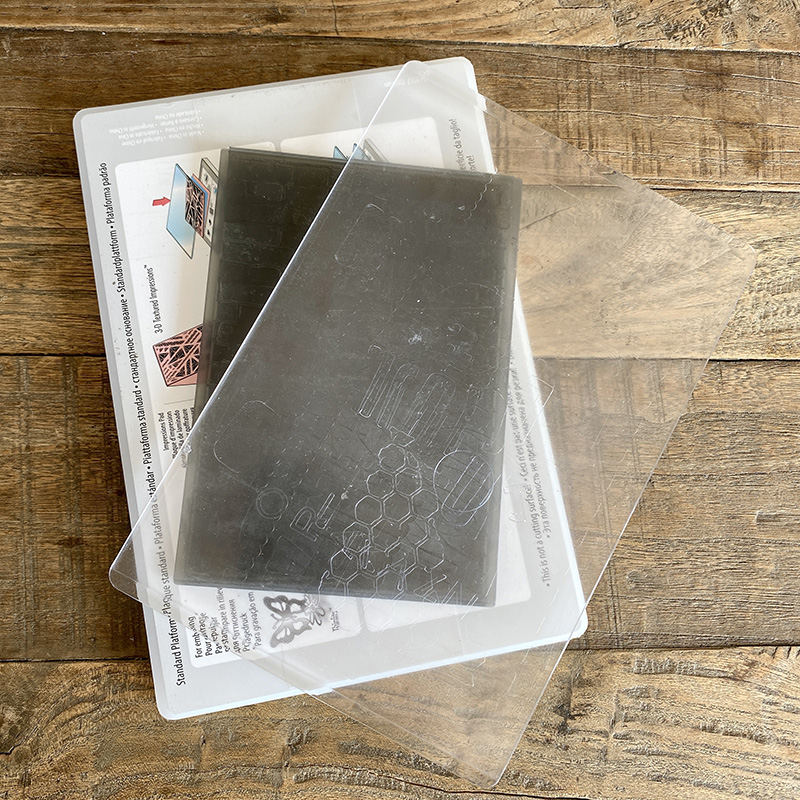
Emboss distress watercolor cardstock with the 3D brickwork embossing folder. You only need your base platform and one cutting plate when running 3D embossing folders through your Sizzix machine. Lightly mist your cardstock and then roll your embossing folder through 3 times. Remember 3D – 3 passes.
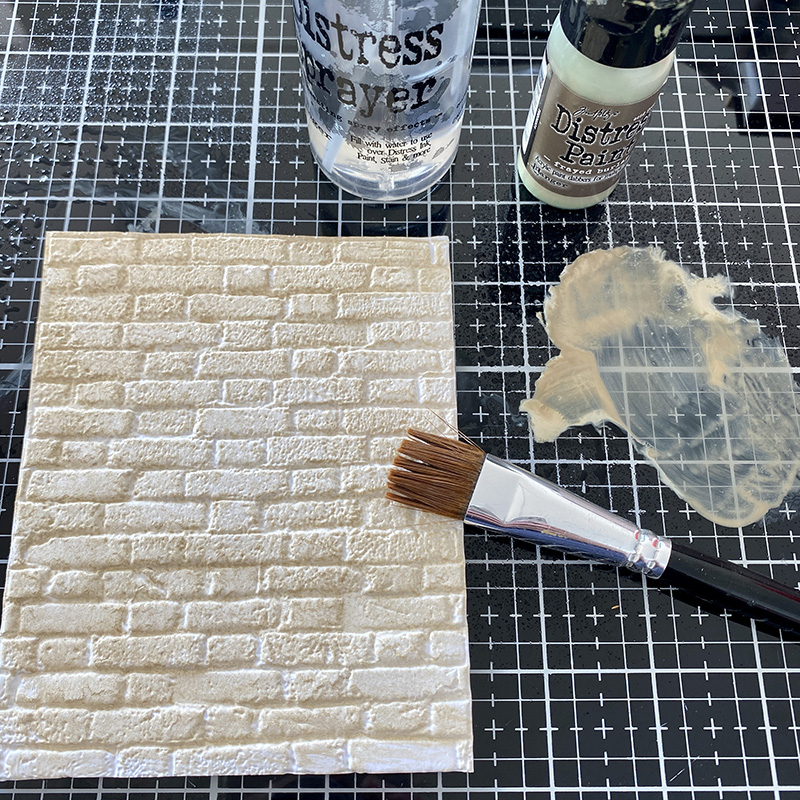
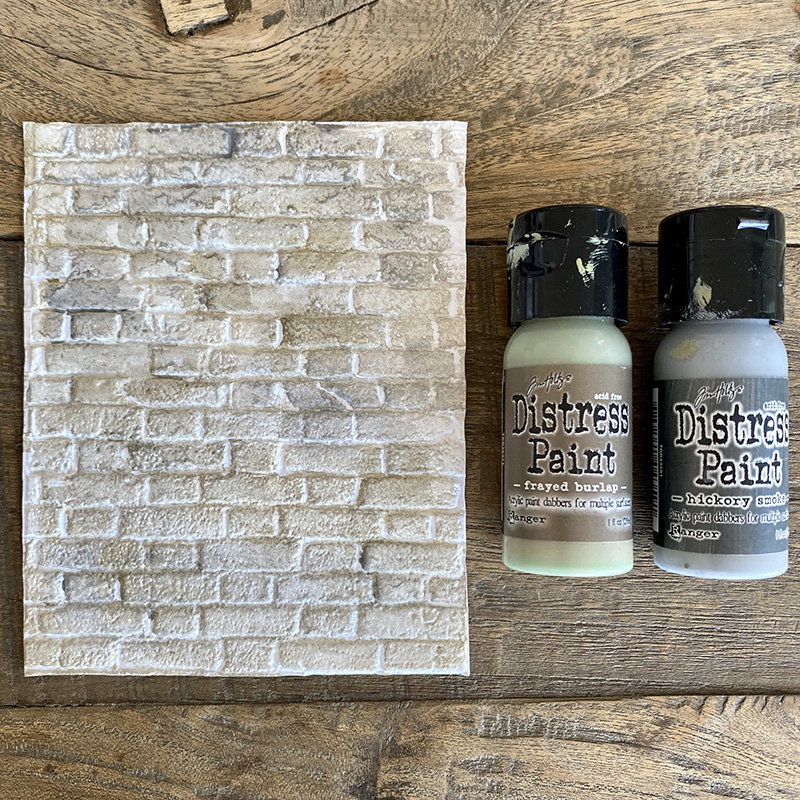
Make a paint wash with distress paint and water and paint over the embossed brickwork background and set aside to dry.
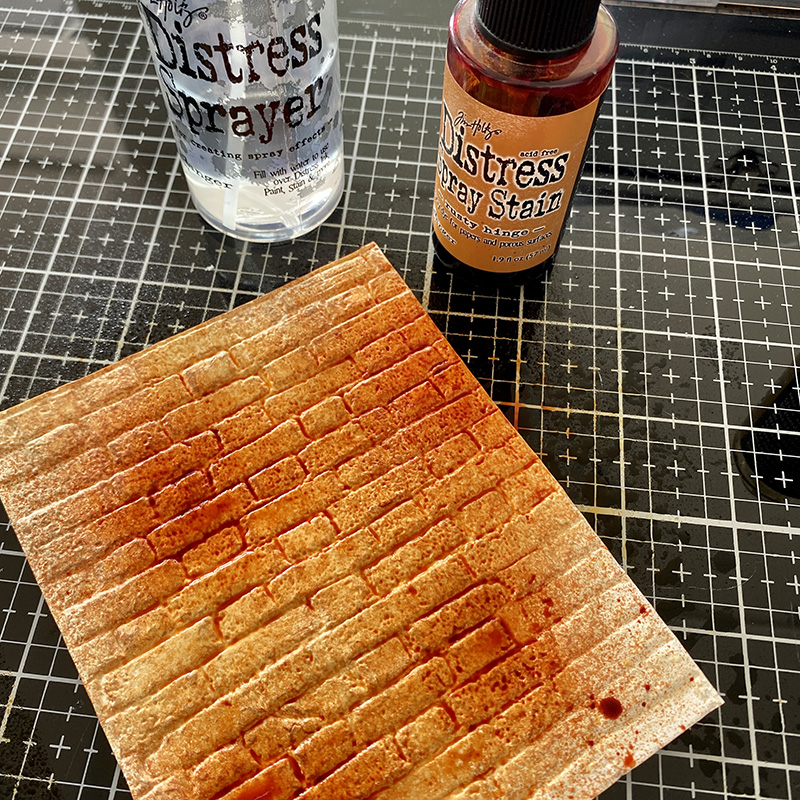
Give the background a light mist and spray with distress spray and dry with a heat tool.
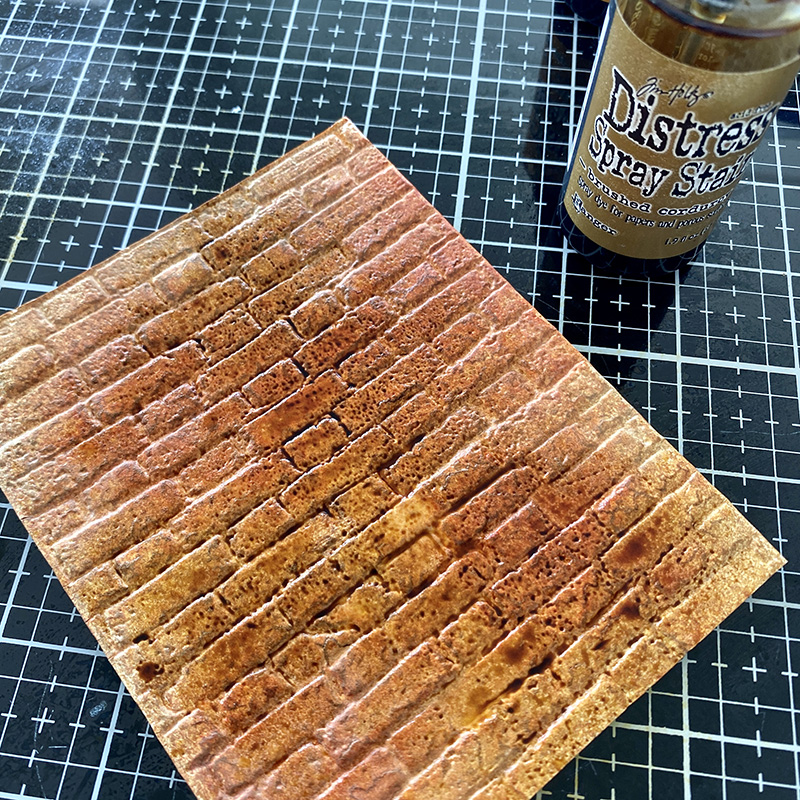
Give the background a light mist and spray with another distress spray and dry with a heat tool.
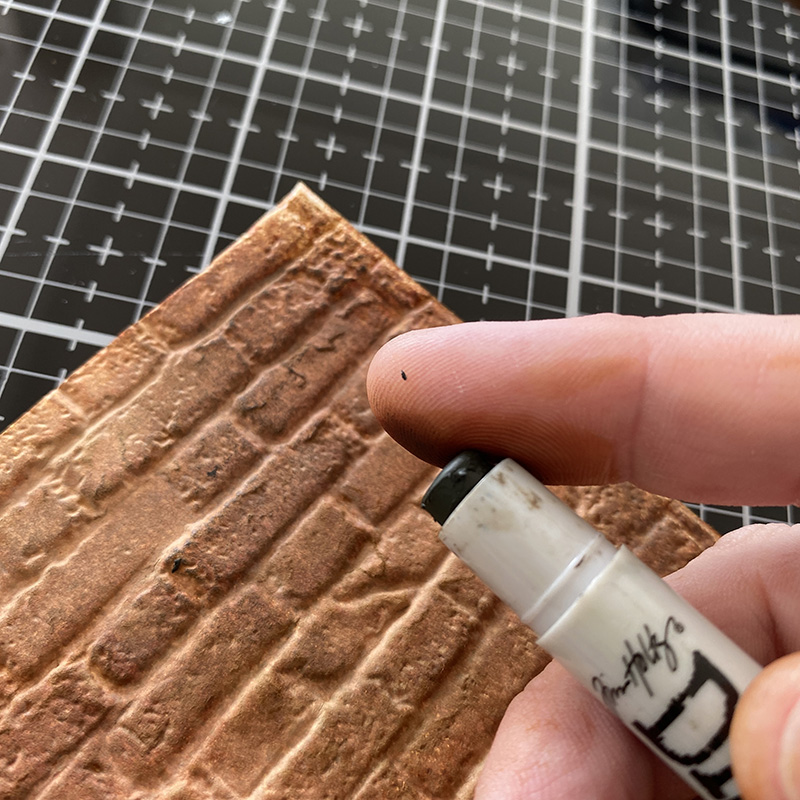
Rub distress crayon onto your finger and rub over portions of the brickwork. Dry with a heat tool.
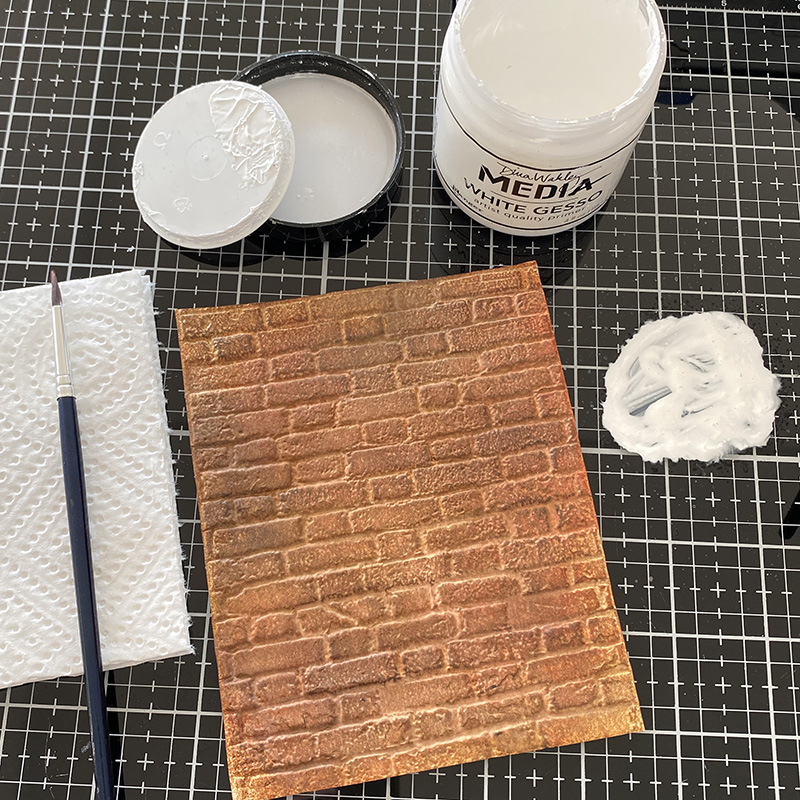
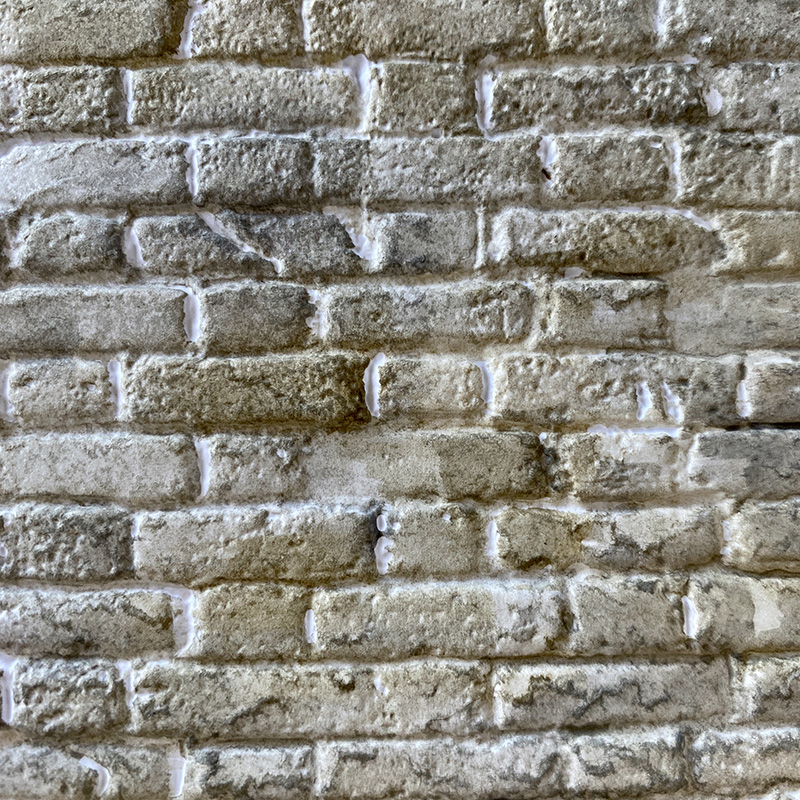
Once the background is dry, really dry. Go ahead and dry it once more just to be sure and gather white gesso, water spray bottle, detail paint brush and paper towel. Put a little gesso onto your glass media mat or non stick craft mat and add a little water and mix.
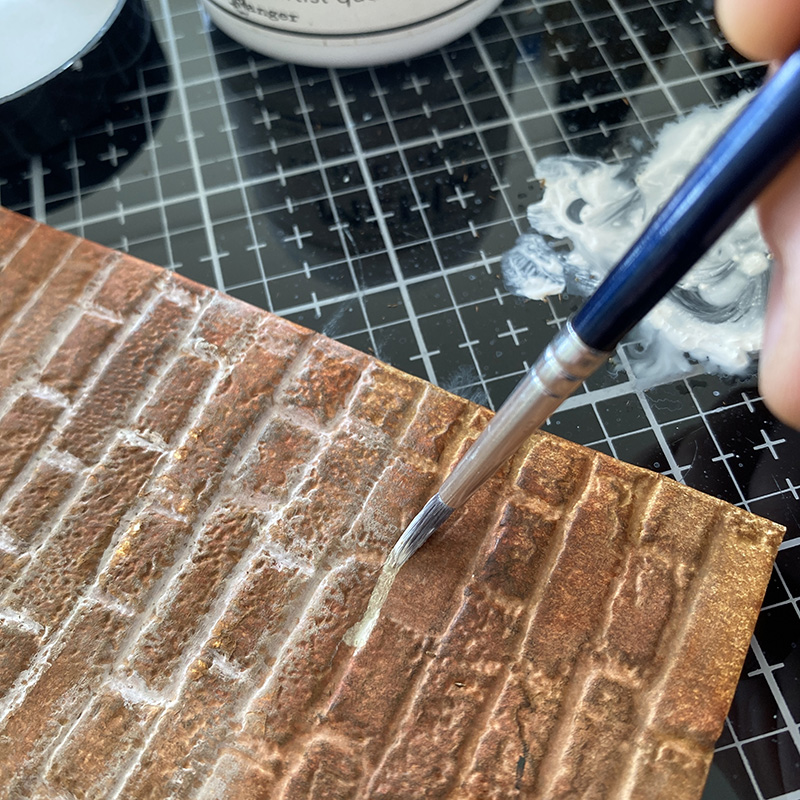
Paint lines of gesso into the grooves of the brickwork and then gently rub with your finger. Between each line dip your brush in water to clean and dry with the paper towel. You are getting rid of any crayon or ink your brush picks up before dipping it back into your gesso puddle. If you don’t do this, you will end up with orange gesso. Dry the brush between each line so the gesso is not too wet as it will reduce the amount of ink and crayon you pick up. Don’t worry about going over the lines, it works for you here. Have a second pass if you need to, but dry first. A little practice goes a long way.
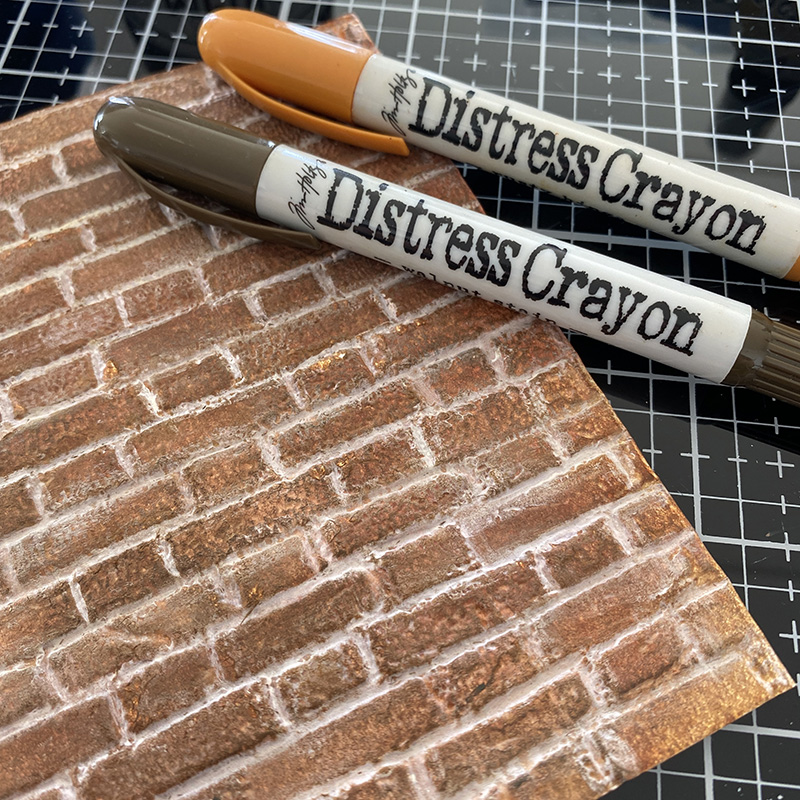
Once finished, dry dry dry and the use a finger to add distress crayon to random bricks to create the imperfection of real bricks.
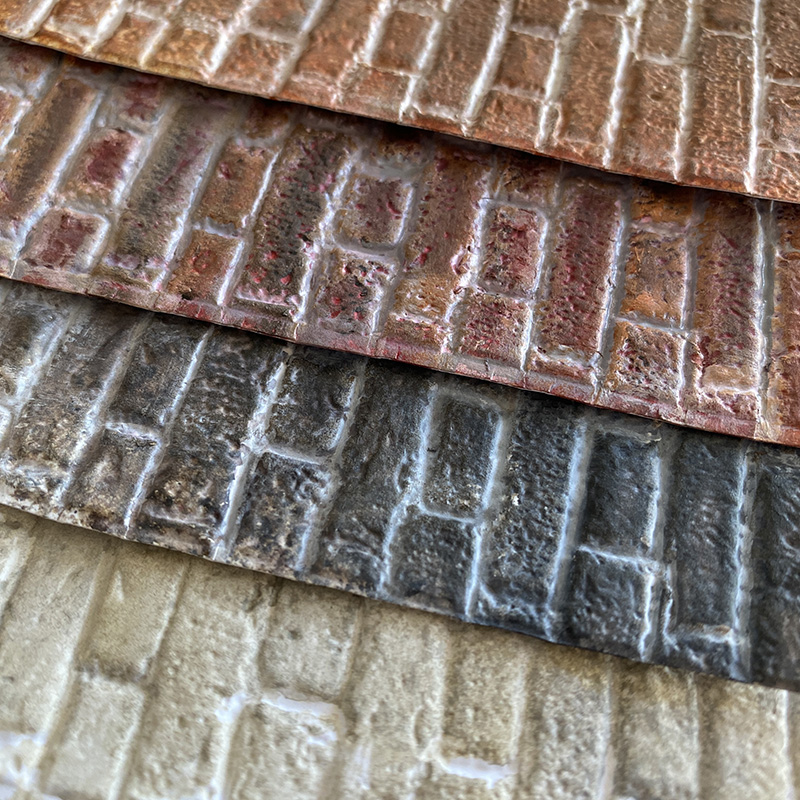
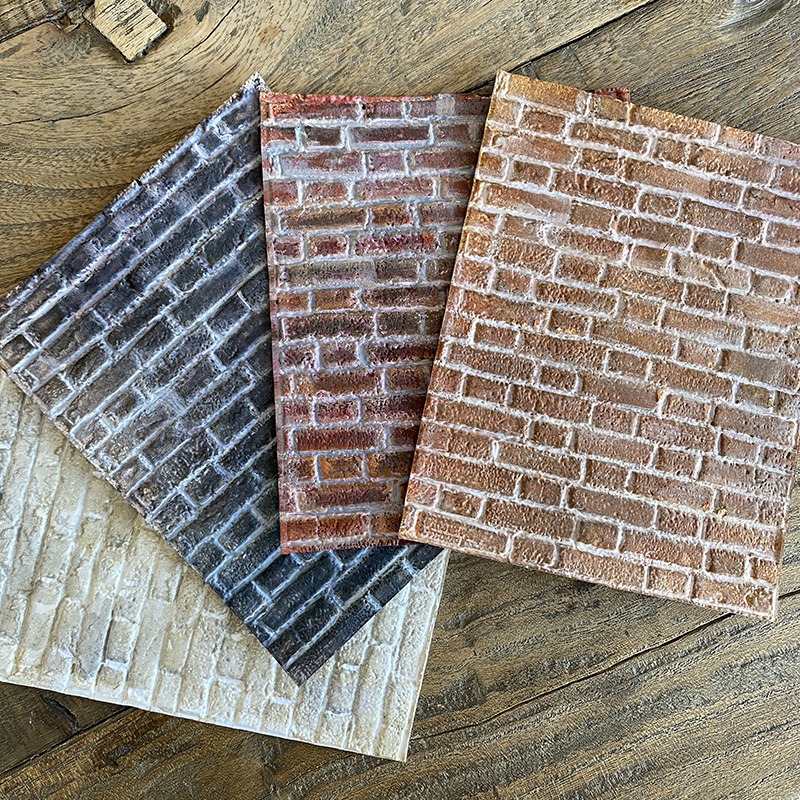
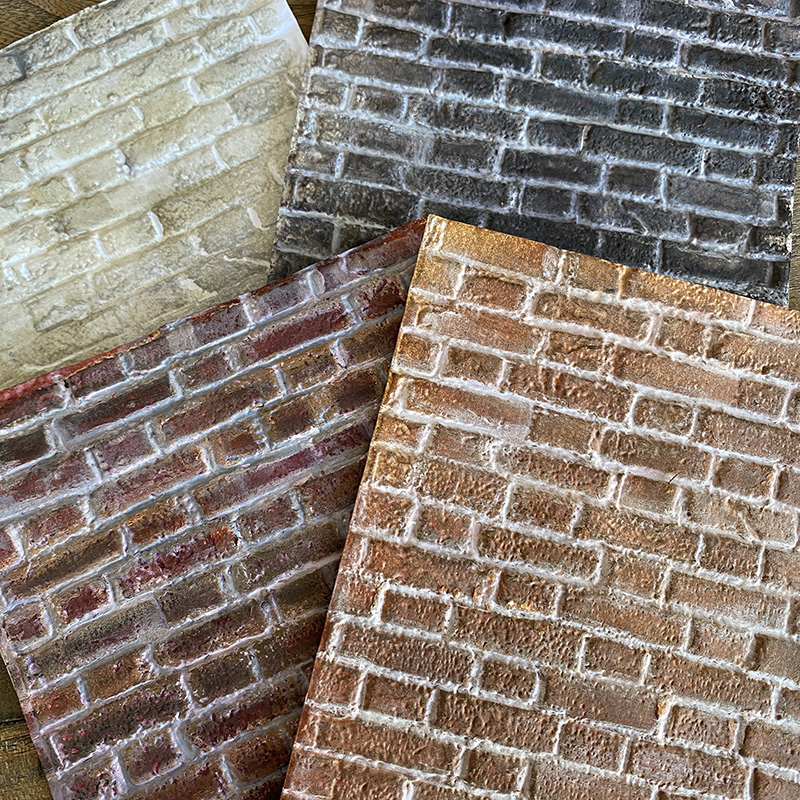
Here are some other combinations for different brickwork…
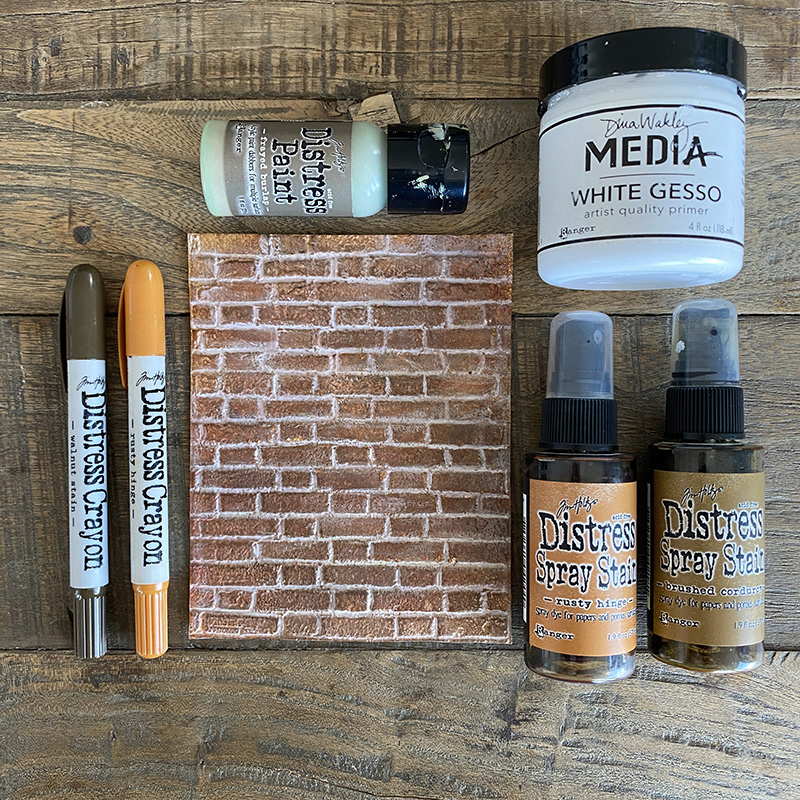
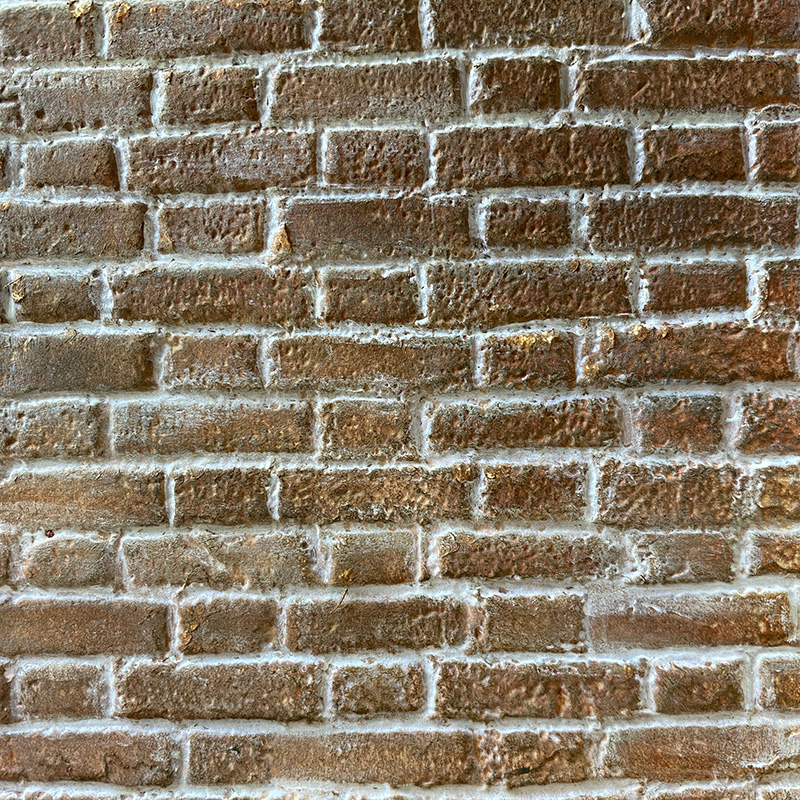
COMBINATION #1: frayed burlap distress paint, rusty hinge + brushed corduroy distress spray stains, rusty hinge + walnut stain distress crayon, white gesso
COMBINATION #1
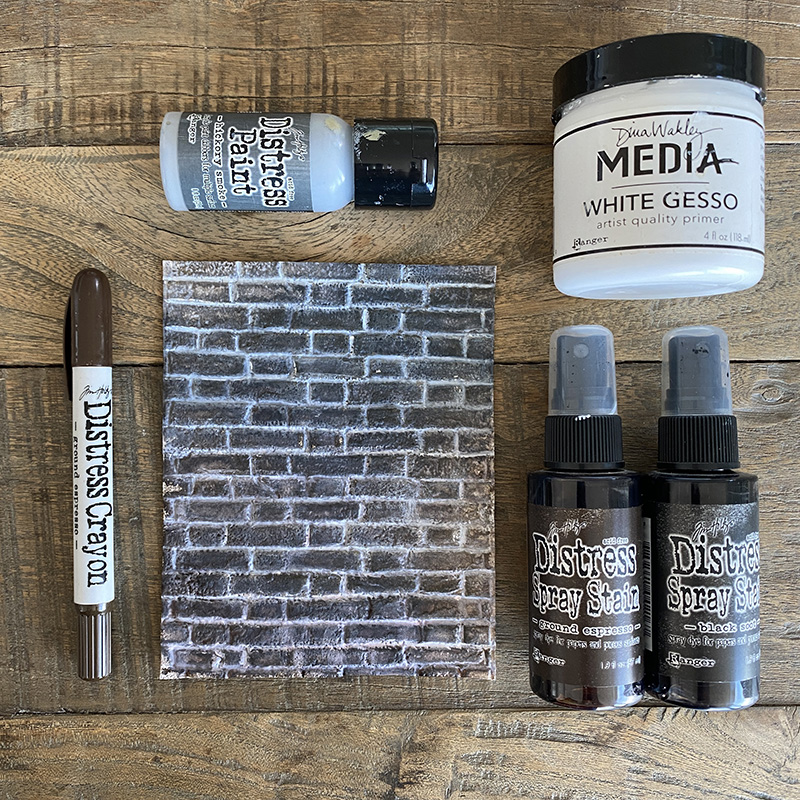
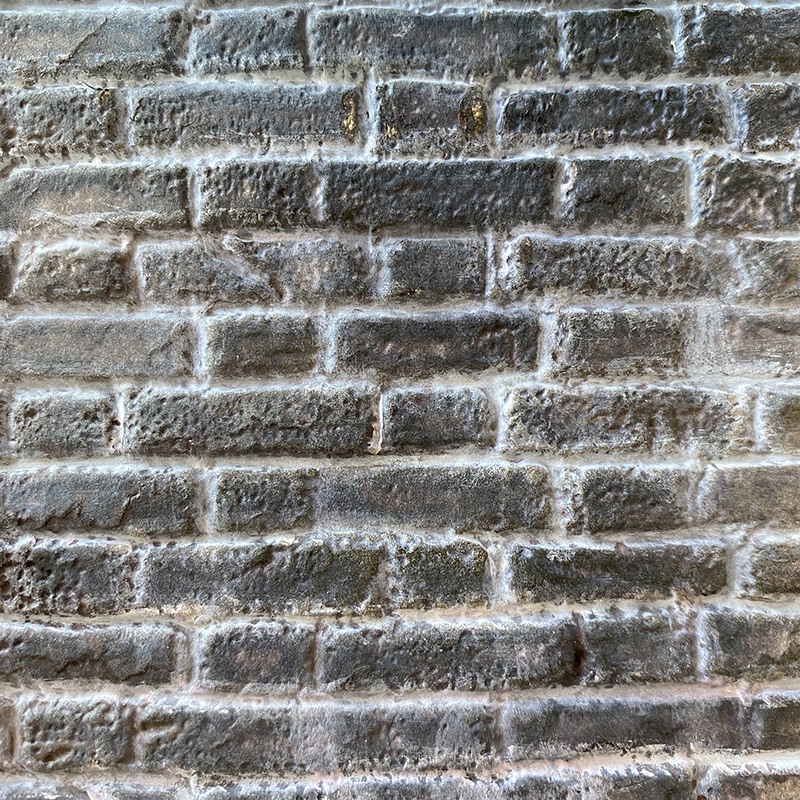
COMBINATION #2: hickory smoke distress paint, ground espresso + black soot distress spray stains, ground espresso distress crayon, white gesso
COMBINATION #2
COMBINATION #3: hickory smoke distress paint, rusty hinge + fired brick + vintage photo distress spray stains, rusty hinge + walnut stain distress crayons, white gesso

COMBINATION #3
COMBINATION #4: frayed burlap + hickory smoke distress paint
This is the easiest combination and does not require gesso and works great behind flowers as a garden wall.
COMBINATION #4
Thanks for stopping by. I’ll be back soon to share a couple of makes using this brickwork. I encourage you to experiment with other combinations. Try embossing small strips of cardstock to make brickwork swatches…
Zoe
…
The products used to create this project are listed below. Thank you for supporting me by using my affiliate links to shop, at no cost to you. I really appreciate it.


Fantastic work! Thanks for shering!
Zoe, this is amazing but in general, I just love everything you create!
Just beautiful 😍
oh my goodness. They look so real! Thanks for sharing.
The white lines, that’s why mine never looked right! Thank you for the tutorial 👍🏼
Zoe,
Your bricks are amazing and really do look real in all your projects. I love seeing all your makes. Thanks for always sharing.
Thanks so much for the step by step tutorial, Zoe! Really looking forward to getting this embossing folder soon and having a go. 🧱
Zoe, this is so brilliant and impressing!! Thank you so much for sharing and helping us all to make our own walls!
Big hugs from HirschEngelchen
Anka
Thank you Zoe, you are a “bricks wall queen”. You are very kind to share with us your technique.
Beautiful brickwork!!! Thanks for the tutorial!
Wow Zoe!! Thanks for the tutorial. This embossing folder is the one that I definitely need; so many uses. I was struggling (in my mind) on how to get the look of brickwork for an idea that I’ve had. Thank so much!
Thanks for sharing Zoe, I need to make up a batch of these to pull out when I need a little texture. I always love it in your projects
A fabulous tutorial Zoe, the white pointing really does make the bricks stand out! xxx
Thank you Zoe! You are an inspiration!!!
Thank you so much for sharing! You’re always very inspiring, especially to a beginner like me! God bless you!
My STARS!!! No one rocks the brickwork, like you, Zoe…and my hubby is a mason!!! 👏🏻👏🏻👏🏻
Love the brick work and you are so talented at making it look so real. Great project Zoe!!! Love your stuff!! 🙂
Absolutely amazing! Thank you for sharing everyone in my family is getting brick backed cards from me this year 😂
Wowzers, they look so real…thanks for the step outs and all the color combinations to get started…swatches are a fabulous idea…practice, practice, practice….LOL…love it!!!
Brilliant! Thanks for sharing, will definitely try your technique!
Love the realism of your brickwork! I’m definitely going to try your technique! Thanks again for sharing!
Zoe, Thank You so much for this tutorial. I just love your art work and always look forward to seeing what you come up next with.
This is such a fabulous post. Thank you for all the details and info!
These are great Zoe! Thanks so much for sharing your tutorial and making it easier.
Thank you Zoe! I love your sense of detail. Your blogs are very easy to understand.
This is soooooo helpful. Ty
This is awesome! Thanks for sharing!
Beautiful! Thanks for the tutorial! It looks so real!
Great turtorial, thanks for sharing👏🏻
Wow! Just wow! I can’t wait to try this! You make it look easy, but I’m sure it’s not! I’m just now tiptoeing into grunge;)
These are fabulous- thank you for sharing your technique
I see a background brick bender coming on. Thank you so much for the tutorial
This is a wonderful tutorial. Thank you for explaining in detail ❤️❤️
Thank you! Fir sharing your secrets! Can’t wait to make!
thanks so much for the tutorial. I never did the gesso part and that makes all the difference. I’m so happy to know now.
These are amazing. Thank you so much for sharing your technique with us
Thank you so much for sharing this with us! They’re so amazing!
This is such a fabulous tutorial and so much detail we can all follow easily … thank you so much for sharing with us!
Fabulous brick work Zoe
Thanks for a great tutorial
These are so awesome! They look real! Thank you so much for the wonderful tutorial!
Thanks so much for the tutorials. I love your artistry
Thanks for the Tutorial. Your brickwork is amazing! Wish I could put it on my house!!!! (guess I will have to settle for faux houses) Thank you so much.
Great tutorial. Thanks!
Perfection! Thanks for the tutorial, I can only hope my attempt will look as good!
Thanks so much for the tutorial. Your bricks are super realistic!
WOW! Thanks for sharing.
So beautiful Zoe! Thanks for sharing your awesome ideas. Your makes are gorgeous.
[…] want to say a big thank you for the amazing response and kind comments on my brickwork post. I hope you’ll try it out and I can’t wait to see all the different combinations you […]
Fantastic as all your works are! Thank you for the how to ! ❤️❤️❤️
Great tutorial!