I am VERY excited to share a guest blog post that I have over at Ranger Ink.
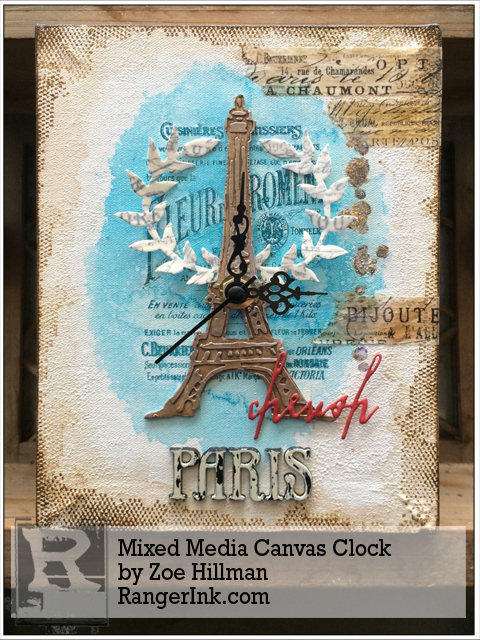
I hope you will be able to stop by and take a look at the mixed media canvas clock tutorial.
Have a great week.
2nd June, 2015 by iGirlZoe
I am VERY excited to share a guest blog post that I have over at Ranger Ink.
I hope you will be able to stop by and take a look at the mixed media canvas clock tutorial.
Have a great week.
Category Craft, Craft Techniques | Tags: | 1 Comment | Views: 539
11th May, 2015 by iGirlZoe
Over the past week I’ve learned 50 new French verbs and when I kept staring longingly at PEINDRE, (the verb to paint), I knew I was in desperate need of some creative down time!
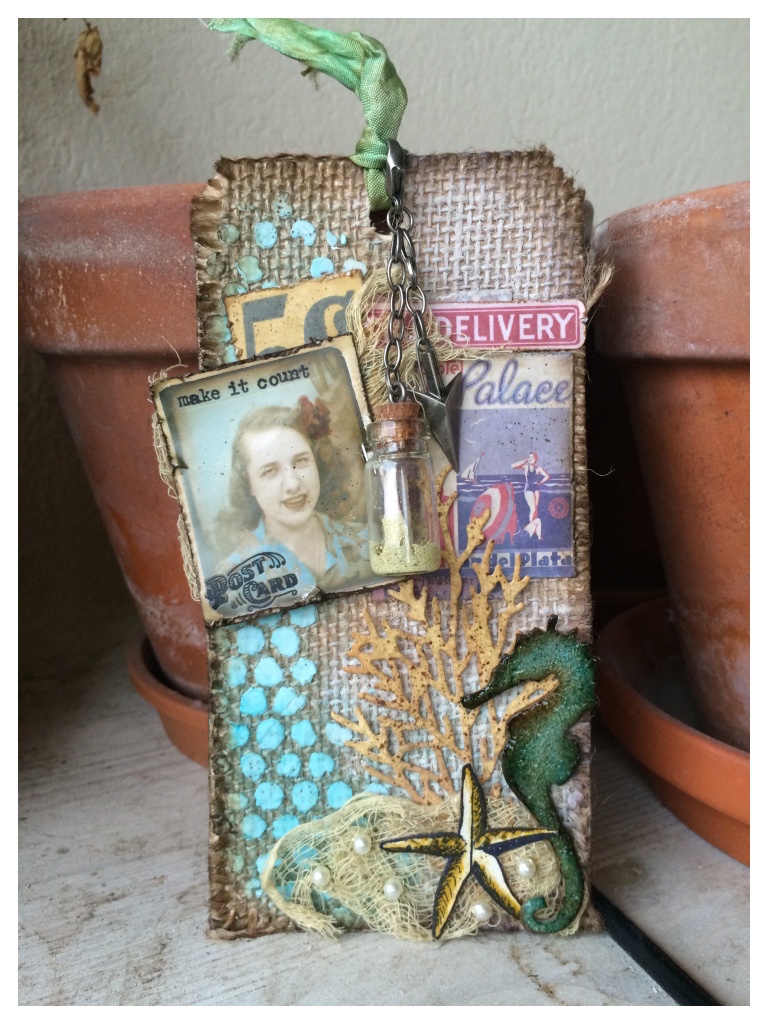
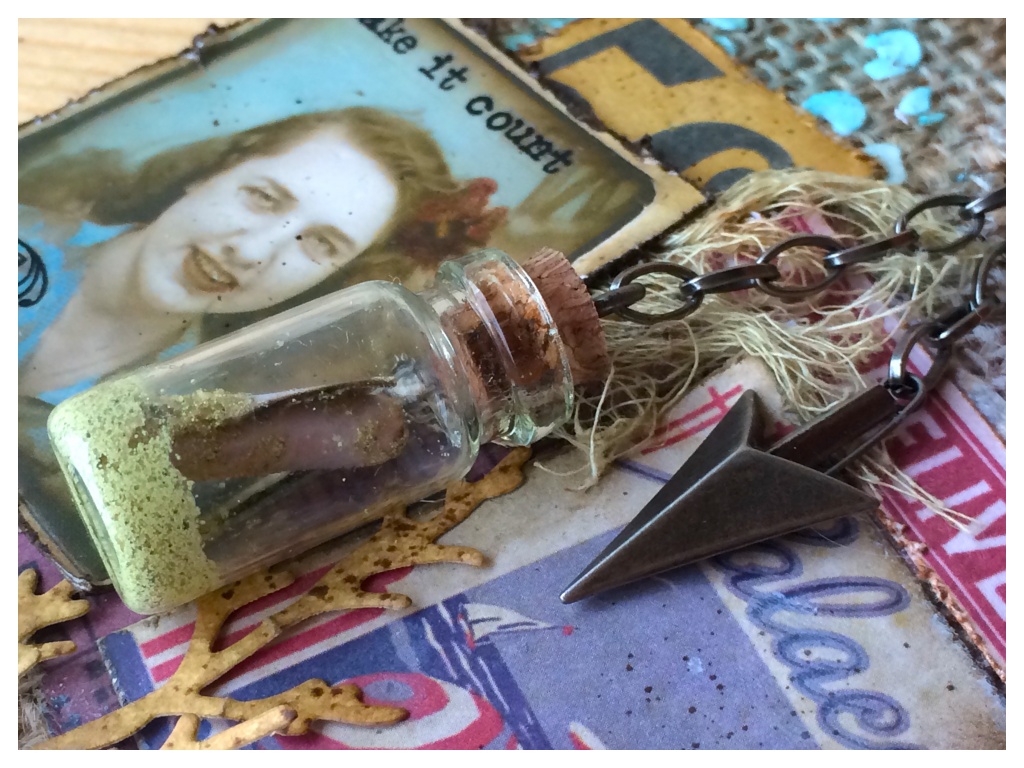
I made a second tag inspired by Tim’s May 12 tags of 2015 and yet again the photobooth card inspired my beach theme. I thought the girl in the photo looked liked she was on holiday in Hawaii! The photobooth cards are fantastic for giving you somewhere to start and my tired brain was very grateful for all the creative inspiration it could get!
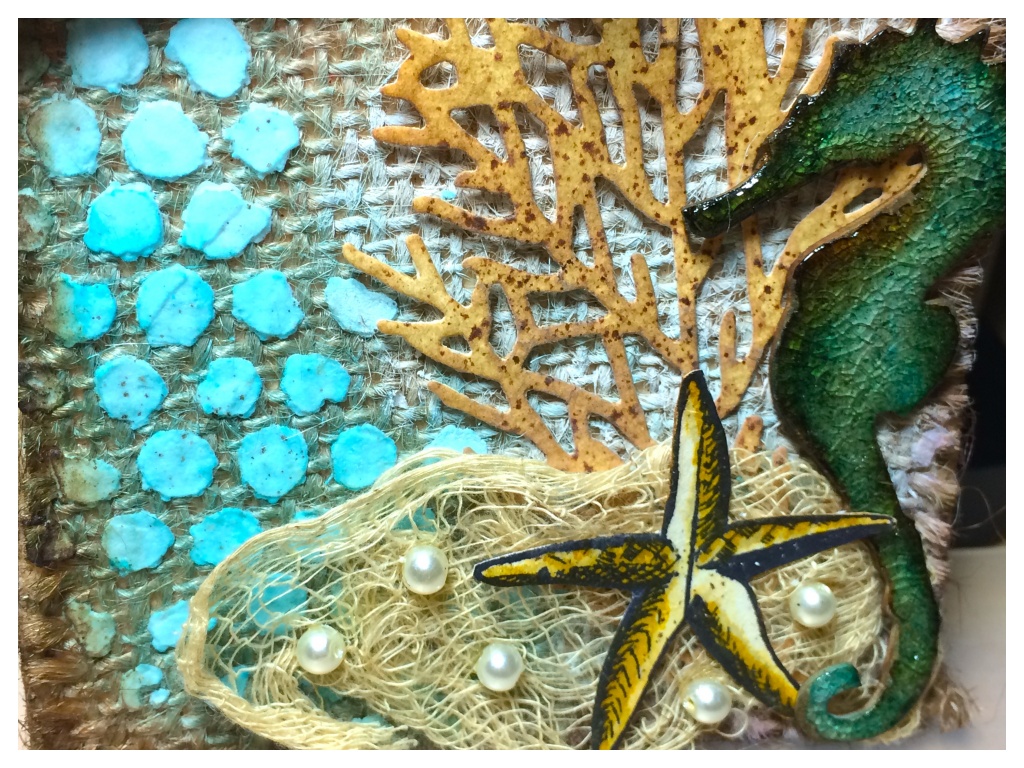
I used the Tim Holtz bubble stencil with Ranger texture paste and the new mermaid lagoon distress ink to create bubbles. After applying the ink, I spritzed some water over the top and then patted dry with a paper towel to lighten the shade. I love that you can build and dilute the distress ink colour so easily! I dyed some cheesecloth with antique linen distress spray to look like fishing net and attached with a tiny attacher staple which I concealed under watercolored blueprint star fish! I attached pearl beads with glossy accents to make it look like they had been caught in the net.
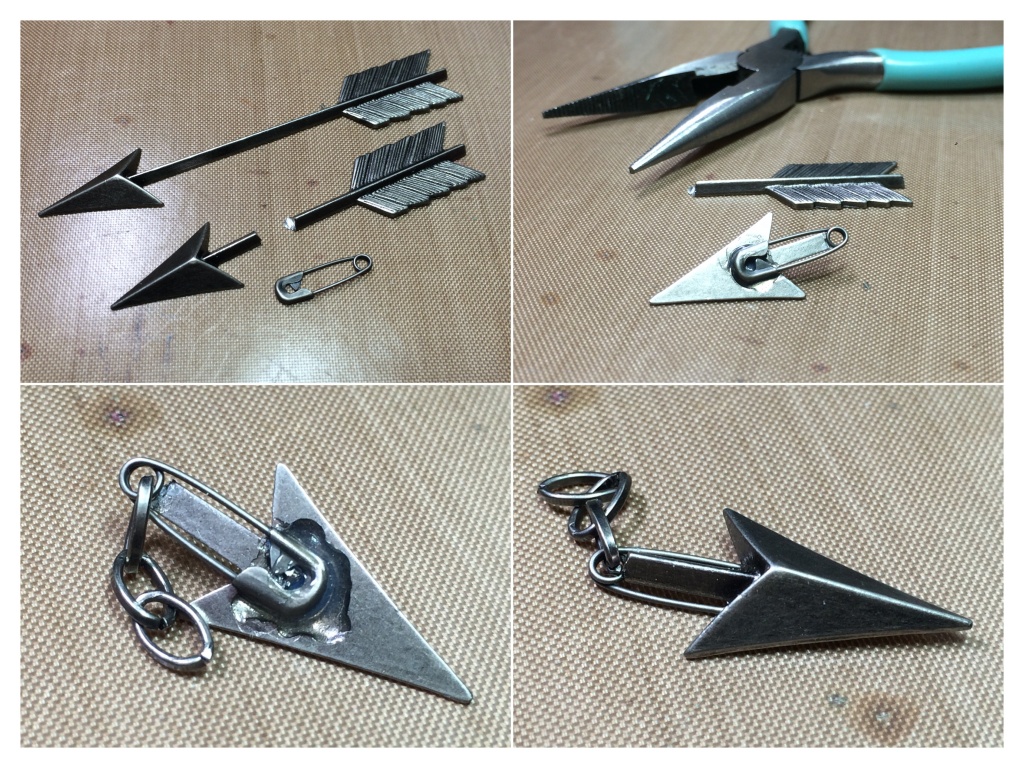
I wanted some nautical themed elements for my tag so I used some idea-ology to create an anchor. I cut the head off an adornment arrow and attached a mini pin to the back with glossy accents. Once completely dry, I attached the chain and hung from the tag.
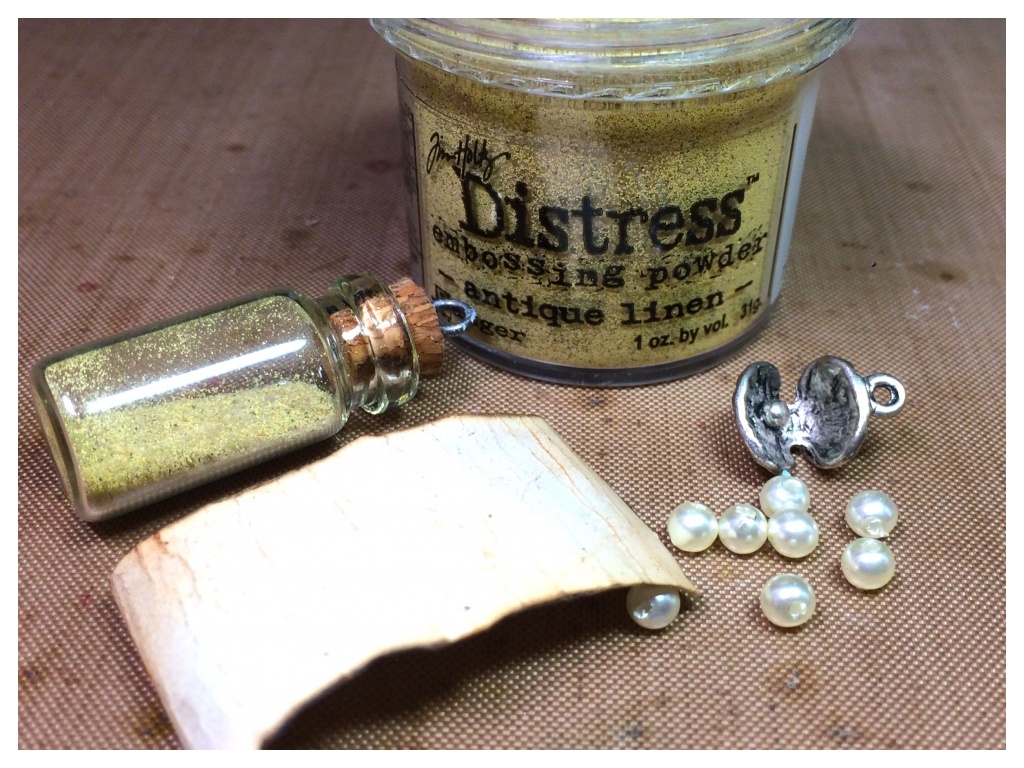
Another nautical themed item I wanted to create was a message in a bottle with wet sand inside! I remembered Tim showing a technique for making sand in last years 12 tags. I adapted the technique slightly as I needed to make it inside the tiny bottle, but check out Tim’s technique, it’s really really cool.
I got so involved that I only took one snap for instagram! It’s really easy to do though…
Directions:
-remove cork from the glass vial and screw an eye into the top (set aside)
-take a small piece of paper 1/8 smaller in height than the glass vial and distress and ink the edges
-roll up into a scroll and secure with a little glossy accents (set aside)
-fill glass vial to 1/8 with antique linen distress embossing powder
-carefully drop glossy accents into the middle of the glass vial being careful not to get any on the inside sides
-use a pockey tool to mix into a paste
-drop the scroll and a few pearl beads into the bottle and set aside to dry
-secure the cork with a little glossy accents and once dry, attach the chain and it’s ready to hang
*once the paste dries it won’t move around inside the glass bottle and will adhere the message into place
Thanks for taking the time to look at my tag. You can see this months tag and techniques on Tim’s blog and you can see the post translated into French on Scrapdeco’s blog.
For lots of inspiration check out the following challenges:
Tim Holtz 12 Tags of 2015
Inspiration Journal Monthly Challenge
Category Craft, Craft Challenges | Tags: | 7 Comments | Views: 794
5th May, 2015 by iGirlZoe
I love it when the 12 tags of 2015 are posted just before the weekend as it allows me to dive straight in. The reveal of May’s distress colour twisted citron AND May’s tag ON THE SAME DAY got me really ramped up to get inky.
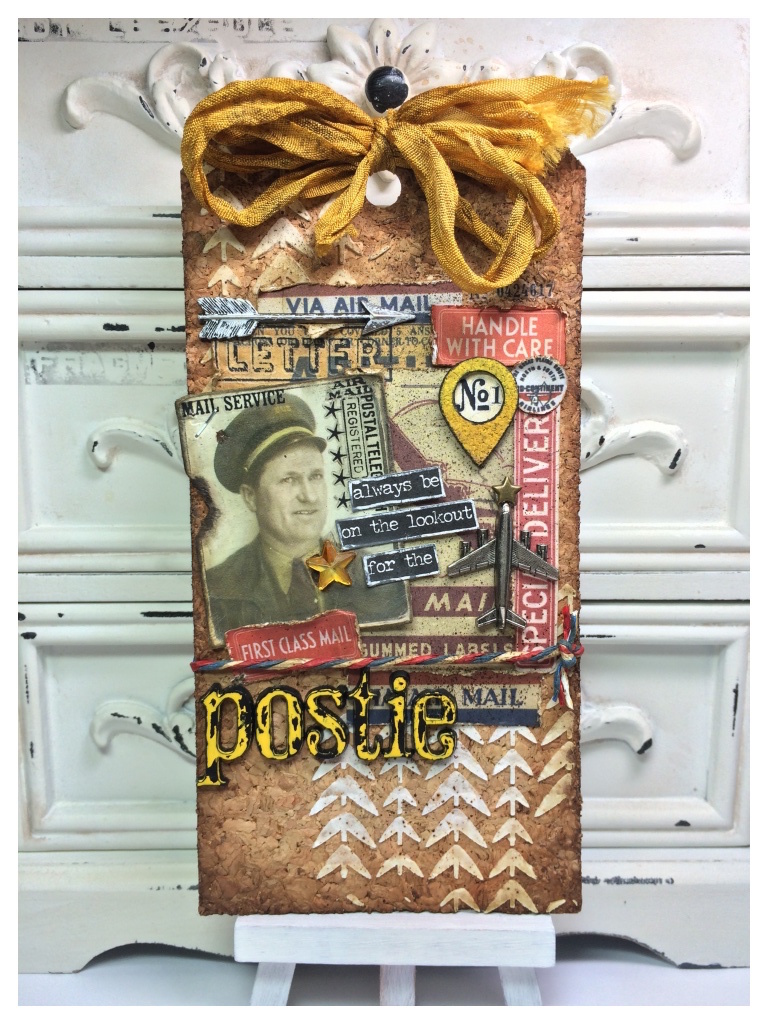
I had a look through the new Tim Holtz photobooth cards and found a card that inspired me to pay homage to my postman …bringer of happy mail, (who I love and regularly run towards, screaming, whooping and cheering loudly)!
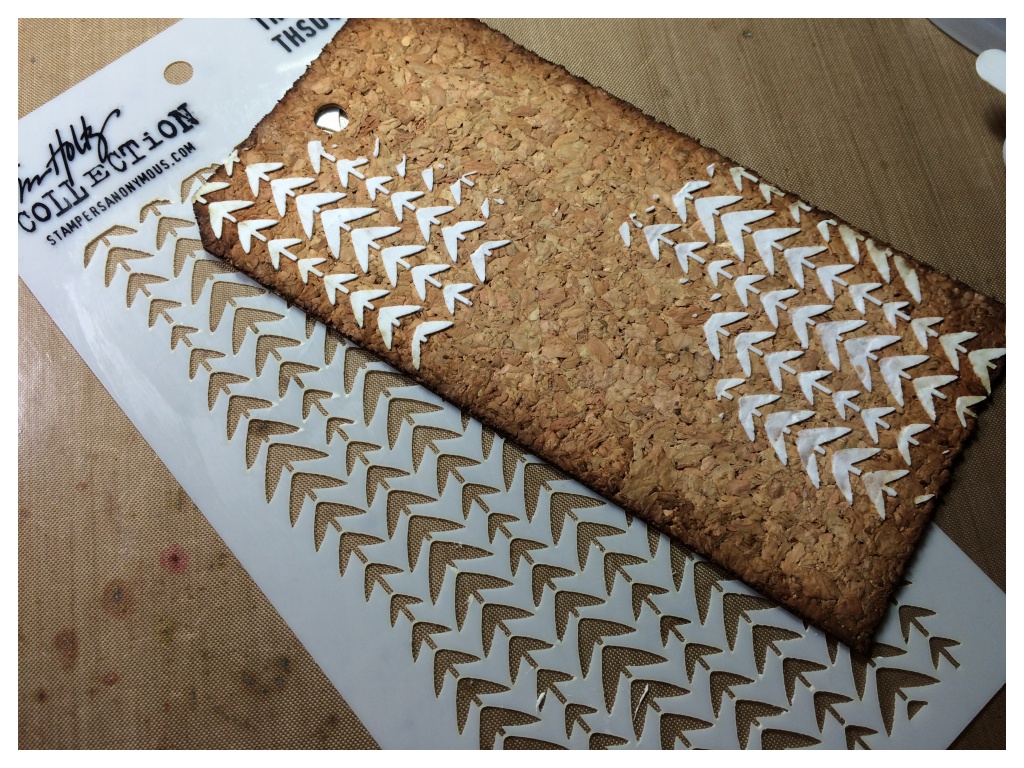
I reached for a sheet of new idea-ology burlap, which comes with corregated and cork sheets and decided that the cork worked better for me. I used this new stencil which I am a little bit in LOVE with and reminds me of the arrows on postal packaging I’ve received.
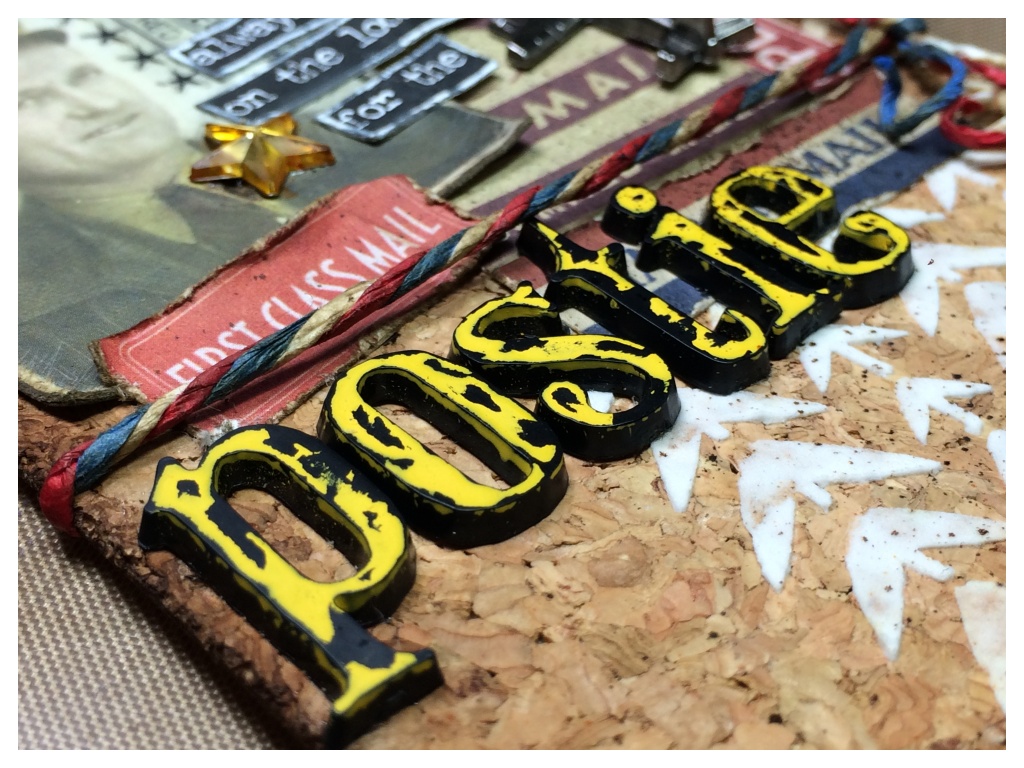
The Swiss post colours are yellow so I grabbed my mustard seed distress paint and covered some alphaparts.
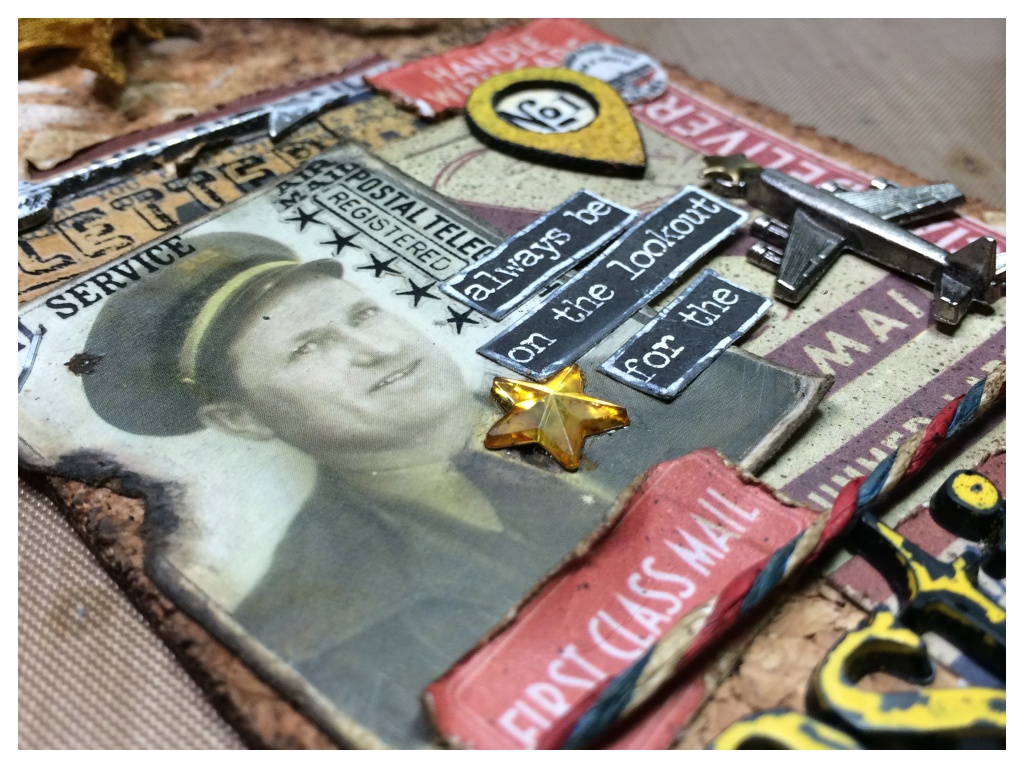
There was lots of postal ephemera to choose from in Tim Holtz’s ephemera packs. I also used mustard seed distress markers to colour the postal uniform in the photobooth card. Check out Tim’s tag for techniques. I cut up one of the new small talk sayings to read “always be on the lookout for the” and placed above the “postie” alphaparts. I am always on the lookout for the postie! 😉
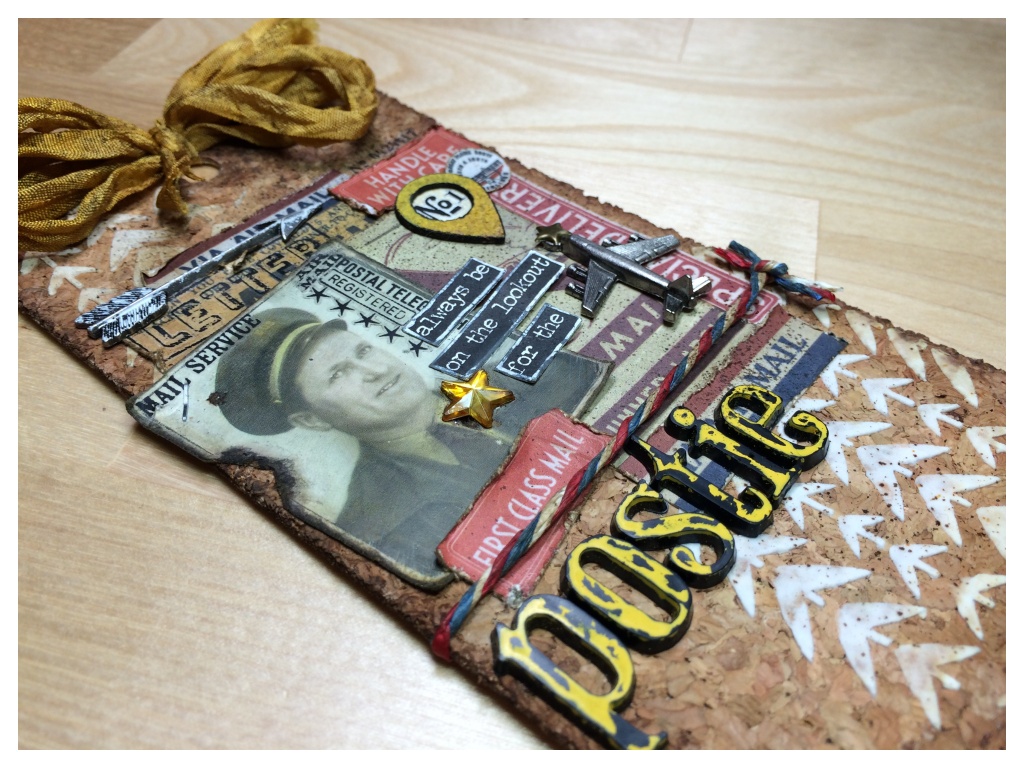
Thanks for taking the time to look at my tag. You can see this months tag and techniques on Tim’s blog and you can see the post translated into French on Scrapdeco’s blog.
I hope you can check out the following challenge blogs.
Tim Holtz 12 Tags of 2015
Inspiration Journal Monthly Challenge
Simon Says Stamps Wednesday Challenge
Category Craft, Craft Challenges, Craft Creations, Craft Techniques | Tags: | 10 Comments | Views: 999
30th April, 2015 by iGirlZoe
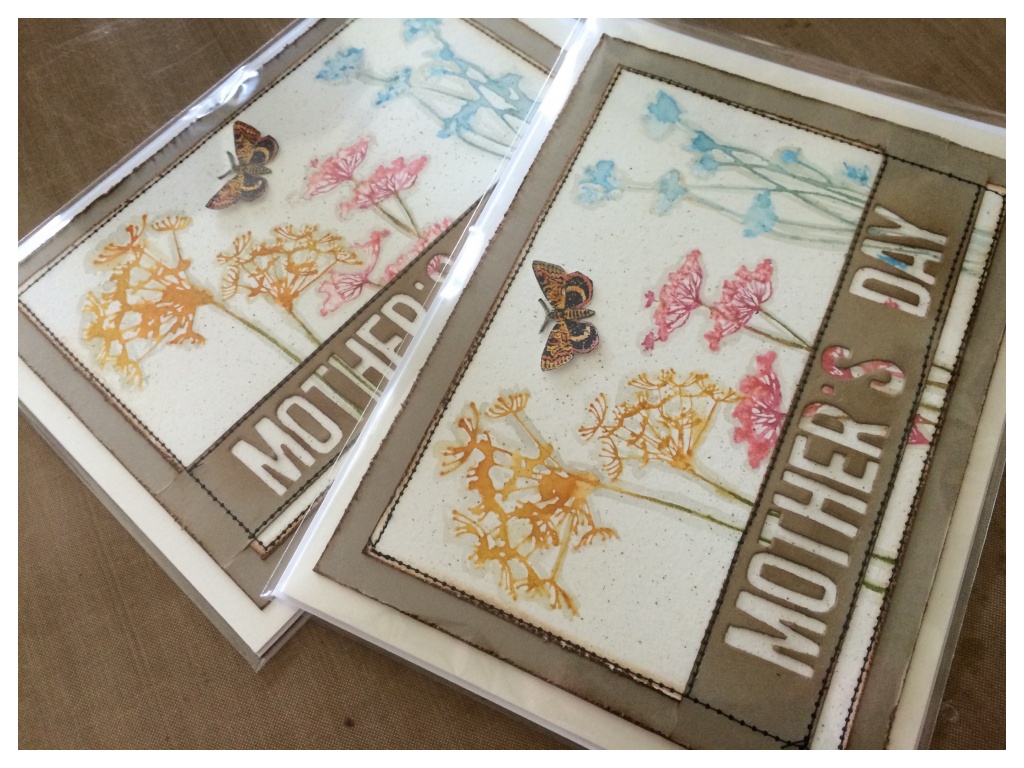
Just squeezing in a second post inspired by April’s 12 Tags of 2015. This time with 2 Mother’s Day cards for a lovely American girl from my French class to send home. She asked me where she could buy Mother’s Day cards in Switzerland so I offered to make her a couple. She had recently given me some Reese’s candy, (and there’s nothing I wouldn’t do for chocolate)!!!
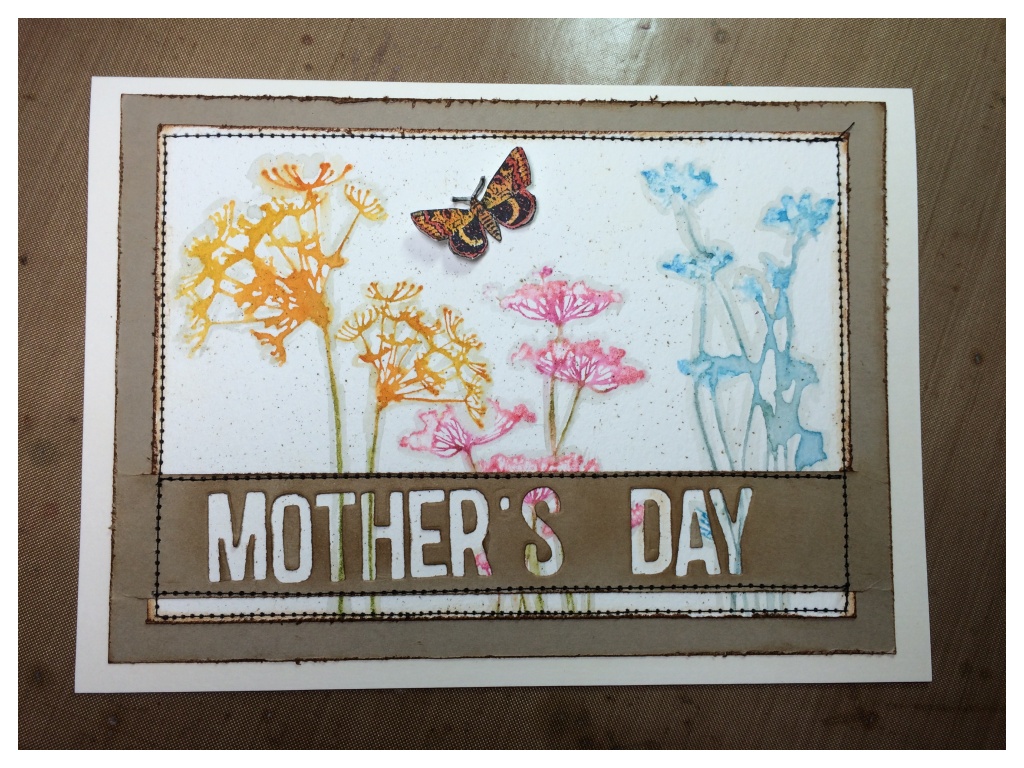
As time was limited, I turned once again to Tim’s April tag for inspiration. I am still waiting for my “craft dealer”, (as my DH calls her), to return from holiday so I can get my hands on Tim’s new flower garden stamps. However, with a little distress ink you can make any stamp work… (temporarily anyway)!
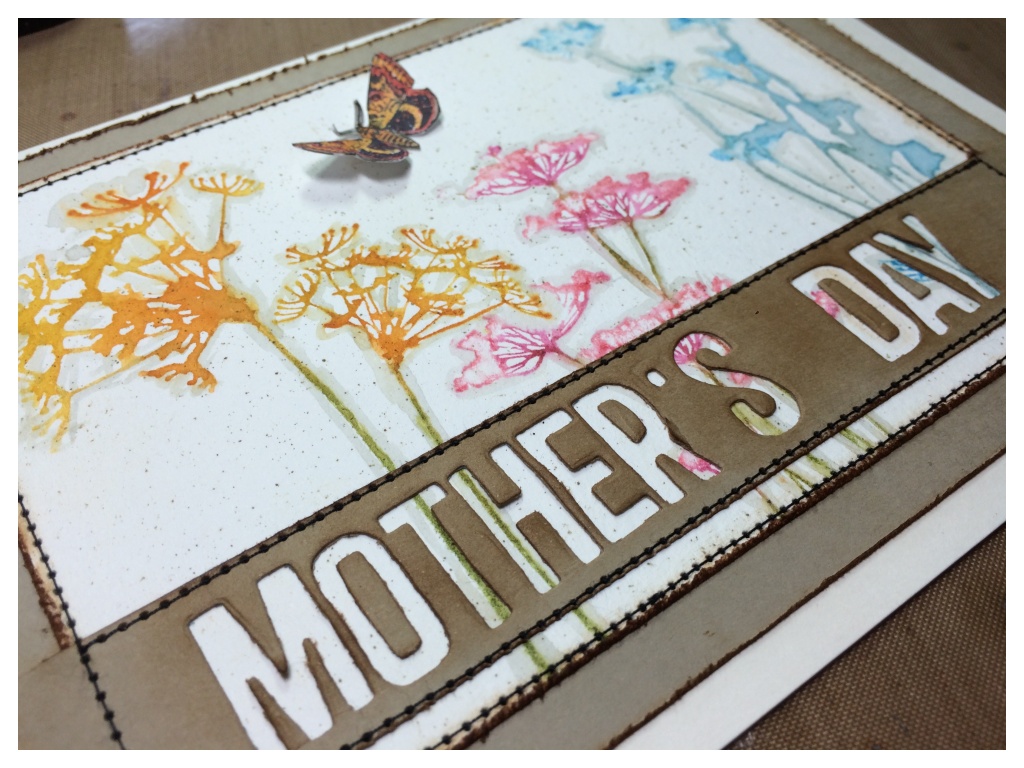
I used the alphanumeric thinlit dies to create a customised “Mother’s Day” banner. I LOVE these dies, they are SO versatile, I LOVE that about Tim’s products!
I can’t wait for Friday! Tim’s May tag and the new distress color is unveiled! Could Fridays get any better? I DON’T THINK SO!!! 😉
Thanks for taking a look at my cards and I hope you can check out the following challenge blogs.
Tim Holtz 12 Tags of 2015
Inspiration Journal Monthly Challenge
Simon Says Stamp Monday Blog Challenge
Simon Says Stamp Wednesday Challenge
 |
 |
 |
 |
 |
 |
 |
 |
 |
 |
 |
 |
 |
 |
 |
 |
 |
 |

Category Craft, Craft Challenges, Craft Creations | Tags: | 5 Comments | Views: 1,318
22nd April, 2015 by iGirlZoe
My French studies continue to keep me busy (and out of trouble), but I made some time to have a go at April’s tag.
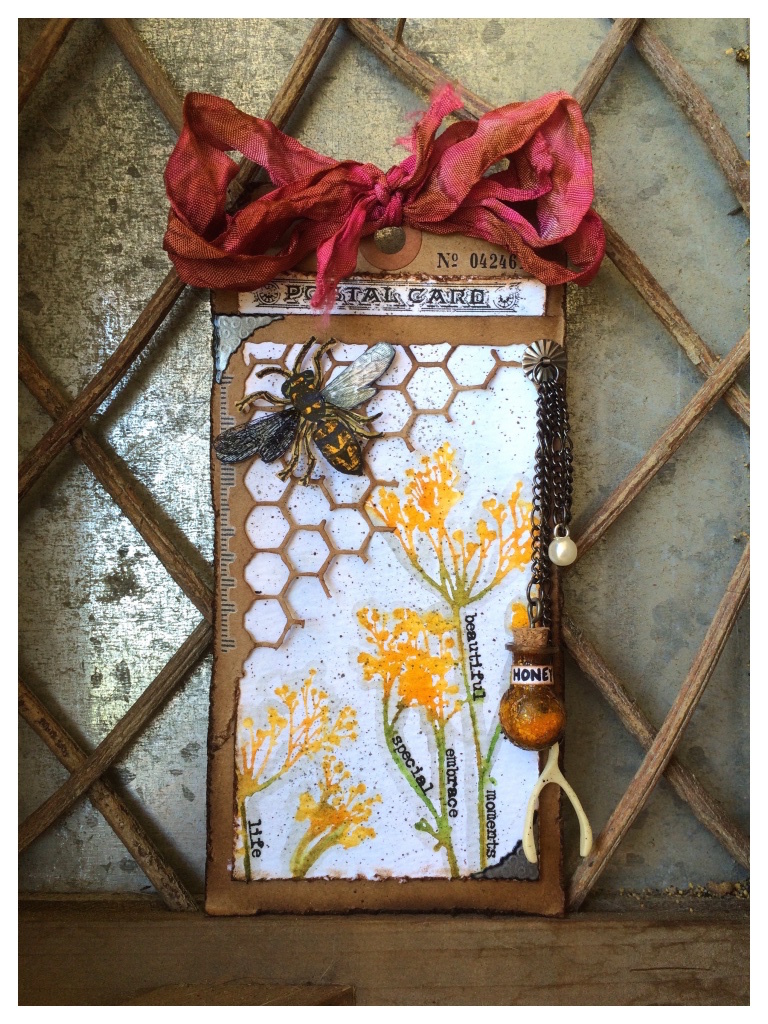
I didn’t think that I wanted the floral stamps, used in this months tag, when they were released! WRONG!!! While waiting for them to arrive and stalking the postman, I decided to improvise. I went right back to the very beginning and used a floral stamp from set #001! They aren’t designed to colour in so I used the distress markers direct to rubber and then spritzed with water and stamped. I love the look of this technique and have used it many times since taking Creative Chemistry with “the professor”…
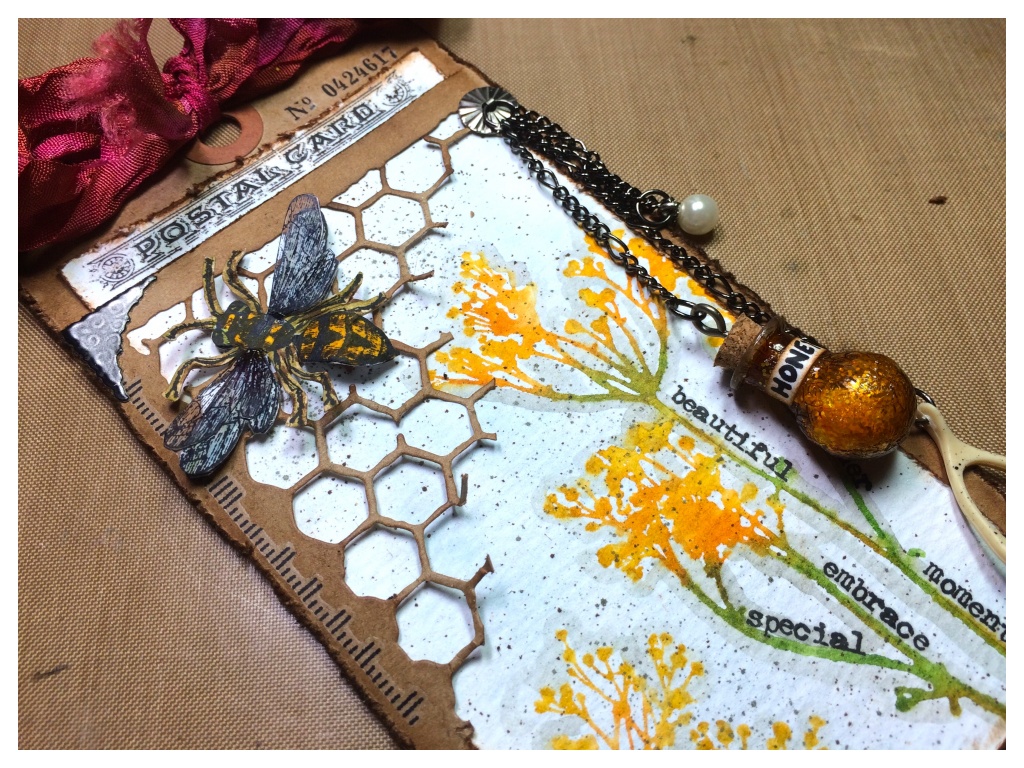
I used Tim Holtz’s new mixed media die set. This set is worth buying a die cutting machine for! I am not kidding, it’s awesome! Unlike me with a craft knife!! If you follow me on instagram you will know what I mean! #CraftFail
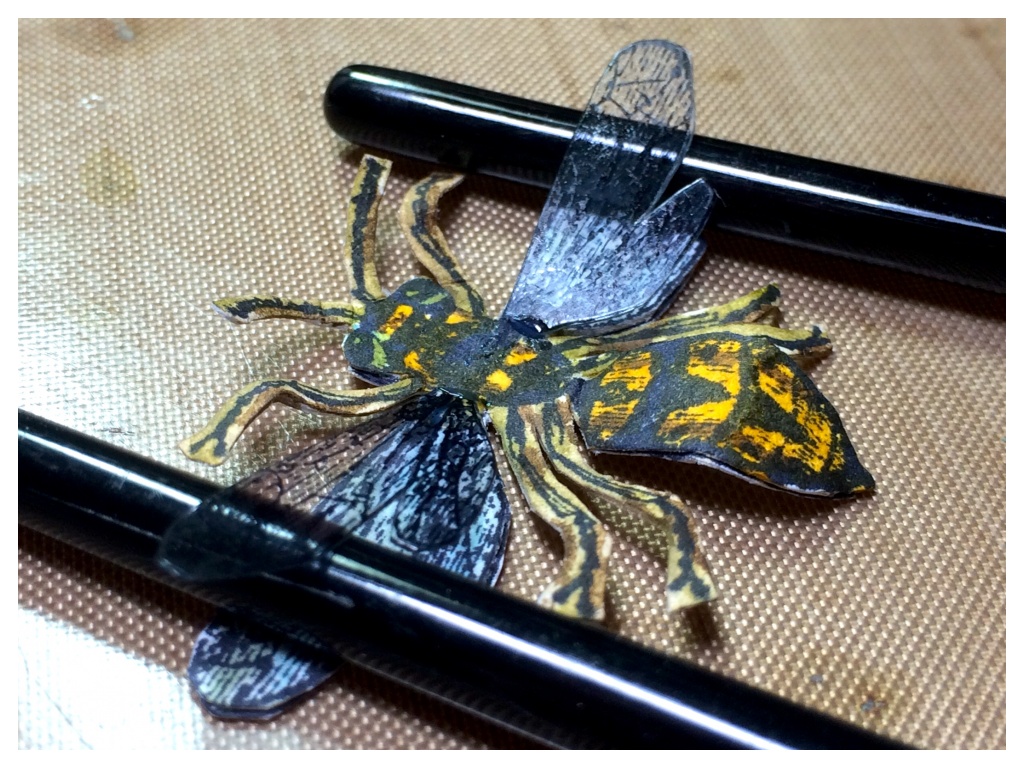
I stamped the bee from another earlier stamp set #083 and then stamped a second time on shrink plastic, just the wings this time. With a blob of glossy accents, I attached the wings and propped them up with paintbrush handles until they had dried in an upright position. I watercoloured the stamp with distress markers. I added lots of remnant rubs to the tag and some discontinued idea-ology from my stash.
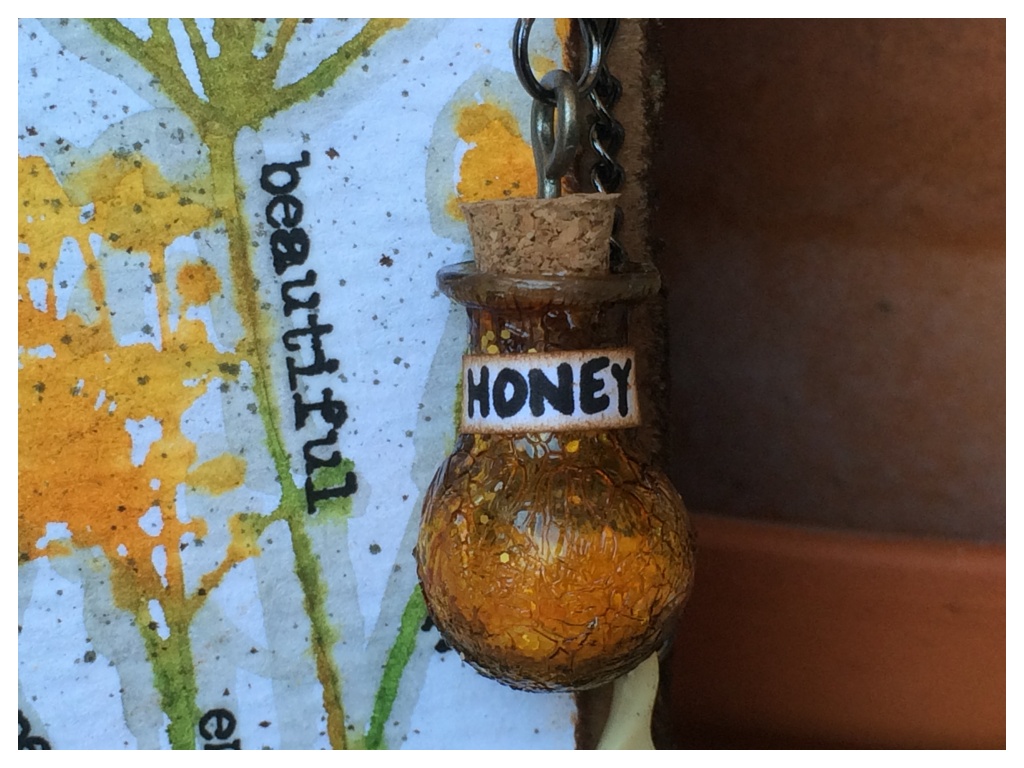
The new idea-ology tiny vials are seriously cute. You can see how they’re altered in my Through the Looking Glass post. I filled it with mustard seed distress glitter and sealed the cork on with glossy accents. I added an idea-ology screw eye and hung it from the chain. My DH made the honey label for me. I love his writing, he used to write me love letters when we dated as teenagers, so it’s special to have it on as part of my tag. <3
Thanks for taking the time to look at my tag. You can see this months tag and techniques on Tim’s blog and you can see the post translated into French on Scrapdeco’s blog.
Category Craft, Craft Challenges, Miscellaneous | Tags: | 7 Comments | Views: 1,231
10th April, 2015 by iGirlZoe
Hello everyone. I am guest blogging over at A Vintage Journey today where Julia set an awesome theme, “Through the looking Glass!” You can see the finished project over there and the step-by-step below.
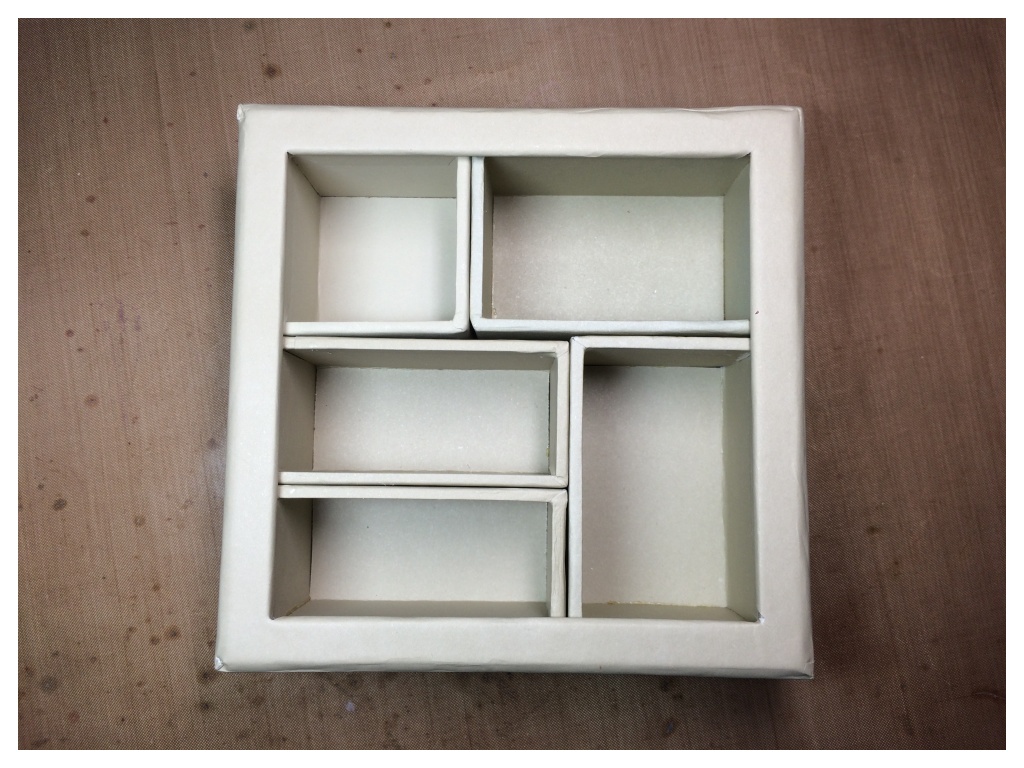
Take Tim Holtz’s square 5.75″ x 5.75″ idea-ology configuration box. This one was very kindly gifted to me by my good friend Genevieve, (thank you <3)!
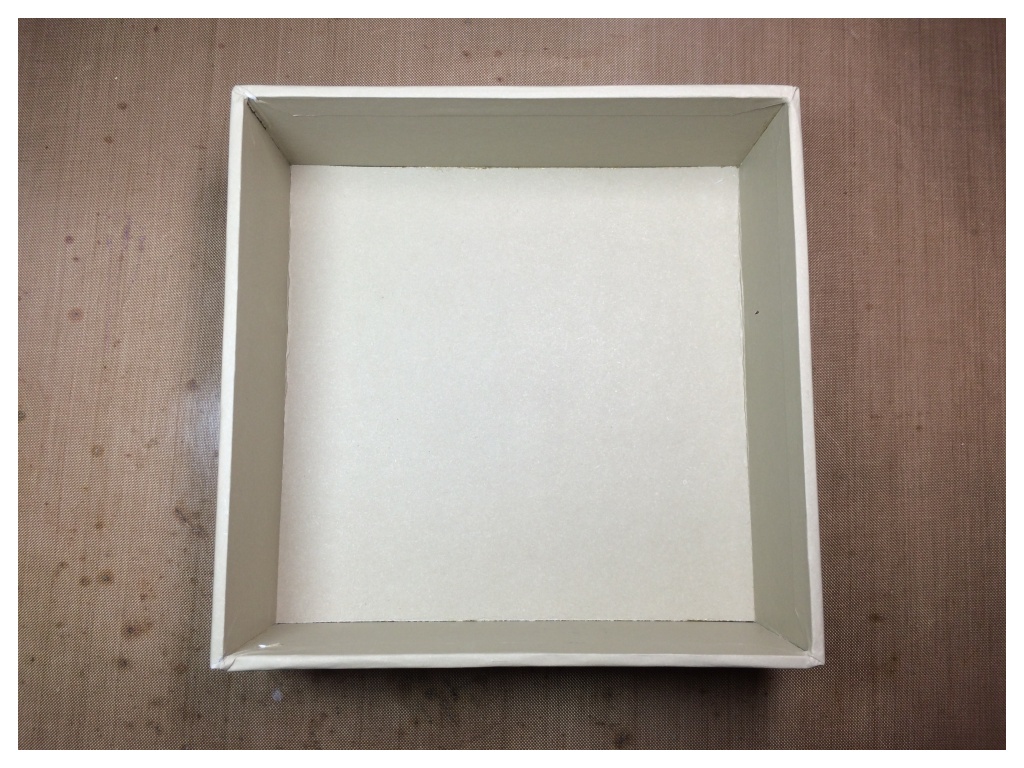
Put aside the lid and insert boxes to use another day.
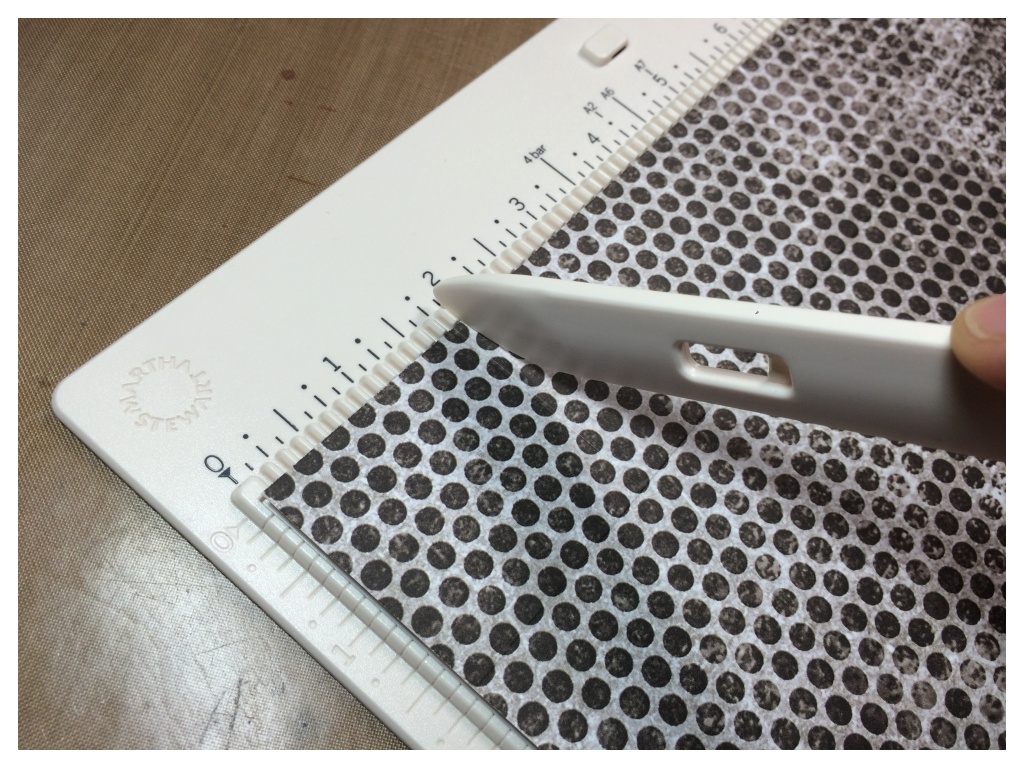
Cut a sheet of paper (7.5″ x 9.25″). Score across the top of the longest edge (1.75″), then turn the paper 180 degrees and score left to right (1.75″ & 7.5″).
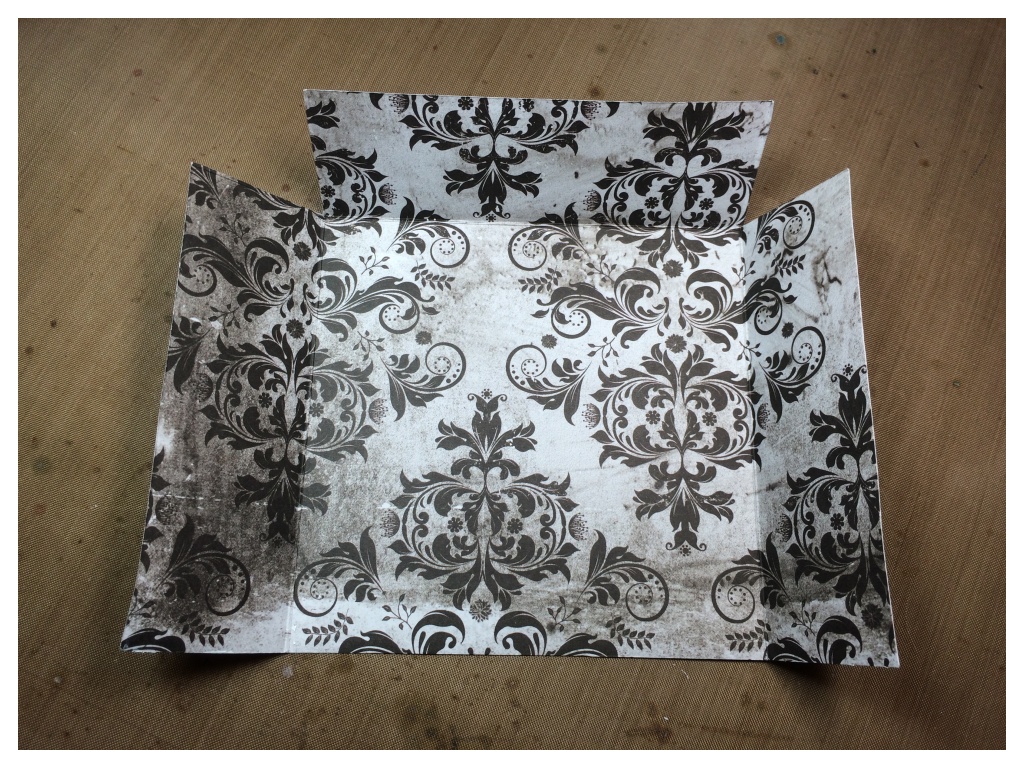
Trim the excess square out of each top corner and cover the reverse in glue n seal.
*TIP: work quickly, glue n seal waits for no one. 😉
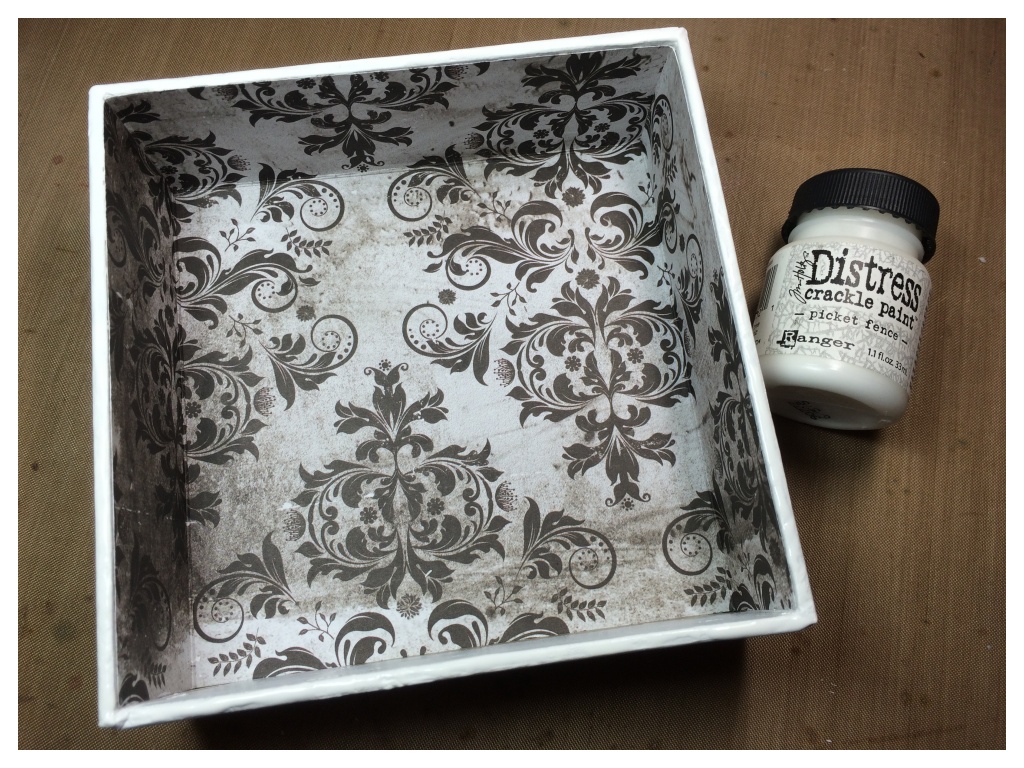
Line the configuration box and paint the edges with distress crackle paint and set aside to dry.
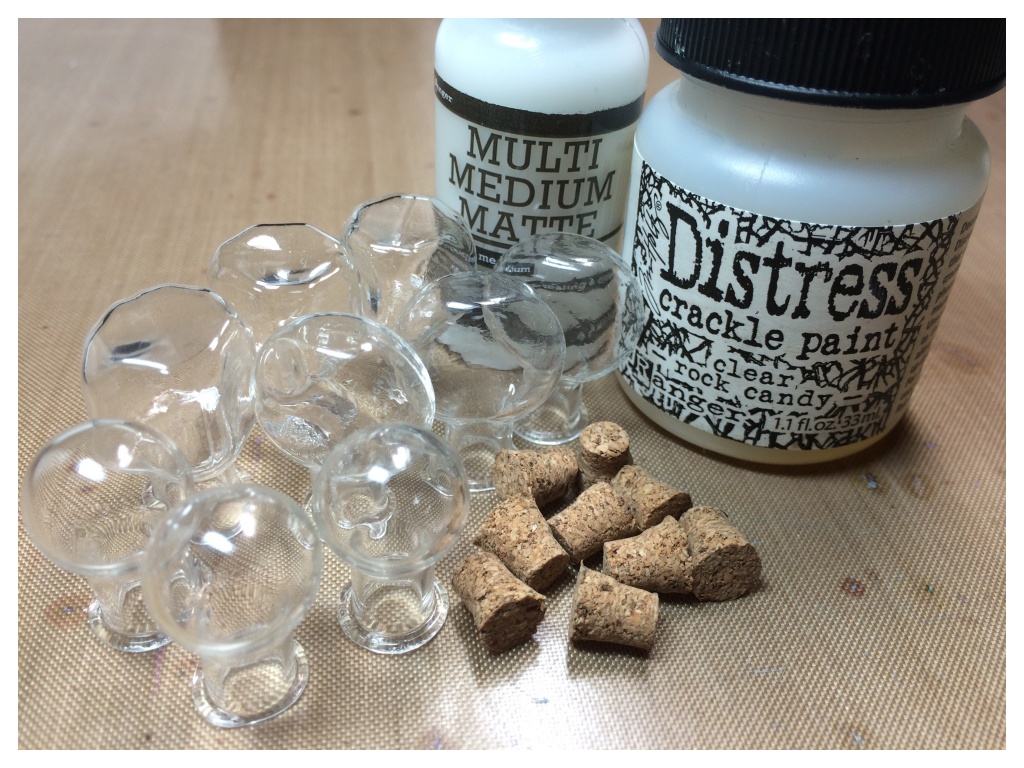
Cover Tim Holtz idea-ology tiny vials and light bulbs with multi medium matte and set aside to dry.
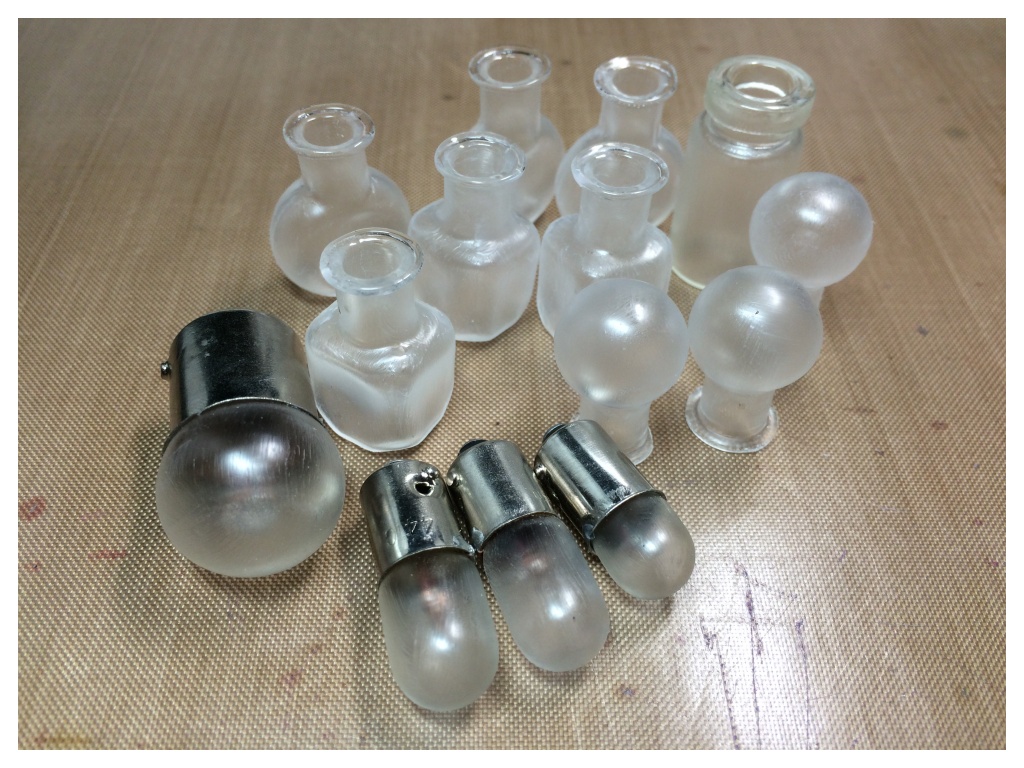
Cover each with a good layer of distress crackle glaze and set aside to dry.
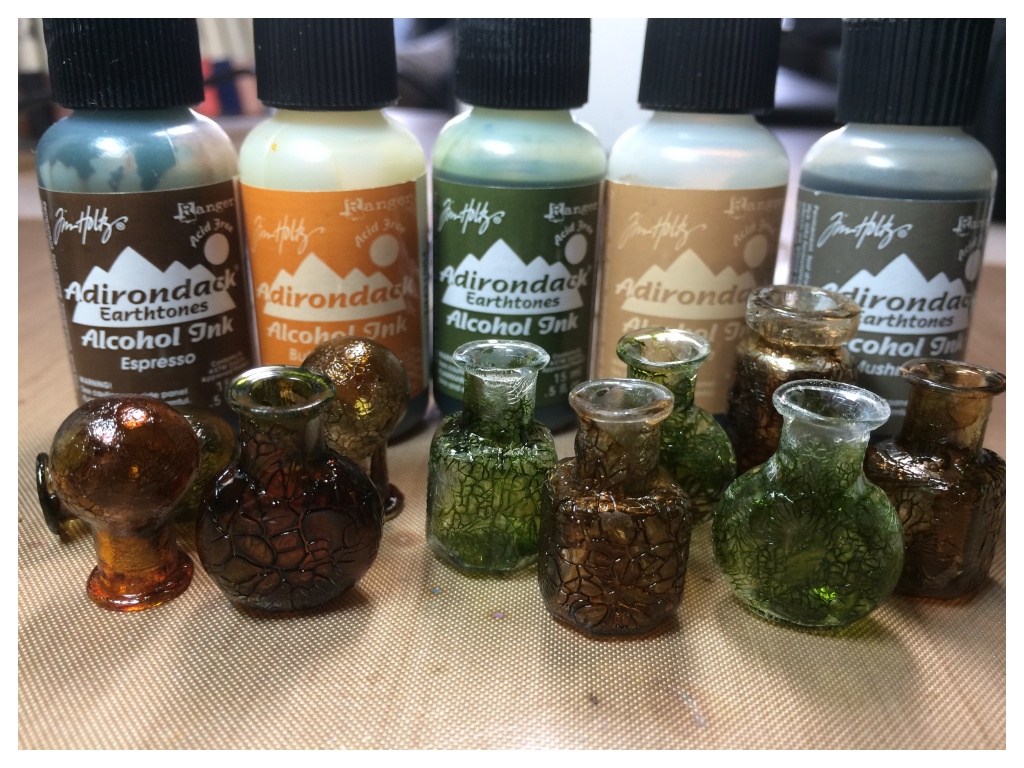
Once completely dry, drop alcohol ink on each bottle and set aside to air dry.
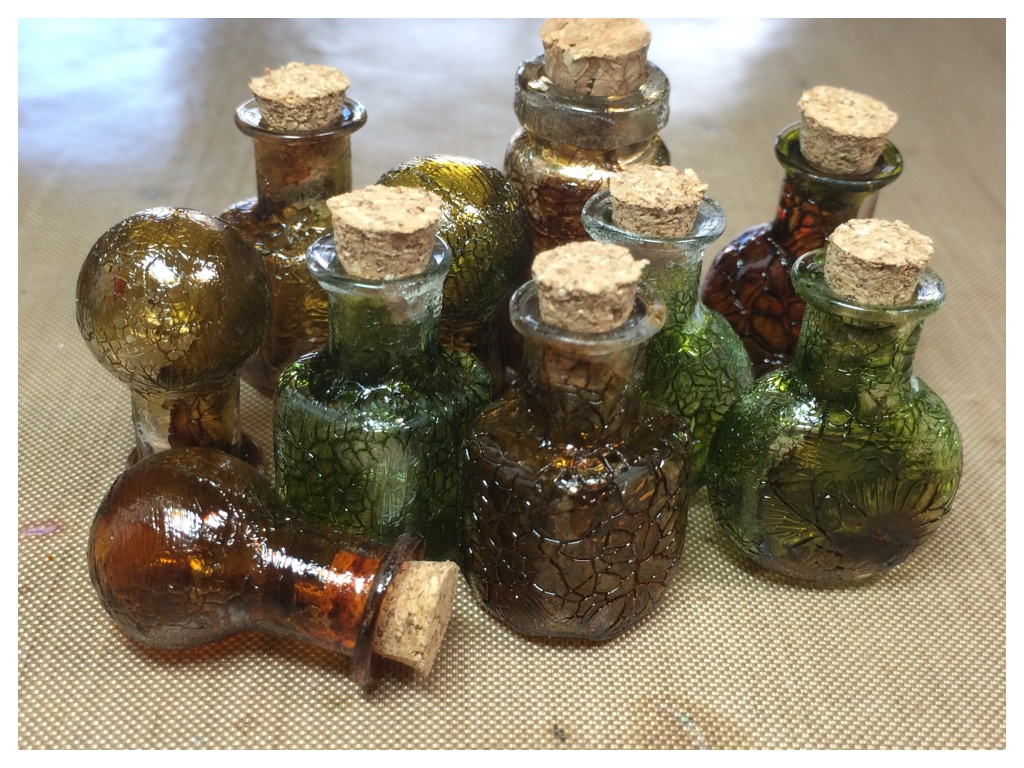
Put the corks back into the vials and make tiny labels to attach to the vials with string.
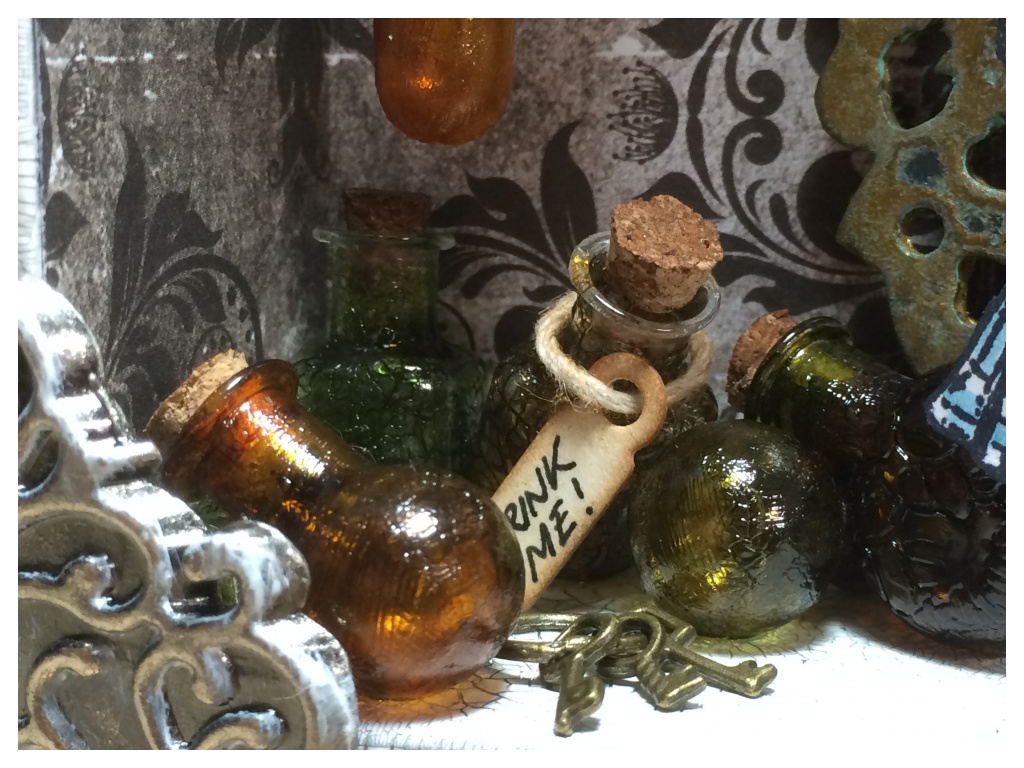
Arrange vials into your configuration box and then glue into place with glossy accents.
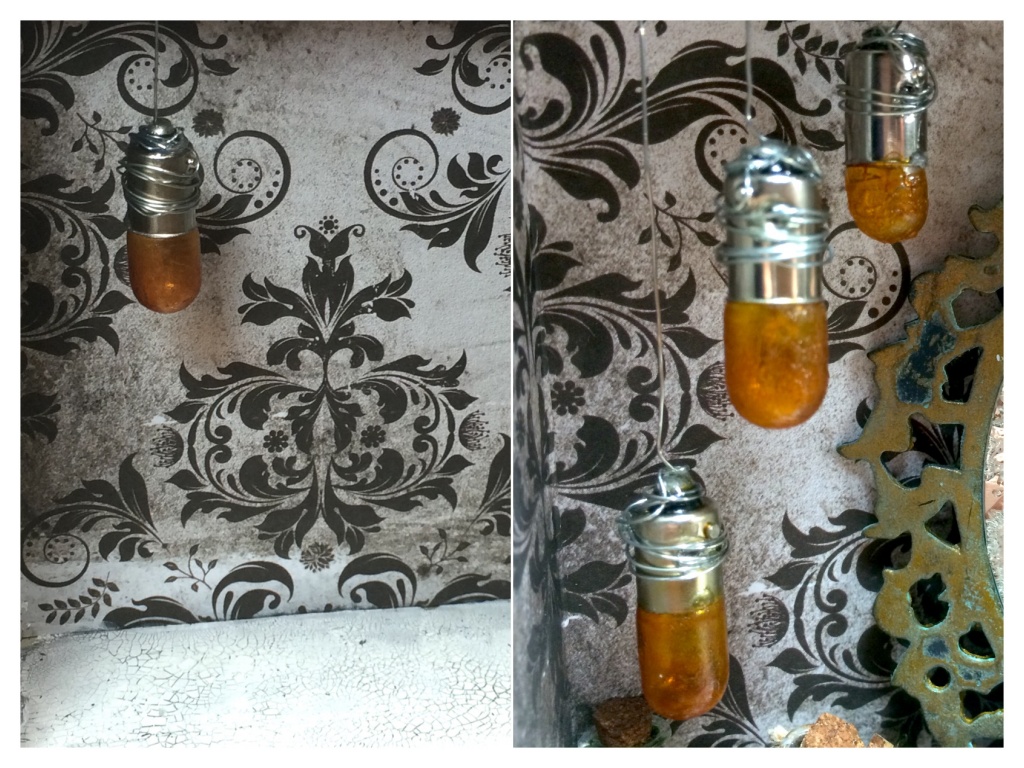
These hanging bulb lights were inspired by the AWESOME lights from this years Tim Holtz CHA idea-ology booth!
Crackle glaze the bulbs, (same method as before), wrap wire around the top, secure in place with glossy accents and set aside. While waiting for the glossy accents to dry, poke 3 holes into the top of the configuration box. Once the glossy accents are dry, poke the wire underside through the top and secure with tape, (which will be covered next).
Cover the outer top and side of the configuration box with picket fence distress paint and once dry, cover in a layer of distress crackle paint. Allow the box to dry completely and then rub walnut stain distress ink into the cracks and remove excess with kitchen roll (paper towel).
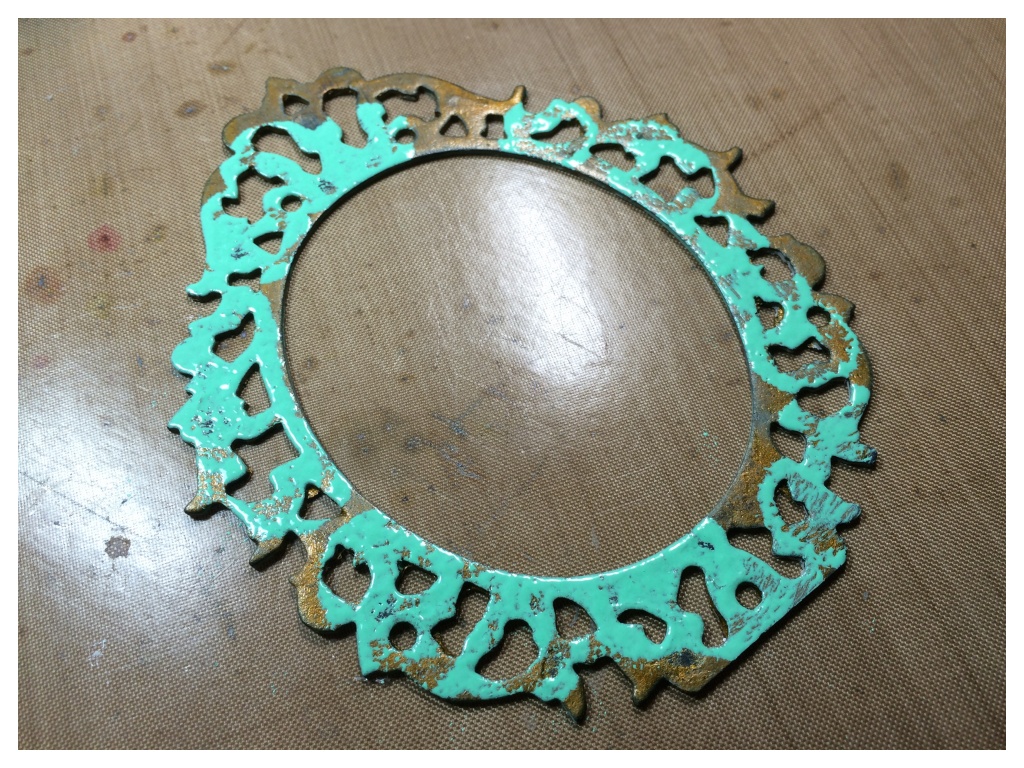
Next prepare the mirror frame. Die cut a Tim Holtz ornate frame from grungeboard and cover with tarnished brass distress paint and set aside to air dry. Once thoroughly dry, sand portions of the frame and cover in cracked pistachio distress paint and allow to almost dry. Wipe away paint with kitchen roll (paper towel), the cracked pistachio distress paint will come away easily from the painted surfaces and cling to the edges of the sanded areas giving a faux aged patina look.
In order to hide the reverse side of my stamped fussy cut Alice image, I added distress crackle paint to idea-ology mirror. It also gives a cool shattered effect.

Finally, assemble your confirguration box adding several of the bottles to the top and adding some idea-ology hardware.
I die cut “WONDERLAND” from Tim Holtz holiday words script thinlit die set. This fits in perfectly with the theme and helps me to continue my challenge to use my festive dies for other things throughout the year.
Hope you’re still with me! To see the finished project, stop by A Vintage Journey and enter the “Through the Looking Glass” challenge.
Thanks for stopping by and for your comments, I really appreciate them.
Have a great weekend.
Category Craft, Craft Challenges, Craft Creations, Craft Techniques | Tags: | 13 Comments | Views: 1,659
6th April, 2015 by iGirlZoe
Hello everyone. I am SO excited to let you know that I have a guest blog post over at Ranger Ink today.
I hope you will stop by and check out my tutorial.
Have a great Monday.
Category Craft, Craft Challenges, Craft Creations, Craft Techniques | Tags: | 7 Comments | Views: 813
24th March, 2015 by iGirlZoe
My French studies continue to consume most of my time, but I finally took time out over the weekend to get inky and create my March tag.
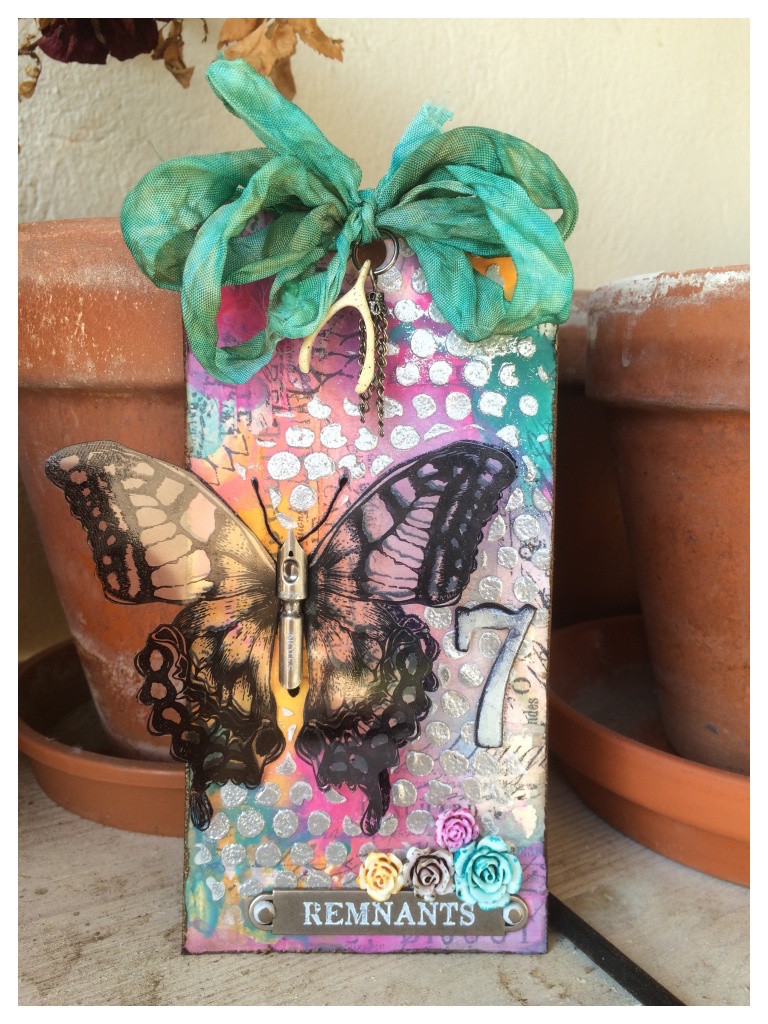
I love love love the background of Tim’s March 12 tags of 2015. It’s so bright and the distress paint gives such a gorgeous deep colour. It inspired me to go bold with my colour palette and I HAD to use the same butterfly stamp as I just didn’t want to use anything else more.
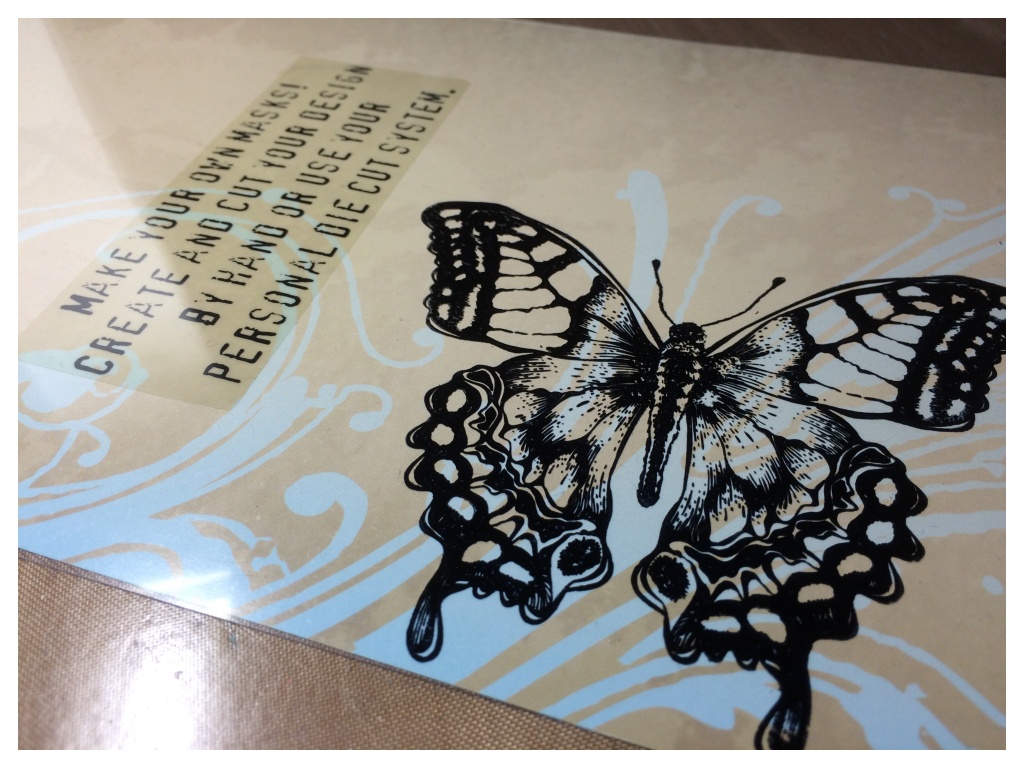
One of the (many) things that I love about the 12 tags is one idea inspires another. Tim uses a masking technique and when I was preparing my butterfly mask, I had the idea to use the backing sheet to make an overlay. I don’t need the backing sheet as I’m storing the butterfly mask over the top of the stamp sheet, (a great idea of Tim’s).
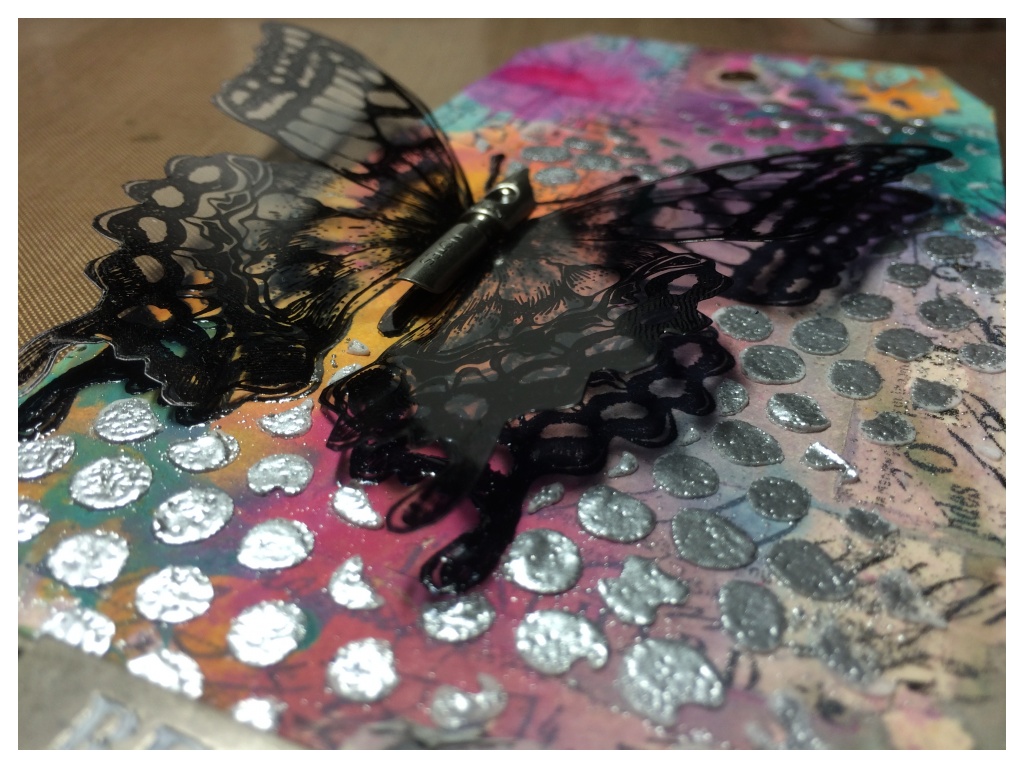
The backing sheet is thick enough that you can crease the wings so they fold up. I really like the 3D effect!
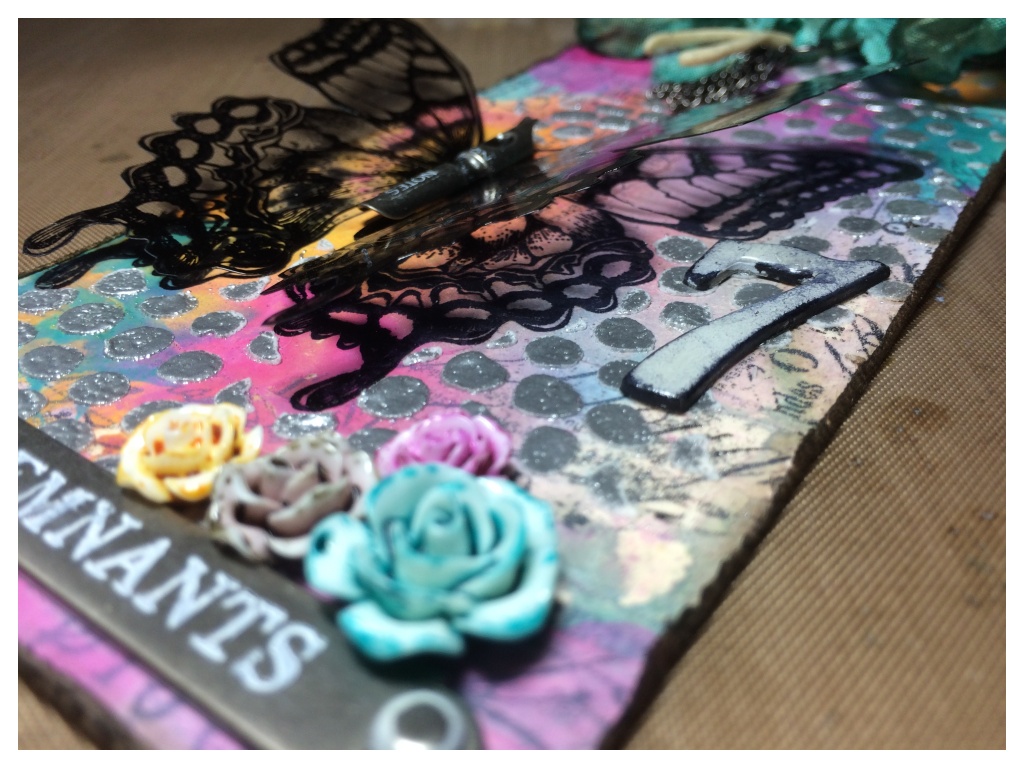
Thanks for taking the time to look at my tag. You can see this months tag and techniques on Tim’s blog and you can see the post translated into French on Scrapdeco’s blog.
Category Craft, Craft Challenges | Tags: | 6 Comments | Views: 908
16th March, 2015 by iGirlZoe
Hello. Just a quick post to share a birthday card that I made for my Nephew’s first birthday. I meant to post this a week ago, but I went back to school to study French and the first week was a bit hectic.
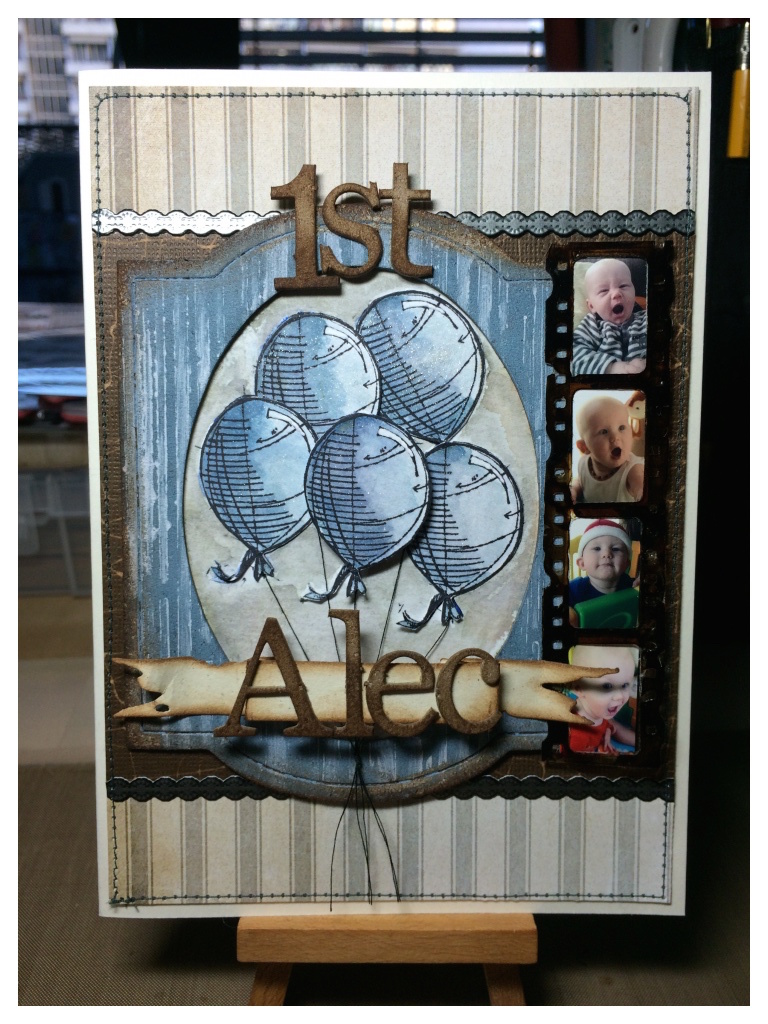
Excuse the poor lighting. Daylight saving time hasn’t begun in Europe yet and it had been a bit grey outside when I took this pic! I need to sort myself out a portable light box. If anyone has any recommendations, I would appreciate them.

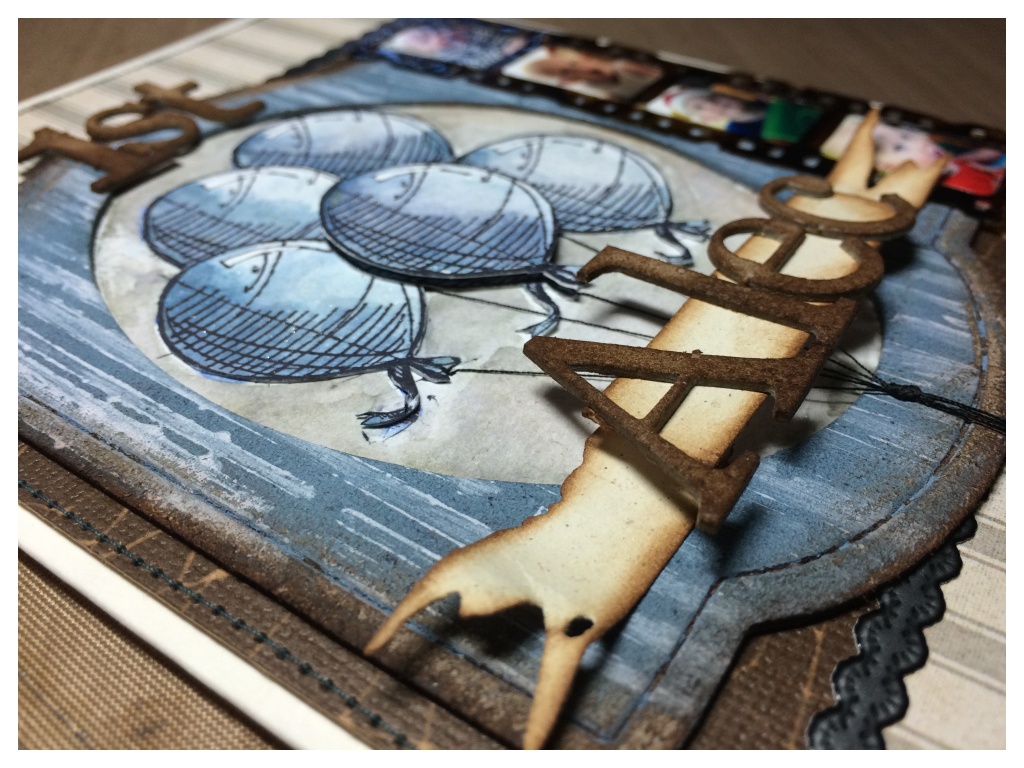
I made the negative by die cutting shrink plastic with Tim Holtz mini filmstrip and ticket decorative strip die. I dropped alcohol inks onto the plastic until it resembled a real negative strip. I printed miniature photos of my Nephew throughout his first year using my Canon Selphy printer.
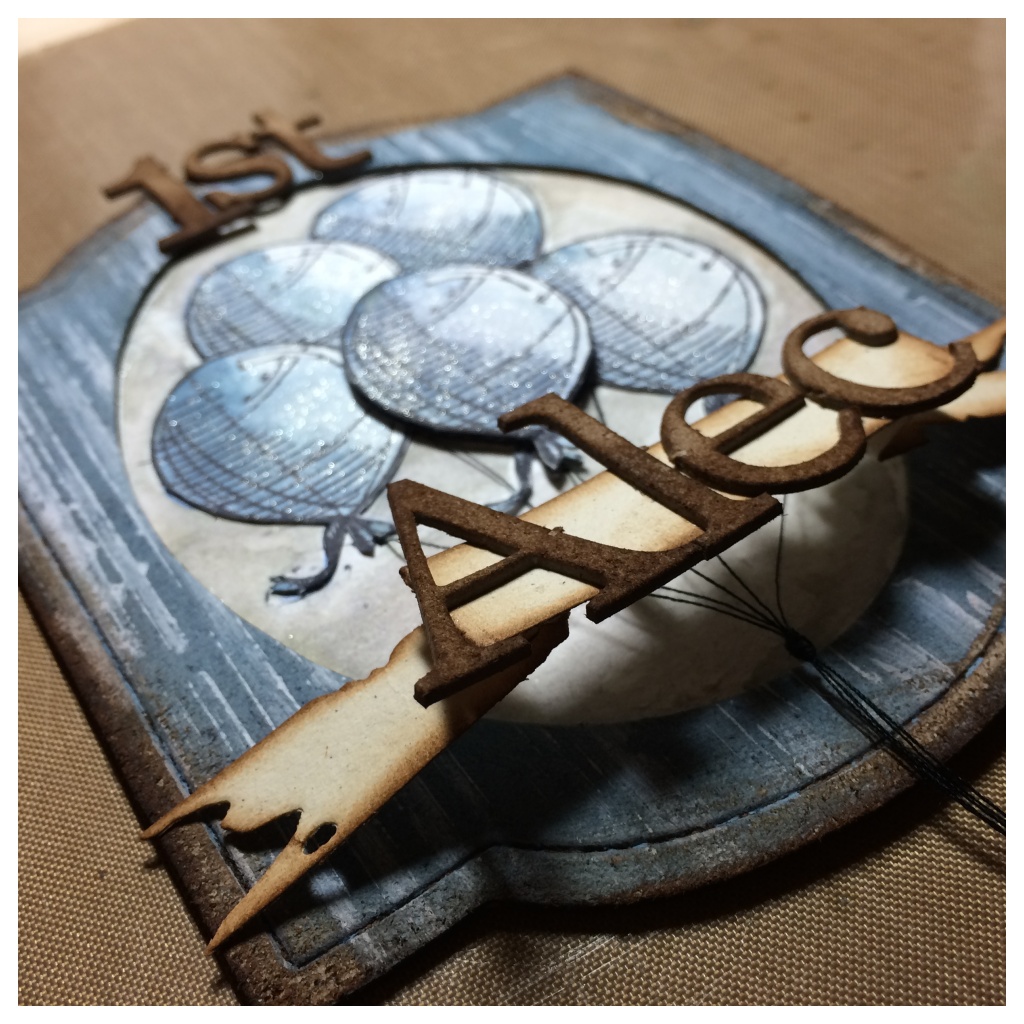
I stamped, watercolored with distress markers and fussy cut the balloon blueprints and die cut a cameo frame from grungeboard and inked with distress paint and inks.
Thanks for taking the time to look at my card and thank you for your comments, I really do appreciate them.
~
supplies: tim holtz; surfaces (distress watercolor cardstock, grungeboard, manilla cardstock, shrink plastic, core-dinations kraft core)/distress ink (stormy sky, vintage photo, walnut stain)/distress ink markers (stormy sky, frayed burlap, pumice stone)/distress paint (stormy sky, picket fence)/alcohol inks (espresso)/idea-ology (paper stash french industrial, industrious stickers borders)/dies (cameo frame, sized ovals, tattered banners, mini filmstrip & mini tickets)/stamps (#154 mini blueprints 4)
other: archival ink (jet black)/glossy accents/sewing machine
Category Craft, Craft Creations, Craft Techniques | Tags: | 3 Comments | Views: 827
25th February, 2015 by iGirlZoe
Phew! I’m just in time with this months Tim Holtz 12 Tags of 2015!
I’ve just spent 4 wonderfully restful days in the mountains with my DH celebrating 7 years since I moved to Switzerland, and I took some time out to make my tag.
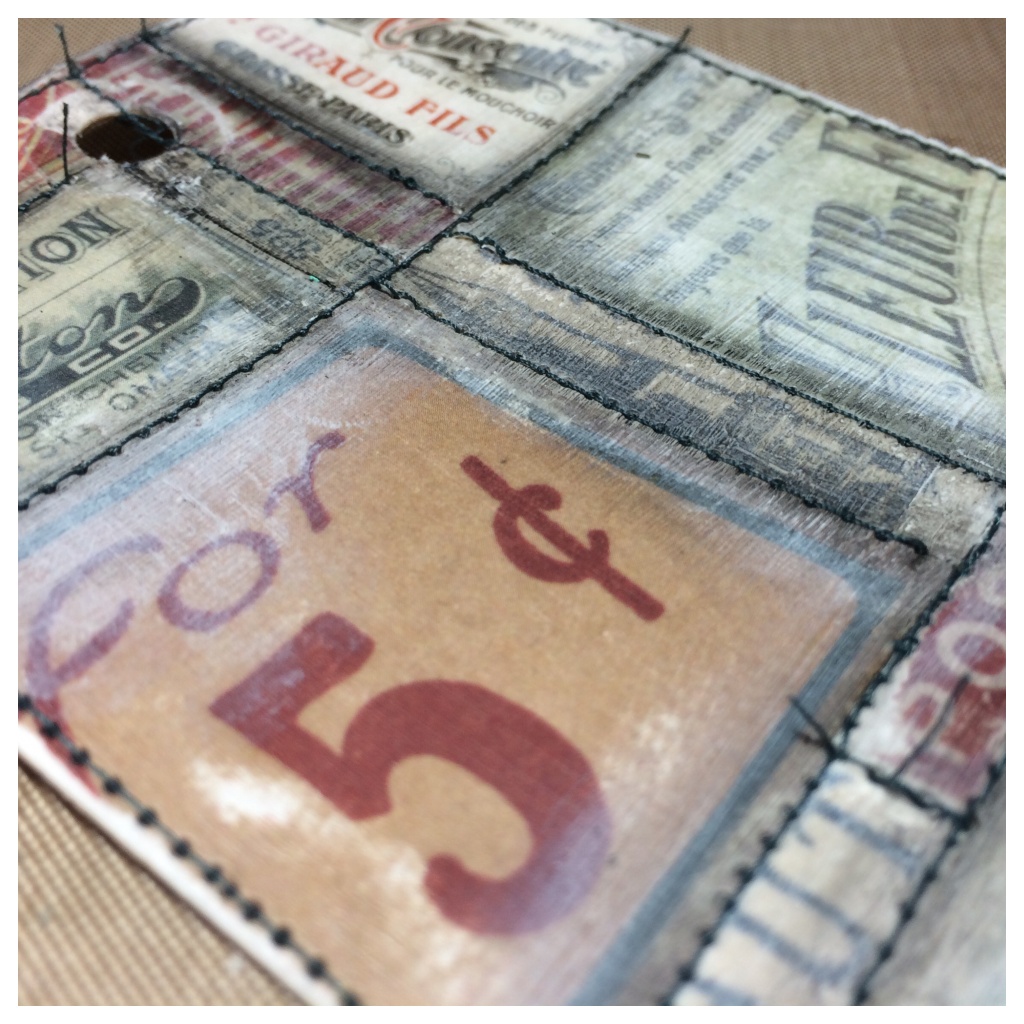
My love affair with my sewing machine continues, so I took Tim’s patchwork idea literally. Once I had prepared the patches, (see Tim’s blog post for the technique), I stitched between them.
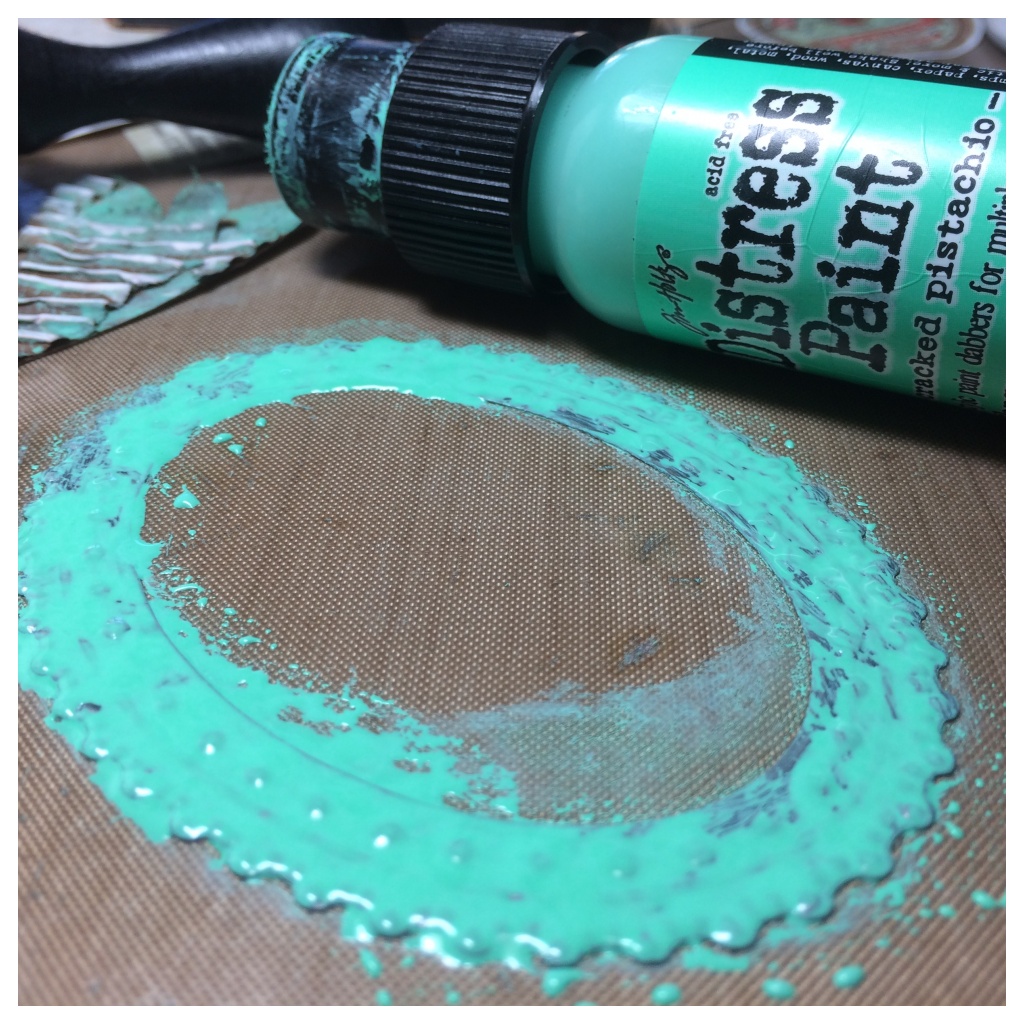
My other love affair is with the new distress colour, Cracked Pistachio! I covered the industrious frame sticker with cracked pistachio paint and allowed to almost dry, then wiped sections for a great faux patina.
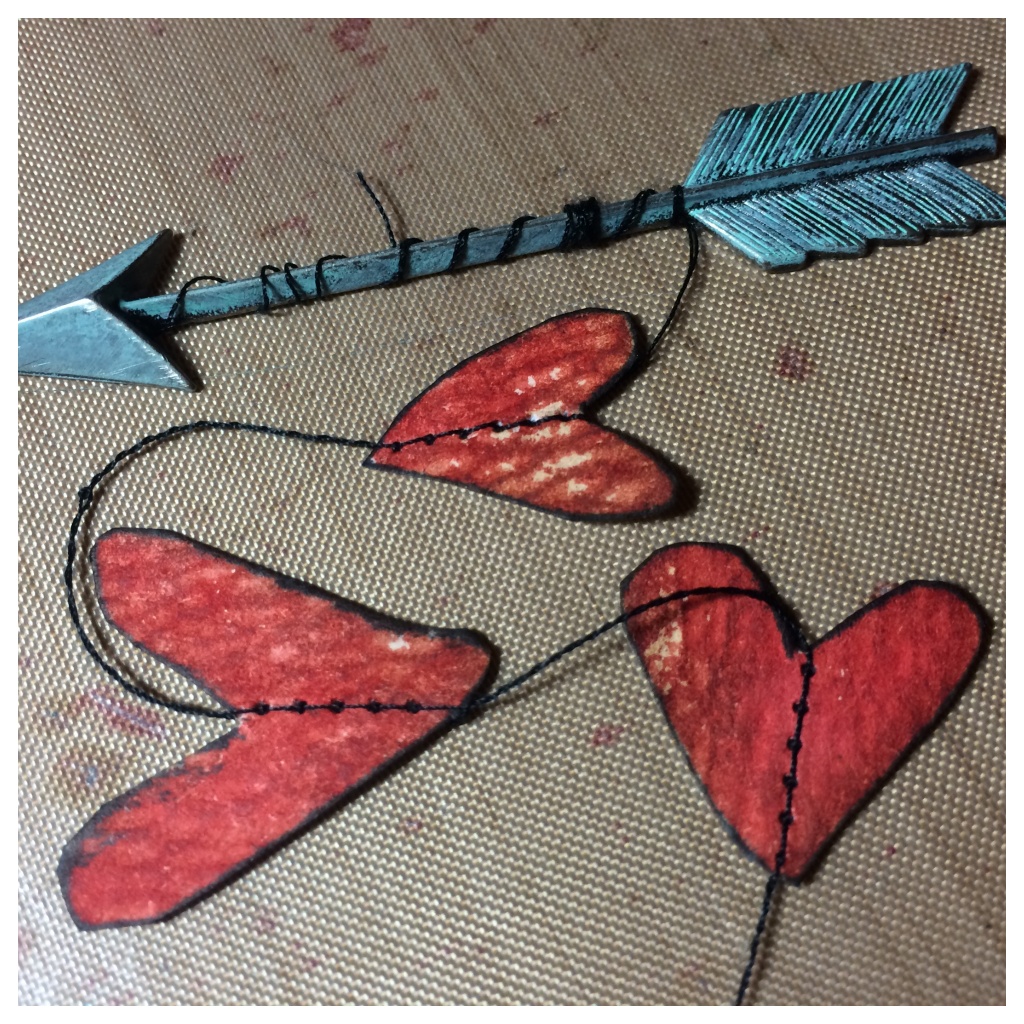
I stamped hearts using the new Tim Holtz stamp set “watercolor” set. I cut them out and fed them through my sewing machine, leaving a length of thread between each. I wrapped the excess thread at the top around the arrow adornment and then glued the arrow to the tag.
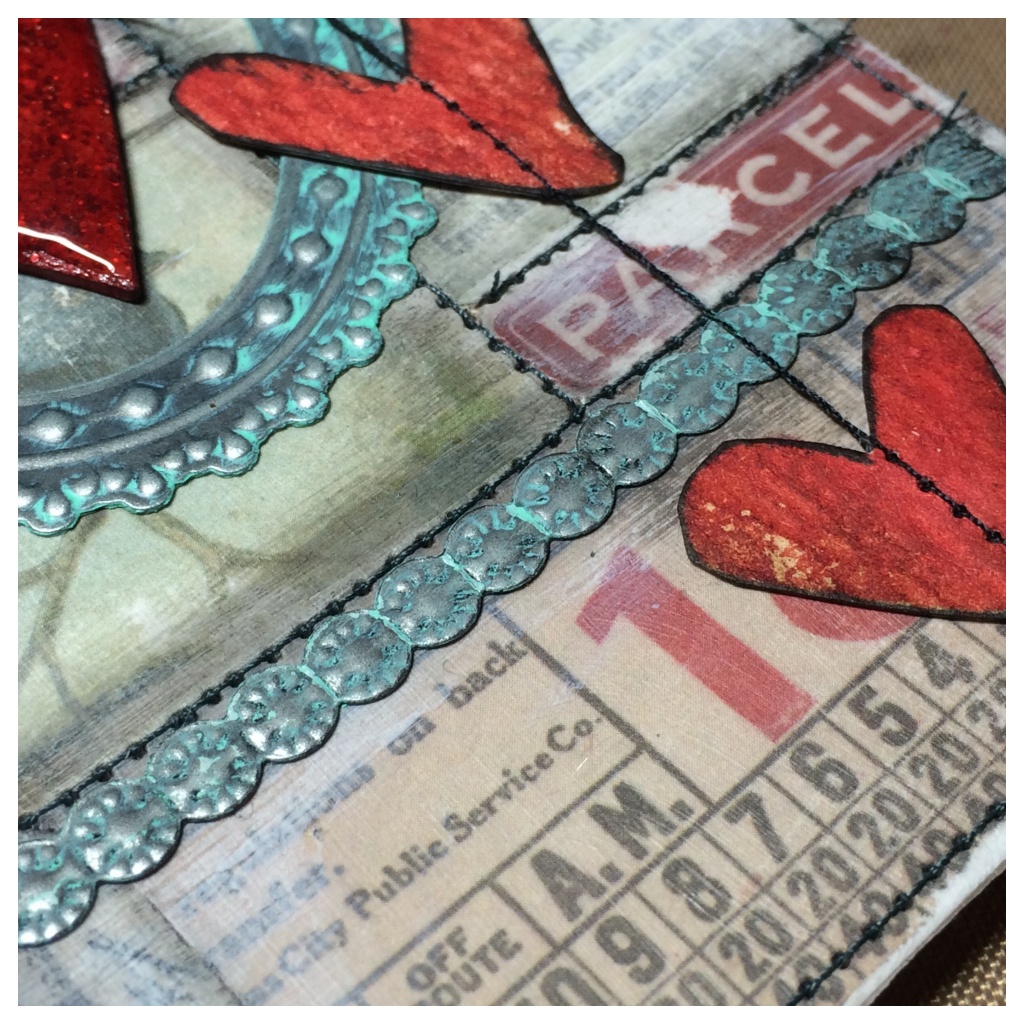
I repeated the faux patina on the industrious border and XO stickers, as well as the arrow adornment. I had to talk myself out of just covering the entire tag in a cracked pistachio paint wash! 😉

I am SO excited about the new Tim Holtz handwritten thinlit dies that are being released this year! Whilst waiting for them, I re-purposed a die from the holiday scrip set. I thought the sentiment was perfect for this. I made the heart as shown in my Love Distress post.
Thanks for taking the time to look at my tag. You can see this months tag and techniques on Tim’s blog and you can see the post translated into French on Scrapdeco’s blog.
I am also playing along with the Love is in the Air challenge over at Inspiration Journal and the No Rules challenge over at Simon Says Stamp.
~
supplies: tim holtz; surfaces (manilla tag, distress watercolor cardstock)/distress ink (fired brick)/distress ink markers (black soot)/distress paint (picket fence, cracked pistachio)/distress stickles (fired brick)/idea-ology (ephemera pack, industrious stickers, arrow adornment, crinkle ribbon)/dies (holiday words: script, movers & shapers mini hearts)/stamps (#217 watercolor)
other: glue n seal/glossy accents/sewing machine
Category Craft, Craft Challenges, Craft Techniques | Tags: | 7 Comments | Views: 1,304


I was there in the afternoon.