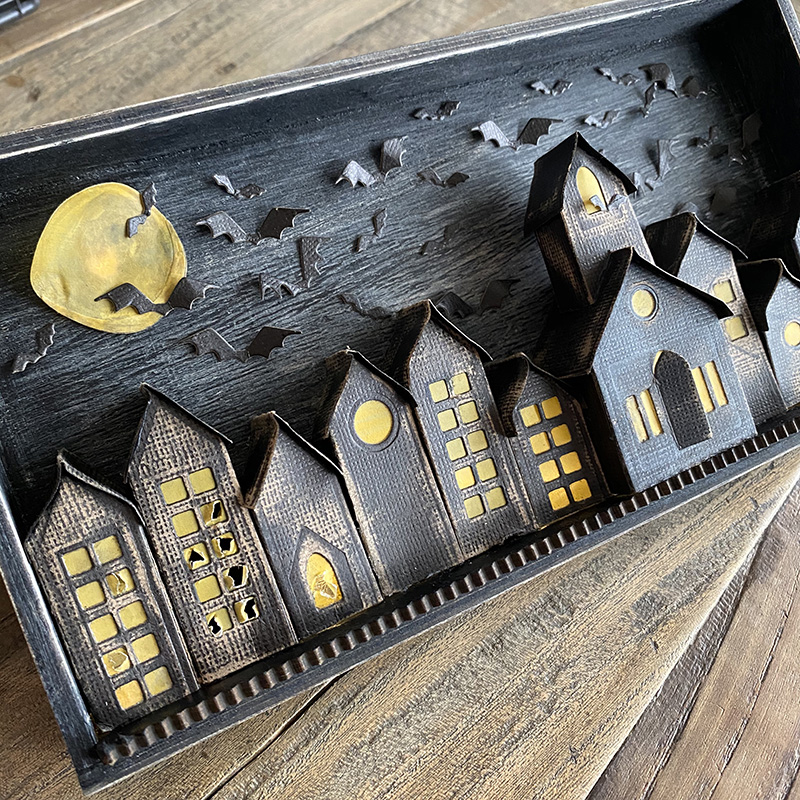
Hello friends. Firstly I want to say a great big thank you for your kind comments on yesterdays post. I really appreciate the encouragement and I hope that the post will encourage you to make and share something too. I’m back today with a sample I made for the Tim Holtz Sizzix Chapter 4 die release. If you’re ready to get your spook on, take a walk with me down to Halloween street where there are bats in the belfry and something sinister is stirring behind those smashed out windows…
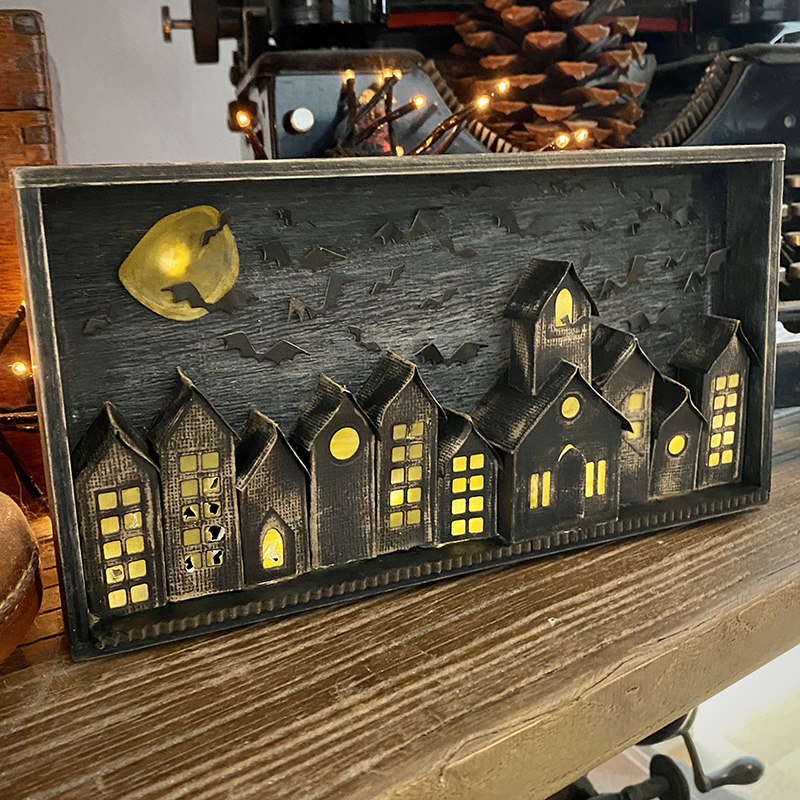
When I received the chapter 4 dies I confess that I completely overlooked the paper village thinlits dies (664741) . It wasn’t until we had our maker team zoom call with Tim and he showed them built that I “got it” and was hooked! They are so versatile, not only in the way that you can customise and accessorise the buildings, windows, doors and roofs; but that they will be suitable for every season. Plus they make a pretty cute birdhouse. 😉
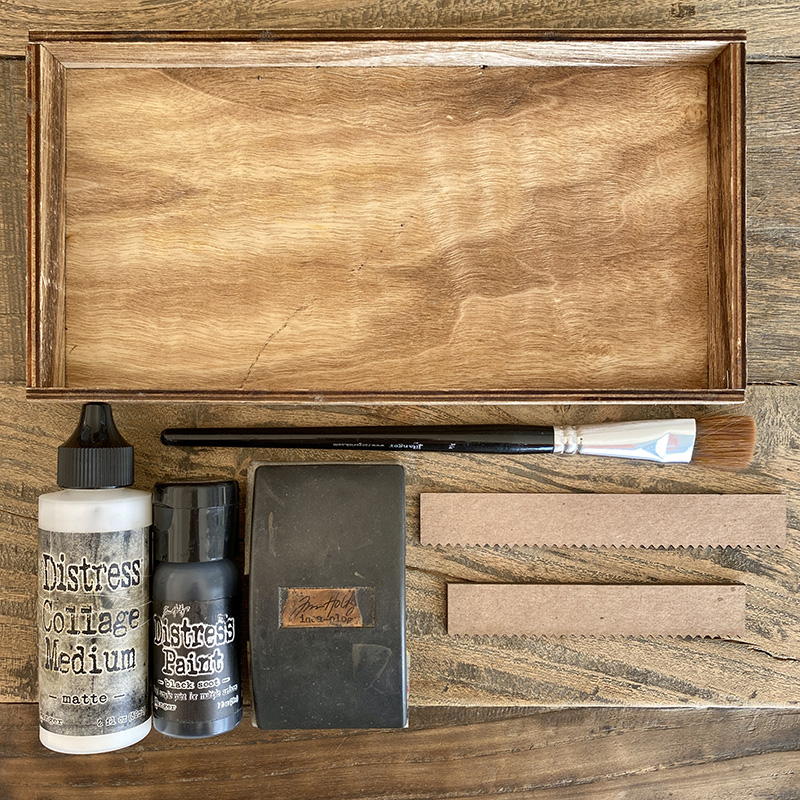
Gather an idea-ology vignette tray, paintbrush, distress collage medium matte, black soot distress paint, a sanding grip or sandpaper and etcetera thickboard pinked trims.
Using the paint brush, cover the vignette tray with black soot distress paint and sand the back and edges to give a distressed look.
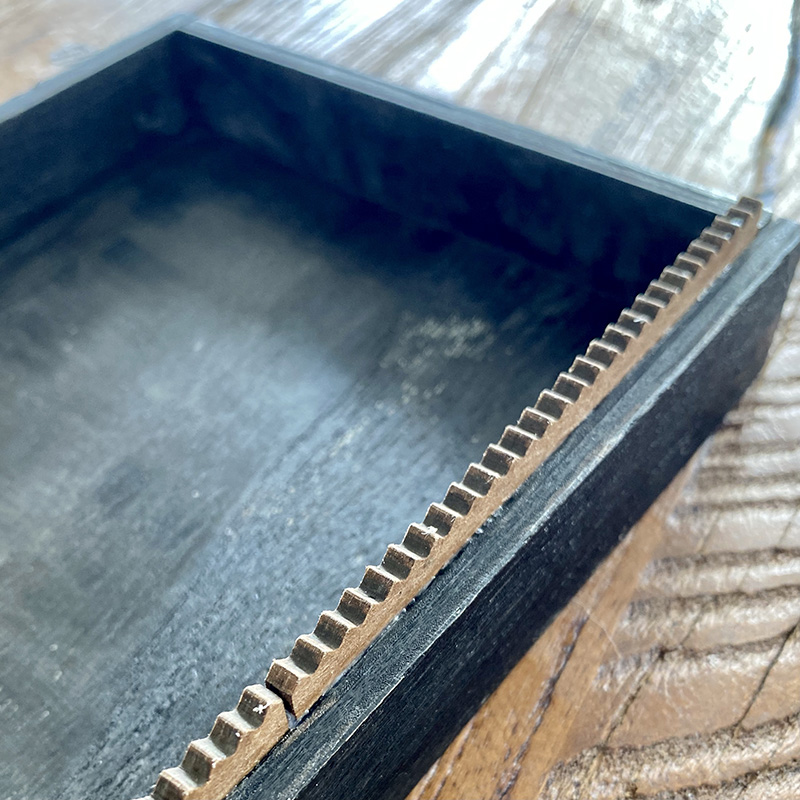
I wanted to use the small vignette tray as my base but the ledge wasn’t deep enough to seat the largest house that I had planned to make into a church. By overhanging the edge of the vignette you would see the light from the tiny lights and it would spoil the effect of a darkened street, so I came up with a solution… etcetera thickboard pinked trim!
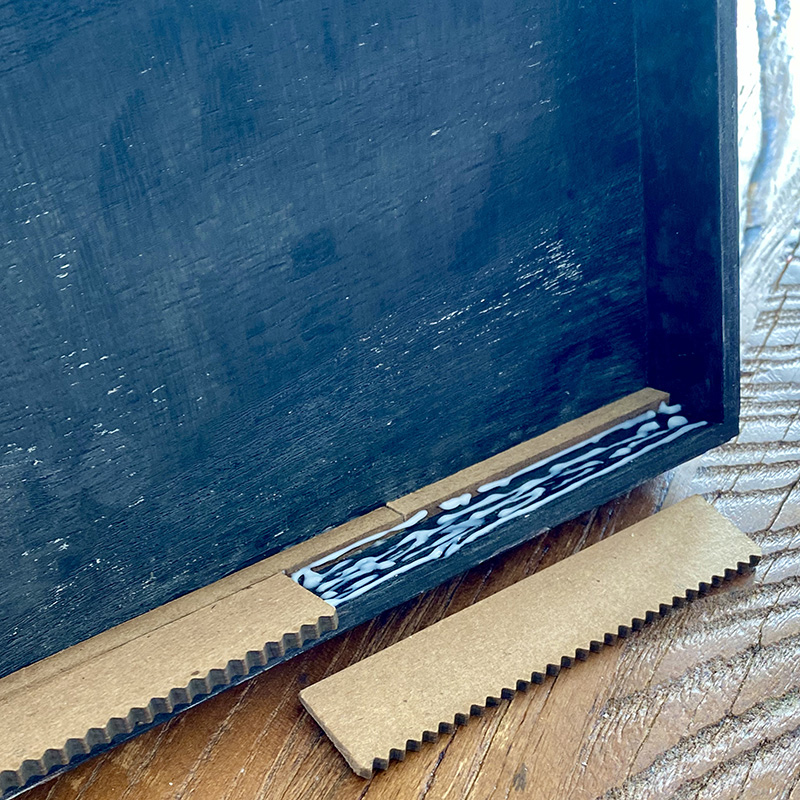
I used etcetera thickboard pinked trims together with trim from the bat web trims which worked perfectly. Using distress collage medium matte to glue the trim into place, I painted with black soot distress paint to match the vignette.
I love the pinked trim for this, it works with the creepy vibe of the vignette and gave me the perfect platform for my paper village…
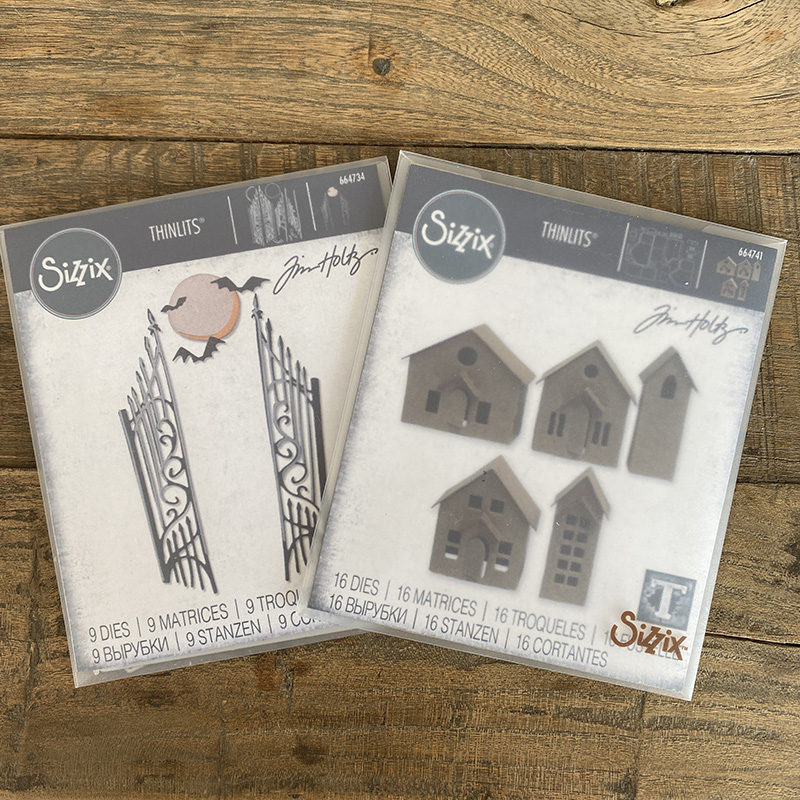
Next it was time to build my street using the paper village (664741) thinlits dies from Chapter 4 and gate keeper (664734) thinlits dies from Chapter 3… If you’re new to Tim Holtz and or the Sizzix dies, they are released in 4 “Chapters” throughout the year.
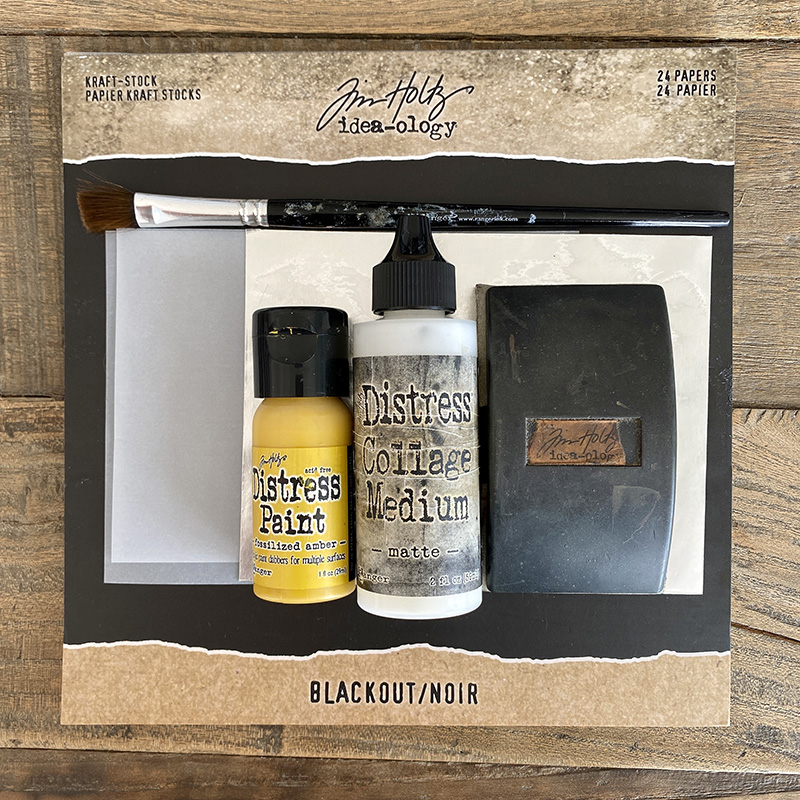
Gather idea-ology Blackout Kraf-Stock (because it is the BEST), alcohol ink foil tape, vellum, paintbrush, sanding grip or sandpaper, distress collage medium matte (you’ll want the bottle for this) and fosslized amber distress paint.
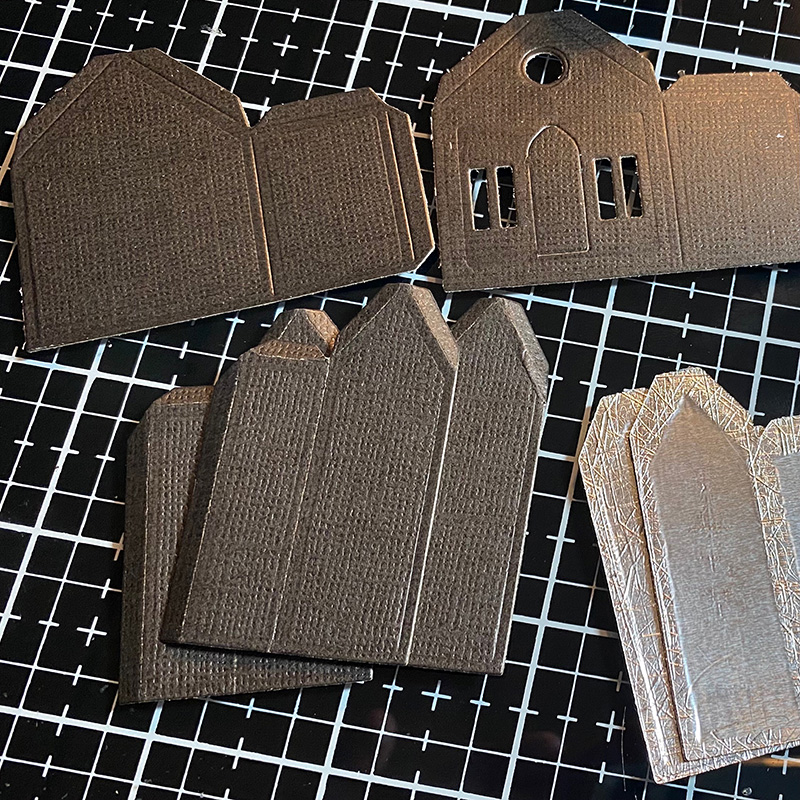
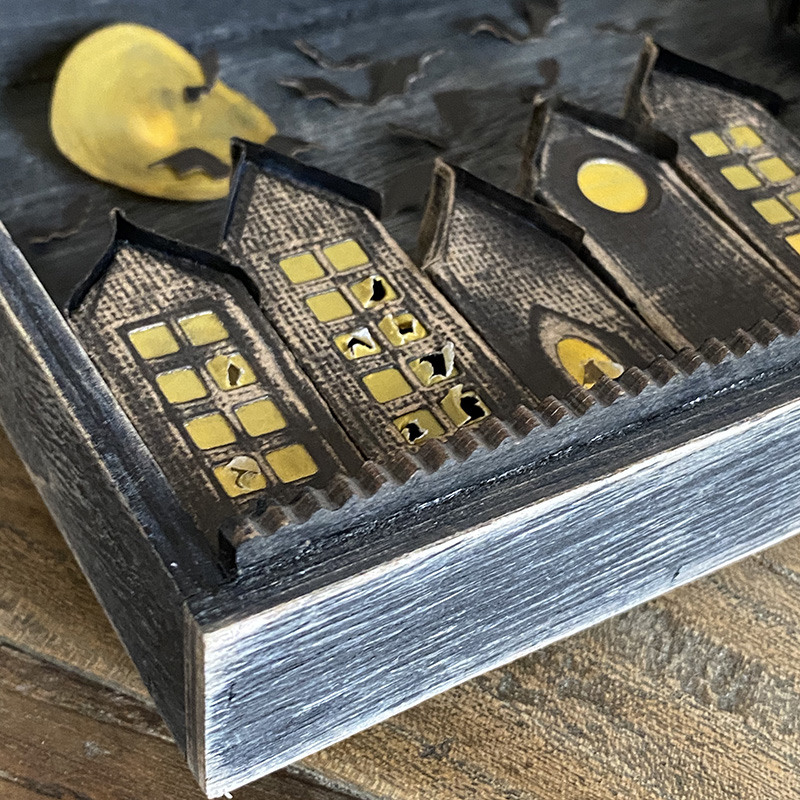
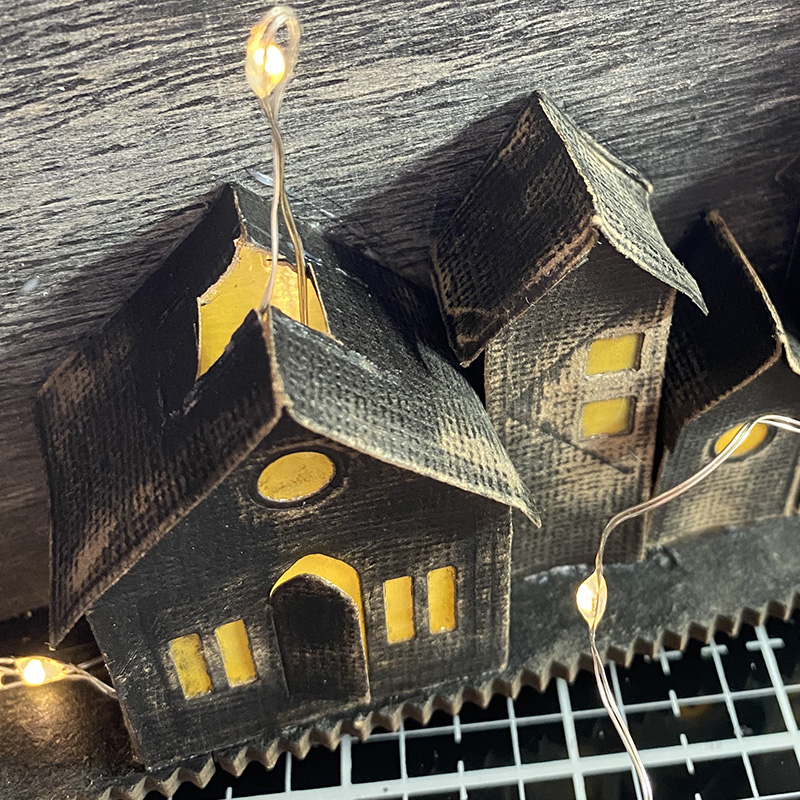
Die cut your village from the Blackout Kraft-stock and sand, it will reveal the cool kraft core. For the back of the houses, cover the blackout with foil tape before die cutting. You don’t need to do this, but the reason that I did with some of the houses was to reflect the tiny light and give a brighter light compared to those which I didn’t line with foil and painted black inside. I didn’t add lights inside those houses to give the effect that the lights were out.
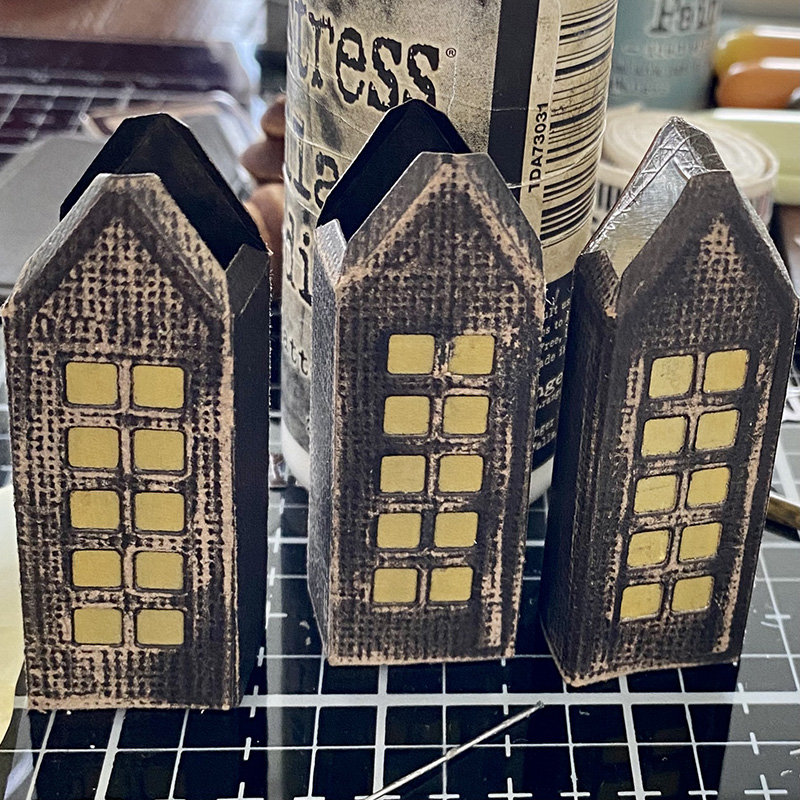
You can see in the pic above that only the house on the right is foil lined. The other two were painted with black soot distress paint and won’t be lit inside.

The tiny lights were fed through a hole in the back of the vignette tray I made using a dremel micro and drill bit. I got this for my birthday and it’s the business. I used a hot glue gun to hold the tiny lights in place before securing them with distress collage medium matte. The hot glue is easier than using tape to hold them in place but I pulled up the hot glue after the Distress collage medium had bonded as the houses won’t sit flush on hot glue. Do not put hot glue on the bulb of the tiny lights, only use it on the wire part or you could damage your lights.
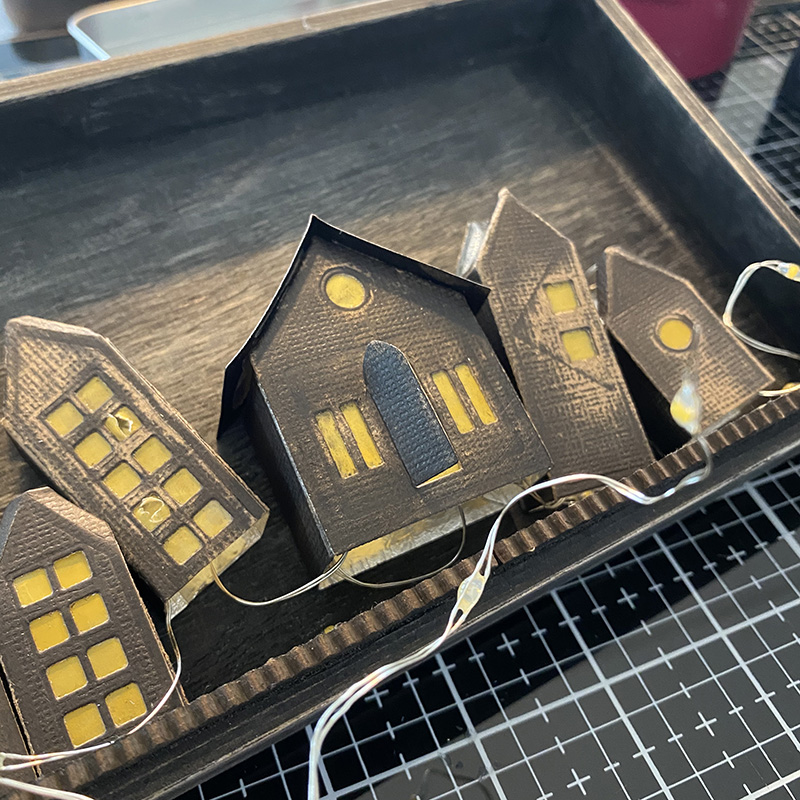
Place your houses into the vignette tray to see where you want them. You will see from the pic above that apart from the large house that would become the church, none of the houses had the roof on. The reason for this was because I wanted to be able to flatten the houses and trim the bottom using my TH tonic guillotine to vary the height of the houses. I didn’t want to trim them until I could see how they looked stood next to each other. I was tucking the lights in to each house to figure out the placement of these too. I thought this picture might be useful for you…
Then it was time to assemble the tray. I thread the lights through the hole at the far left end of the vignette box and ran them along the back, keeping the wire taught and securing in place with distress collage medium. When the lights were at the very right hand end of the vignette I turned them back and used the excess to start to tuck into the houses as I glued them down. The tiny lights are really easy because the wire allows you to bend them into shape, allowing you to place the house over the top and secure by running a line of distress collage medium to the base of the house. The glue shrinks as it dries so you won’t be left with residue.
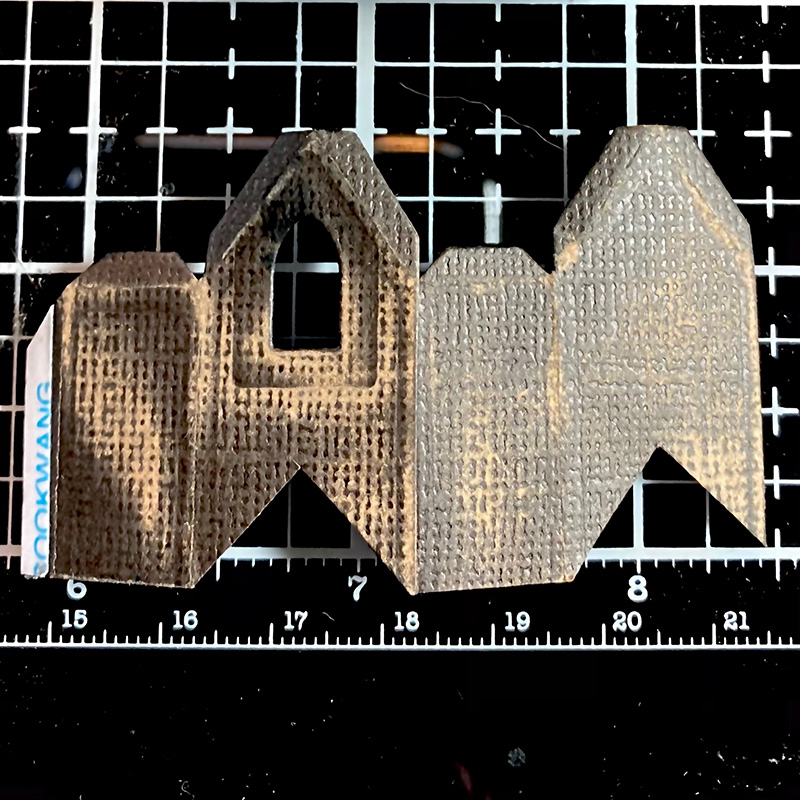
To create the church spire, I die cut the tall thin house and used one of the doors as a window. I cut a V into the front and back (as pictured above) which allowed it to sit on top of the church roof.
I cut a hole in the roof to allow the light to be fed up into the spire.
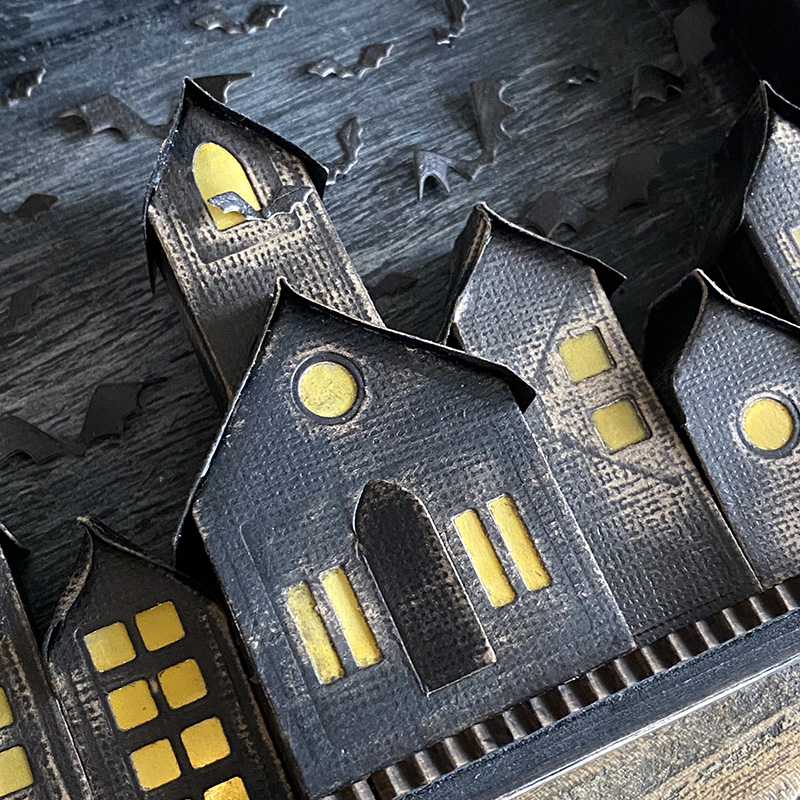
I definitely tapped into my love of Tim Burton and the movie Beetlejuice when I sat down to make this. I curled the roofs slightly to give it a creepy look. I found it was best to place the roof over the house without glue first and curl the roof. Then add glue and hold into place. If you try to curl it as you stick it down for the first time, it peels back up.
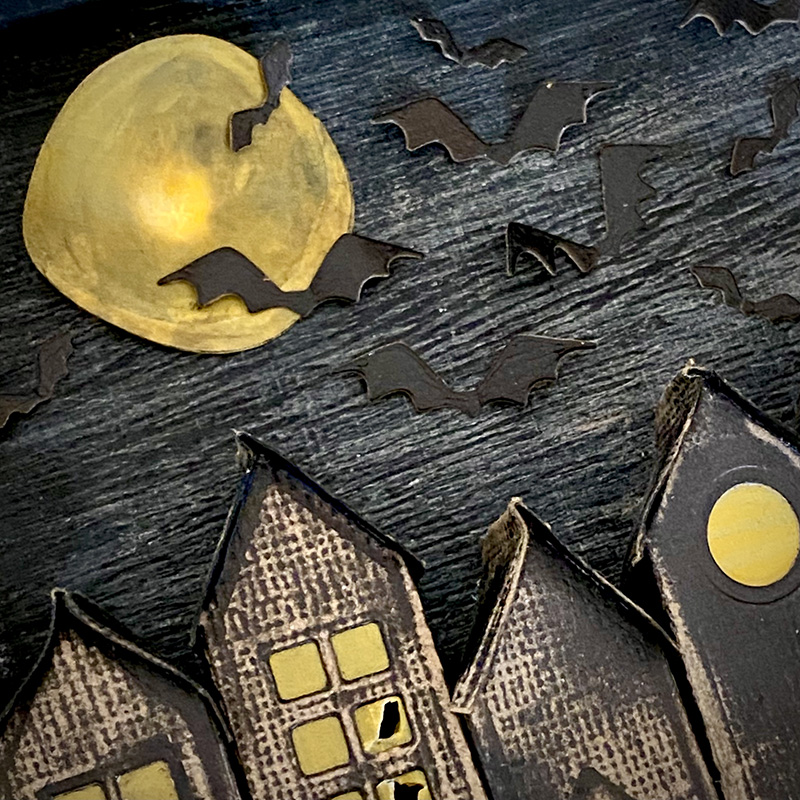
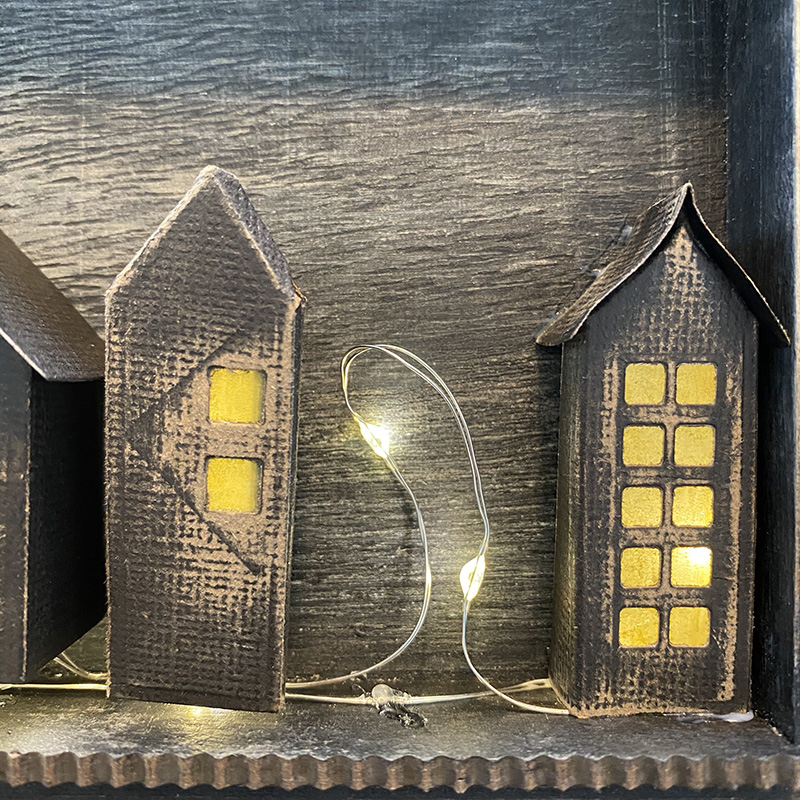
I die cut the moon from the gate keeper thinlits die (664734) out of vellum which I painted with fossilized amber distress paint. I used this paint covered vellum to line the inside of the front of the houses over the windows. The tiny lights thread back out through the hole on the left of vignette and back in through a hole I drilled behind the moon. It allowed me to just use one set of lights for the entire vignette tray.
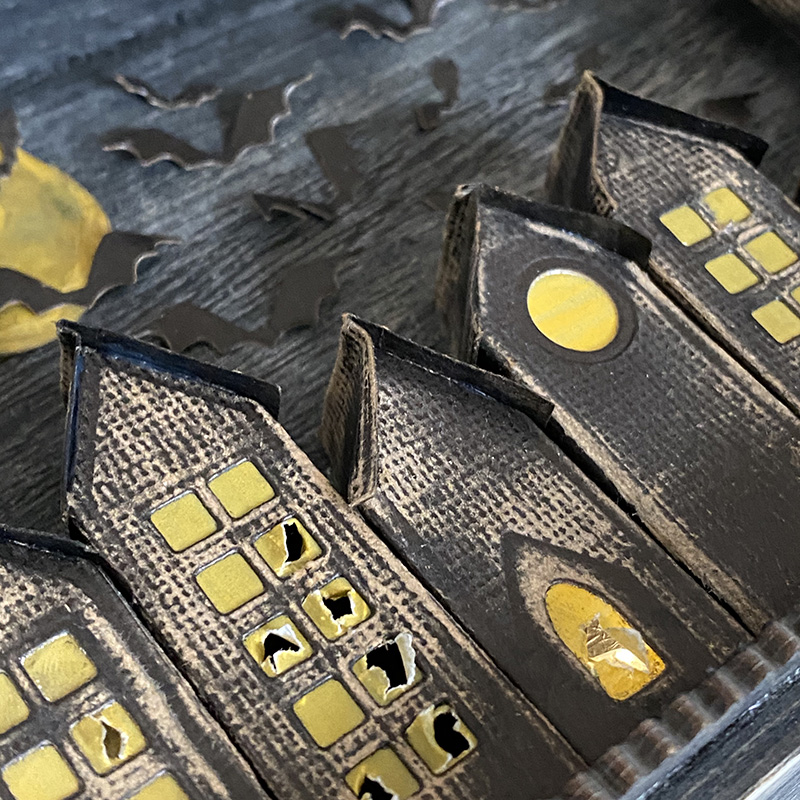
Using my scissors I poked holes through some of the vellum and used the non brush end of my paintbrush to widen them and make them looked smashed out.
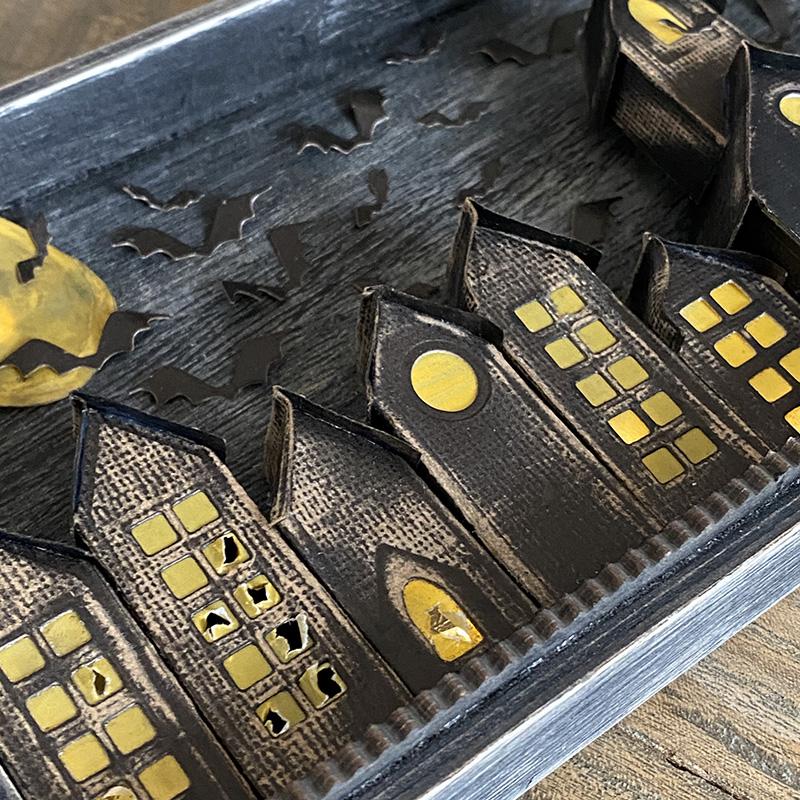
You can see the houses on the left that were painted black inside and had no tiny lights tucked inside. With smashed out windows and no lights they look abandoned…
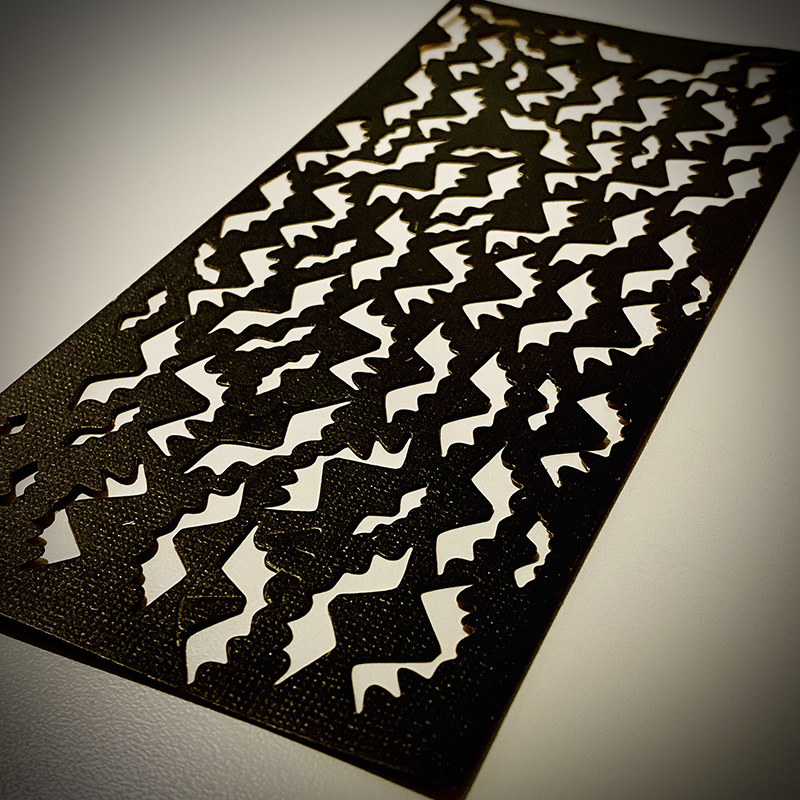
I’m very lucky to have a husband who will help me die cut to meet a deadline. As I was racing the clock to get the houses assembled before FedEx came to collect, my sweet husband die cut all these bats from the gate keeper thinlits die set for me. He’s a keeper.
If you missed out on the facebook LIVE, you can catch up on all the fun over on Tim’s blog.
Thanks for stopping by. I will be back tomorrow with more makey makes.
Zoe


Just brilliant – and so enjoyable hearing how you solved each hitch as you went… really clever to add the pinked trim for a deep enough base, and the church tower is perfect.
Alison x
This was one of my favorites. I love all the ways you used these dies. This is a triumph. The black and grunge and brilliant details ‘broken’ windows! Just inspired. Your creative energy and enthusiasm is inspiring, just like Tim’s. I am spending tomorrow in the attic (not in a crazy lady way, that’s where my studio is) Thanks for spreading the joy of making. xox
What can I say Zoe, other than this is one of my favourite Halloween projects this year (and I so love Halloween!), it is creepy and spooky and fabulous! I loved seeing how you constructed it and of course, now I want to make one too. This was a genius idea! Hugs, Anne xxx
Fun, fun, fun…yes, I would say he is a keeper…I have trouble just getting mine to look at my projects…LOL…So many possibilities from one die set…for all seasons, for all reasons…
This is so cool Zoe. I love the row of creepy houses but the bats and moon seal the deal. Perfect way to fill the empty space!!!
Awesome. I especially love how there are not really alot of different products used to make such an impressive item. It’s a credit to your creativity that you can make something that any Halloween fan would love to have on display using a limited amount of product and die cuts. Great work!
You are so talented, I love all the things you make!
Love it!! How creative you are. I need to order that house set. Thank you for sharing.
Fantastically spooky, dark street and the bats create a scary silhouette for those brave enough to go for a spooky walk…🎃 Love this project Zoe, very inspiring!!
thanks for taking us all on a walk down your creative Halloween Street, another amazing project my friend xxx
Thanks for sharing! This is too cute & you did a fantastic job. I love this project & I love Halloween!
Absolutely stunning! Thank you for sharing how you created it.
Another amazing make Zoe! Love it, thank you for sharing all your tips and tricks. Definitely agree, your hubby is 100% a keeper! I can’t wait to see your colourful version of this too. Look forward to the next makey make xx
Another inspirational piece Zoe! Thanks for sharing all of your challenges and how you overcame them.
I’m not a big fan of creating for Halloween but this is truly inspirational. Great job!
Really a wow piece. Thanks for sharing.
Oh Zoe! This is absolutely amazing! Thanks for the great instructions and techniques that you used! Must have this die!
WOW this is great!!!!!! I love it. Thank you for sharing how you made it also. I have never considered getting house dies till now.
Blackout for life club….😜🖤
Me mates a keeper! Yep!
LOVE the black and dark feel. I might not venture onto this street for candy…lol! What a block of spooky wonderfulness!