‘Ranger Ink’ Category

  1. Limited Edition Rock Candy

    7th October, 2023 by iGirlZoe

    igirlzoe: tim holtz ranger ink distress rock candy glitter

    Hello friends. Happy Saturday! If you joined Tim Holtz for the Halloween Hoopla Part 1, you will have seen him announce the Limited Edition Distress Rock Candy Glitter bottle, launched to celebrate 10 years since Distress Glitter was first launched.

    igirlzoe: tim holtz ranger ink distress rock candy glitter
    The 7.7oz bottle comes with this beautiful vintage label and is most definitely worth having if you’re a Tim Holtz Addict, collector or glitter fan.

    This limited edition bottle is available while stocks last.
    Zoe

    affiliate links used at no cost to you


  2. Distress Embossing Glazes 2023

    19th July, 2023 by iGirlZoe

    igirlzoe: tim holtz ranger ink distress embossing glaze 2023

    Hello friends, hope you’re well and having a nice summer. I’m happy to be back making after a little break. Speaking of being back, it was nice to have Tim and Mario back on our screens for a Saturday LIVE welcoming the new 12 Distress Embossing Glazes. You can see the LIVE replay over on Tim’s blog.

    igirlzoe: tim holtz ranger ink distress embossing glaze 2023
    I love the new Distress Embossing Glazes and I was especially excited to have Pumice Stone and Bundled Sage in the glazes. I also love that Crushed Olive and Squeezed Lemonade look incredible grunged, Peacock Feathers makes wicked patina, Spiced Marmalade makes cool rust and you know that Mowed Lawn on a cauldron at Halloween is going to be amazing!

    igirlzoe: tim holtz ranger ink distress embossing glaze 2023
    I created this fun swatch for the new Glazes using a technique from one of Tim’s YouTube videos. You can see the technique video HERE Timestamp: 1:24:38. Let’s get into the rest of the details…

    igirlzoe: tim holtz ranger ink distress embossing glaze 2023
    To create the background smoosh distress ink and distress oxide ink onto a non stick craft mat and spritz with water. Drag a whole piece of distress watercolor cardstock through the ink wash and dry with a heat tool, going back to pick up ink spots, drying between layers.

    igirlzoe: tim holtz ranger ink distress embossing glaze 2023
    Don’t look past your seasonal stamps as often they can be used all year, like these background stamps from Gothic Tapestry stamp set that I stamped with Distress Archival ink.

    igirlzoe: tim holtz ranger ink distress embossing glaze 2023
    Stamping without a grid block allows you to stamp small portions of the stamp to create a more faded/aged look

    igirlzoe: tim holtz ranger ink distress embossing glaze 2023
    Add design tape to create points of interest or cover up something that didn’t work (which is what happened here lol)! Mount the background onto a sheet of distress kraft heavystock and distress the edges with a paper distresser tool. Swipe the tattered edges with a distress archival ink pad, direct to paper.

    igirlzoe: tim holtz ranger ink distress embossing glaze 2023
    Blend distress ink through a stencil with a blending tool and quickly sprinkle on Distress Embossing Glaze, tap off excess and melt. I love how the glaze makes the ink splodge look wet. I used walnut stain distress ink with pumice stone glaze over the top. It created a nice fade where the ink was lighter.

    igirlzoe: tim holtz ranger ink distress embossing glaze 2023
    In black soot distress archival ink, stamp the dial stamp from The Inspector stamp set onto distress watercolor cardstock and fussy cut. Repeat 12 times so you have a dial for each new Distress Embossing Glaze color. Using the technique from Tim’s demo HERE.

    igirlzoe: tim holtz ranger ink distress embossing glaze 2023
    My sweet husband created some labels which you are welcome to use HERE. I printed them onto printer paper and mounted onto distress watercolor cardstock with distress collage medium. Set aside to dry for a few minutes.

    igirlzoe: tim holtz ranger ink distress embossing glaze 2023
    Using a die from the Chapter 3 Specimen die set to create tiny little tags. The font is perfectly sized.

    igirlzoe: tim holtz ranger ink distress embossing glaze 2023
    I secured with a little piece of tape and ran through my sidekick.

    igirlzoe: tim holtz ranger ink distress embossing glaze 2023
    Edged with walnut stain distress ink using a mini blending tool.

    igirlzoe: tim holtz ranger ink distress embossing glaze 2023
    Using distress collage medium, glue the label onto the base of the corresponding dial, allowing the label to hang off the edges a little.

    igirlzoe: tim holtz ranger ink distress embossing glaze 2023
    Repeat for each color.

    igirlzoe: tim holtz ranger ink distress embossing glaze 2023
    Poke 12 holes in the back where the dials will be attached. I did this by laying my dials where I wanted them to be and marking through the middle of a dial with a pencil.

    igirlzoe: tim holtz ranger ink distress embossing glaze 2023
    Secure the dials with an idea-ology large fastener. Confession… I intended to bash each of these with my tiny texture hammer and completely forgot until I was editing my photos for this blog post.

    igirlzoe: tim holtz ranger ink distress embossing glaze 2023
    igirlzoe: tim holtz ranger ink distress embossing glaze 2023
    Thanks for stopping by and let me know if you have any questions.
    Zoe


    affiliate links used at no cost to you


  3. Vintage Lost Shadow

    7th February, 2023 by iGirlZoe

    igirlzoe: tim holtz lost shadow distress ranger ink

    Hello friends. Before getting started on my Galentine and Valentine cards, I’m sharing my final make from the Tim Holtz LIVE launch of the gorgeous new member of the Distress family, Lost Shadow!

    igirlzoe: tim holtz lost shadow distress ranger ink
    Naturally I had to make something with a hat and the new Tailored thinlits die set was perfect. I wanted to create a “sampler” to showcase the different mediums of Lost Shadow Distress. Let’s get into the details…

    igirlzoe: tim holtz lost shadow distress ranger ink
    I love the Lost Shadow Distress Paint as a base for idea-ology metal. I added it to an idea-ology vintage clip. You can see underneath the idea-ology adornments star I added, the metal is not shiny but a nice vintage matte gray, which is the Lost Shadow Distress Paint! I added distress opaque grit-paste, and once dry, crackling campfire and ground espresso distress paints to create a rust effect. I used a little walnut stain distress crayon over the top to create extra grunge. YUM!

    igirlzoe: tim holtz lost shadow distress ranger ink
    Use the same products as on the vintage clip and adornments star to distress the idea-ology hardware heads.

    igirlzoe: tim holtz lost shadow distress ranger ink
    Lost Shadow Oxide Spray over distress cracked leather cardstock is a dream! Look how it wicks into the cracked leather and is perfect for embossing, I used the new dotted multi-level embossing folder, which I love!

    igirlzoe: tim holtz lost shadow distress ranger ink
    Lost Shadow Distress Paint works as a great resist. I dipped the hat and coat die cuts from Tailored die set into the paint and dried before blending in walnut stain distress ink. You can see where the paint resisted the ink for a weathered look. The entomology moth was stamped and cut using the entomology stamp set and matching framelits die set, both available and linked below. I used Lost Shadow Distress Re-inker to watercolor the moth. It’s very subtle and pairs beautifully with walnut stain distress.

    igirlzoe: tim holtz lost shadow distress ranger ink
    The ticket booth stamps were die cut using the matching framelits set and sprayed with Lost Shadow Distress Spray Stain. Edged with a little walnut stain distress ink and stamped with black soot distress archival ink. I love that you don’t need many products to create these cool tickets. The wishbone was weathered with a little Lost Shadow Distress Paint.

    igirlzoe: tim holtz lost shadow distress ranger ink
    Using the eye chart stencil and a mini blending tool, I blended Lost Shadow Distress Paint to stencil numbers down the side of the etcetera tag.

    igirlzoe: tim holtz lost shadow distress ranger ink
    Thanks for stopping by and let me know if you have any questions.
    Zoe


    affiliate links used at no cost to you


  4. Lost Shadow Distress

    2nd February, 2023 by iGirlZoe

    igirlzoe: tim holtz lost shadow distress ranger ink

    Welcome to the family Lost Shadow Distress! If you missed the formal introduction, RUN over to Tim’s blog and watch the replay. What a fantastic party with so much inspiration and such a beautiful story about how the name came to be. I love hanging out on a Saturday for the LIVES and the new color reveal always has an extra special buzz about it and for me, this color was one to get really excited about. Here come the NEUTRALS!

    igirlzoe: tim holtz lost shadow distress ranger ink
    Lost Shadow is just my type and definitely one for the “most used box”… Five stars to Tim and the chemists at Ranger Ink for bringing us yet another chameleon distress with truly magical properties! Add frayed burlap spray stain to Lost Shadow oxide spray and see the magic for yourself! That’s where the background for this make began. Let’s get into some of the details…

    igirlzoe: tim holtz lost shadow distress ranger ink
    The mottled magic that happens when Lost Shadow distress oxide spray meets frayed burlap distress spray stain and it turns different colors! I was playing around, adding other browns and loved the end result so I decided to create a larger background and add it to a thickboard etctera tag.

    I’ve had a few questions about Etcetera tags and how to use them so I’m adding an action photo…

    igirlzoe: tim holtz lost shadow distress ranger ink
    Apply a light layer of distress collage medium to the bottom part of the tag. Line up the cardstock over the etcetera tag and press down the glued section. Peel back and begin adding distress collage medium to the tag, pressing down the cardstock as you go.

    igirlzoe: tim holtz lost shadow distress ranger ink
    If you want to stitch the edges, you would do this before gluing the cardstock to the tag. I sanded the edges using the new distress sanding disks on a mini round blending tool. This gets rid of any paper overlap and gives nice worn edges to ink with distress ink (I used walnut stain). You could poke through the hole and add the reinforcer that comes with it, but for this tag I chose not to.

    igirlzoe: tim holtz lost shadow distress ranger ink
    I die cut a piece of distress watercolor cardstock with the mixed media #3 thinlits die set (661186) and sprayed with Lost Shadow distress spray stain. I love the subtle but awesome mottled effect it gives and how it tones down the sharp white. I edged with walnut stain distress ink and added an idea-ology vintage clip to the top of the etcetera tag which was aged by adding Lost Shadow distress paint.

    This die has has been retired but it maybe out there if you search. An alternative would be to use another of Tim’s alphanumeric sets to create a similar background.

    igirlzoe: tim holtz lost shadow distress ranger ink
    I die cut a retro typewriter from the Tim Holtz Bigz die and embossed with the 3D industrious folder. Adding Lost Shadow distress paint as a base coat and then spraying with distress spray stains in various brown tones. Once dry I spritzed Lost Shadow distress oxide spray stain over the top to give some mottled light spots.

    I added a star from the idea-ology stars adornments pack which I covered with Lost Shadow distress paint and once dry, added a little distress opaque grit-paste and ground espresso and crackling campfire distress paints to give a rusty effect. Lost Shadow distress paint as a base for rusting metal idea-ology is AWESOME! I’m going to use this all the time, I ordered another paint so I have a back-up!

    igirlzoe: tim holtz lost shadow distress ranger ink
    I love to use etcetera trims as shelves for my makes. The decorative trims thinlits die set is a game changer and I use it all the time. I used to have to trace around the trim and then sand the trim. The time saved is incredible. I used distress cracked leather cardstock which I dyed with walnut stain distress spray stain and once dry sprayed with Lost Shadow distress oxide spray. I love the way the Lost Shadow oxide wicks into the cracked leather detail of the cardstock. Attach using distress collage medium and trim as required. You can cut through the thickboard with Tim’s scissors.

    igirlzoe: tim holtz lost shadow distress ranger ink
    Assemble your shelves using distress collage medium and add die cut letters, alphanumeric upper case. I used Tim Holtz Squeezers to get the letters lined up and into place without my fingers getting in the way and distress collage medium bottle with the fine tip to add just a tiny amount of glue. You could use adhesive backed sheets or a xyron sticker maker too.

    igirlzoe: tim holtz lost shadow distress ranger ink
    I’m OBSESSED with the new bulletin alphanumeric thinlits dies. When Tim first showed them to the makers I wasn’t sure if I was going to use them much because they’re so big but I couldn’t love them more and can’t stop using them. I die cut from distress watercolor cardstock and tapped the center of the letters into an inky Lost Shadow distress ink wash. For the border of the letters I blended in several layers of the Lost Shadow distress ink and a little walnut stain distress ink to create a darker outline.

    igirlzoe: tim holtz lost shadow distress ranger ink
    I added a piece of flair that is perfect for the typewriter theme and a few idea-ology type chips which I stocked up and have hoarded for years but need to use them, so I went with LOVE because it’s nearly Valentines and because I LOVE Lost Shadow Distress. It really is “just my type”…

    igirlzoe: tim holtz lost shadow distress ranger ink
    Thanks for stopping by and let me know if you have any questions.
    Zoe


    affiliate links used at no cost to you


  5. Tim Holtz Christmas Box

    19th December, 2022 by iGirlZoe

    igirlzoe: tim holtz lumberjack plaid distress ranger ink

    Hello friends, I hope you’re well and enjoying December. I’m sharing a Christmas gift tag box I made for the LIVE launch of the newest member of the Tim Holtz Distress family, Lumberjack Plaid. You can see this Christmas gift tag box and the other new color makes over on Tim’s blog.

    igirlzoe: tim holtz lumberjack plaid distress ranger ink
    I was inspired by Tim’s demo during the LIVE launch of his Christmas stamps and had just enough time to make and ship it for the new distress launch. It’s a simple make that you could complete in an afternoon. You could also do a little compartmental making each evening or when time allows. If Christmas is not your jam, it’s easily adapted to a Halloween, spring or an every day gift tag box. Let’s get into the details…

    igirlzoe: tim holtz lumberjack plaid distress ranger ink
    Using the technique Tim demoed, stamp panels of paper to cover a large vignette box. Add a word plaque from the idea-ology Christmas line with picket fence distress crayon rubbed in and add hardware heads to finish. I used distress collage medium to attach everything.

    igirlzoe: tim holtz lumberjack plaid distress ranger ink
    The inside of the vignette box is sprayed with lumberjack plaid distress ink spray and dried with a heat tool. Add a piece of striped stamped cardstock to the bottom of the vignette box and use the etcetera tag trims and decorative trims dies to create dividers. These are the scalloped edged trims, glued into place with distress collage medium.

    igirlzoe: tim holtz lumberjack plaid distress ranger ink
    Create envelope or gift box seals with the switchlits seal and darling stamp set, watercolored with distress pencils. The seals were cut from distress kraft heavystock and a couple sprayed with lumberjack plaid distress ink spray and the others from idea-ology metallic cardstock. The darling stamps are the perfect size for the seals.

    igirlzoe: tim holtz lumberjack plaid distress ranger ink
    Stamping in lumberjack plaid distress ink, create some tags to add to cards and gifts. The sentiment stamps from the new darling stamp set fit perfectly onto a tag cut from the chapter 3 thinlits collector die set. Grunge up some idea-ology candy canes and tie with string. Stamp and fussy cut to create ephemera, I took stamps from vintage holidays and department store stamp sets. An idea-ology tiny clip will hold them together neatly in the box.

    igirlzoe: tim holtz lumberjack plaid distress ranger ink
    Another technique I took from Tim’s demo to create these card toppers/gift tags using the new vintage label thinlits dies + bold tidings mini and plaid + nordic stamp sets, stamped in lumberjack plaid distress ink of course.

    igirlzoe: tim holtz lumberjack plaid distress ranger ink
    Using the postale thinlits die set from chapter 3 with the darling stamp set and distress watercolor pencils, create some mini cards.

    igirlzoe: tim holtz lumberjack plaid distress ranger ink
    The mini envelopes were created using the postale thinlits set cut from kraft envelopes that you can find here.

    Here’s how you make them…

    igirlzoe: tim holtz lumberjack plaid distress ranger ink
    Take a 5×7 inch kraft envelope and use a letter opener, ruler, palette knife to open the envelope. Trim away the flaps, leaving you with the center of the envelope which perfectly fits the postale envelope die. Run the die through your machine.

    igirlzoe: tim holtz lumberjack plaid distress ranger ink
    If you’re short on time or have no use for spare pieces of kraft paper don’t open the envelope, simply place the postale envelope die over the front of the envelope and die cut through it.

    igirlzoe: tim holtz lumberjack plaid distress ranger ink
    Assemble the envelope, then open the flap and spray one side with lumberjack plaid distress spray and once dry, stamp with the plaid stamp from plaid + nordic stamp set in black soot distress archival ink.

    igirlzoe: tim holtz lumberjack plaid distress ranger ink
    Create a file pocket to store tiny pieces of ephemera and blank notecards. Cut a folder using the specimen thinlits die set and stamp with stamps from vintage holidays stamp set in lumberjack plaid distress ink and black soot and vintage photo distress archival inks. Stitch the sides by hand or with a sewing machine to create the pocket.

    igirlzoe: tim holtz lumberjack plaid distress ranger ink
    Confession time… I repurposed this from my Christmas Charcuterie! I was a little pushed for time and this was perfect for my gift themed box. I think it’s cute to add a little trinket to the box.

    igirlzoe: tim holtz lumberjack plaid distress ranger ink
    I took the “some assembly required” photos for Mario aka MacGyver, who kindly assembles makes which travel better internationally disassembled. If you wanted to make a Christmas box for a gift, you could send it disassembled and wrapped in tissue with an assembly photo.

    igirlzoe: tim holtz lumberjack plaid distress ranger ink
    Thanks for stopping by, I hope this has been helpful and let me know if you have any questions.
    Zoe


    affiliate links used at no cost to you


  6. Witches Potting Shed Part 2

    9th December, 2022 by iGirlZoe

    igirlzoe: tim holtz idea-ology halloween witches

    Hello friends, hope you’re doing well! I had the best of intentions to get these posts finished before Halloween, but alas, December arrived! I make for the dark side all year though and there’s nothing to stop you adapting any of the things I share to any season, so grab your broomsticks witches and let’s continue this flight…

    Remember that the seasonal products are one and done for the season so grab anything you need to last you. To see all the incredible makes, head over to Tim’s blog for the LIVE replay.

    igirlzoe: tim holtz idea-ology halloween witches
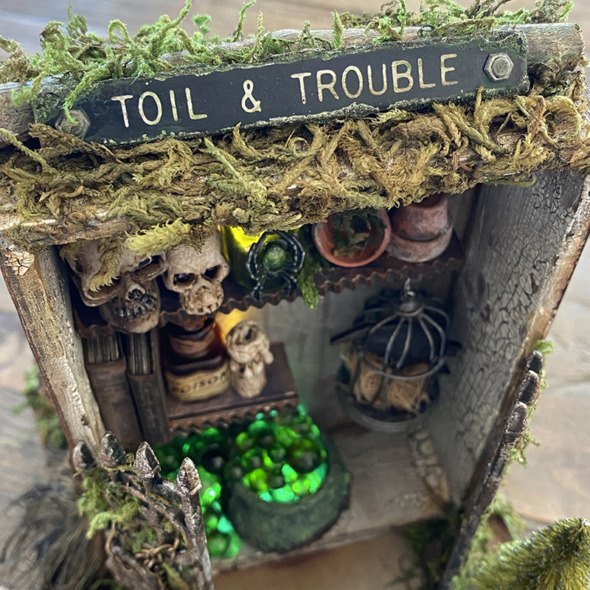
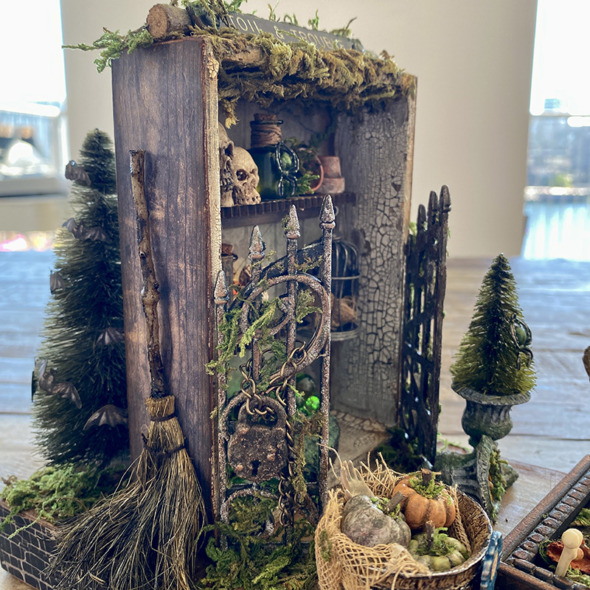
    Today I’m sharing part 2 of the witches potting shed made for the LIVE launch. You can see the introduction and close ups in my first post. Let’s get into the details…

    POTTING SHED, CAULDRON + GATES

    igirlzoe: tim holtz idea-ology halloween witches
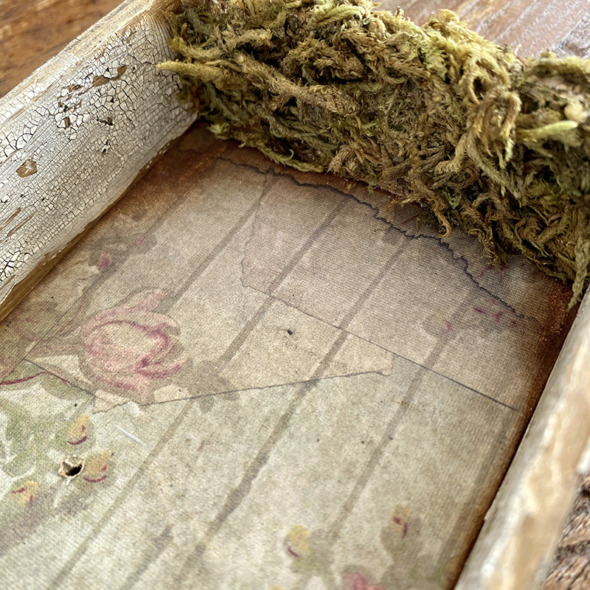
    In Part 1 I talked through preparing the vignette box.

    igirlzoe: tim holtz idea-ology halloween witches
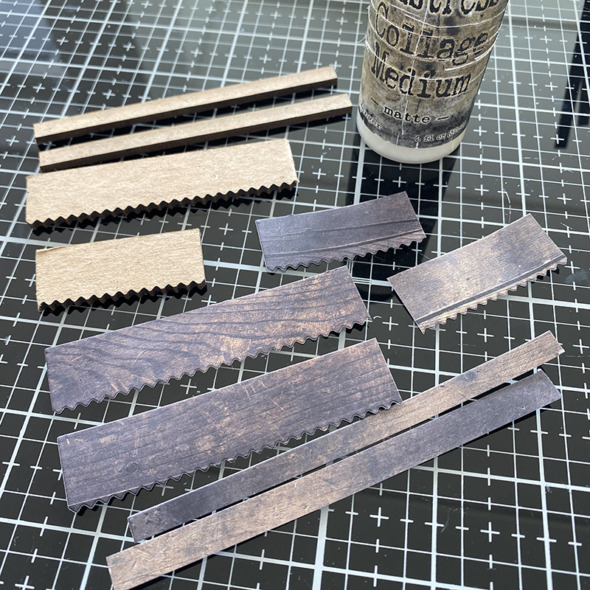
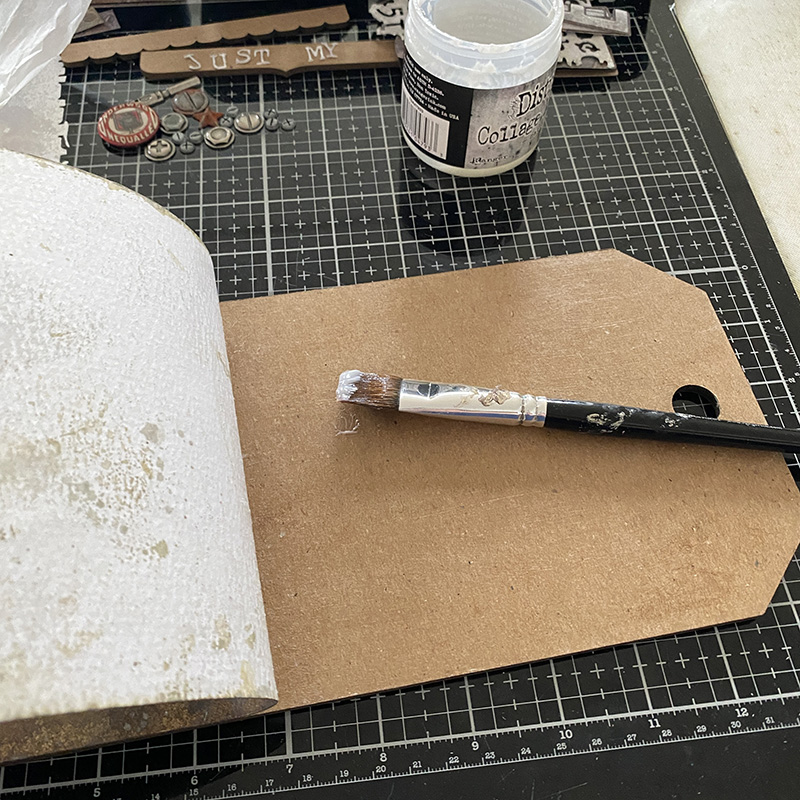
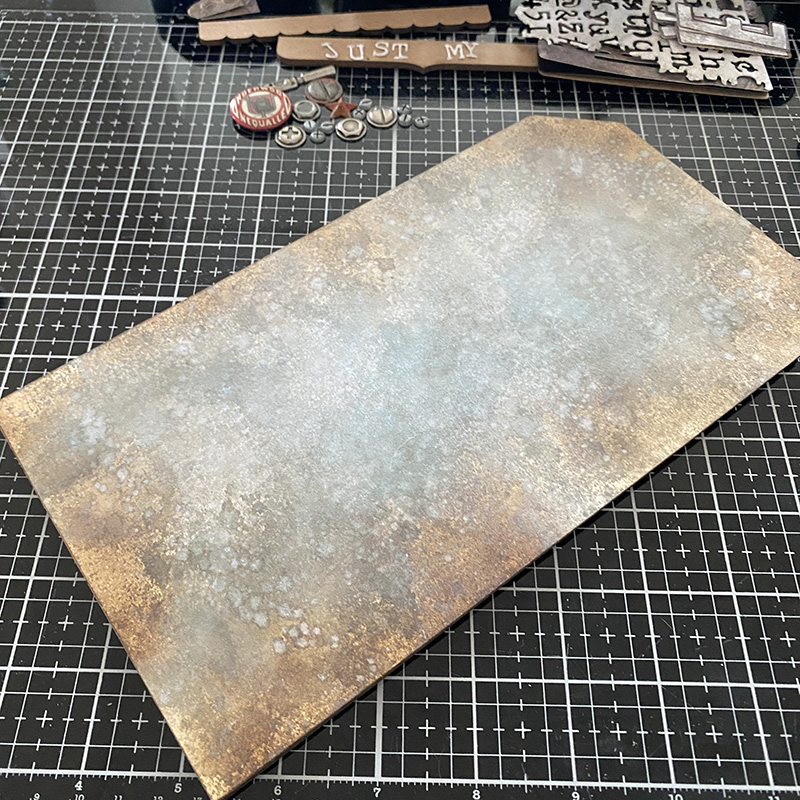
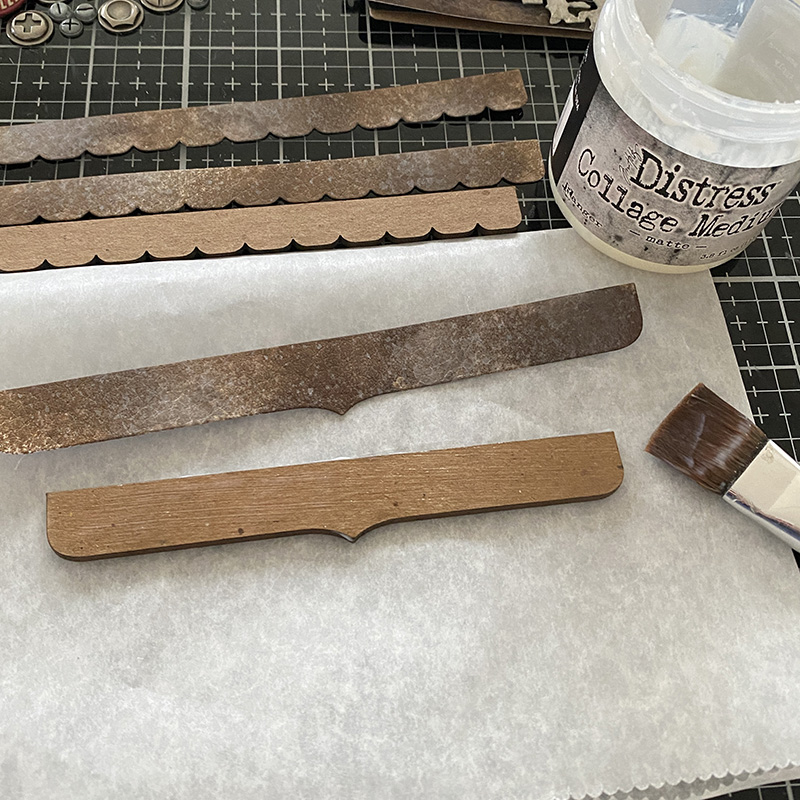
    To create the shelves for the potting shed, cut pieces from the idea-ology Halloween backdrops with the decorative trims thinlits die. These dies perfectly fit the etcetera thickboard trims, I used scalloped edged with the corresponding dies. Use distress collage medium to glue the die cuts to the thickboard trims.

    igirlzoe: tim holtz idea-ology halloween witches
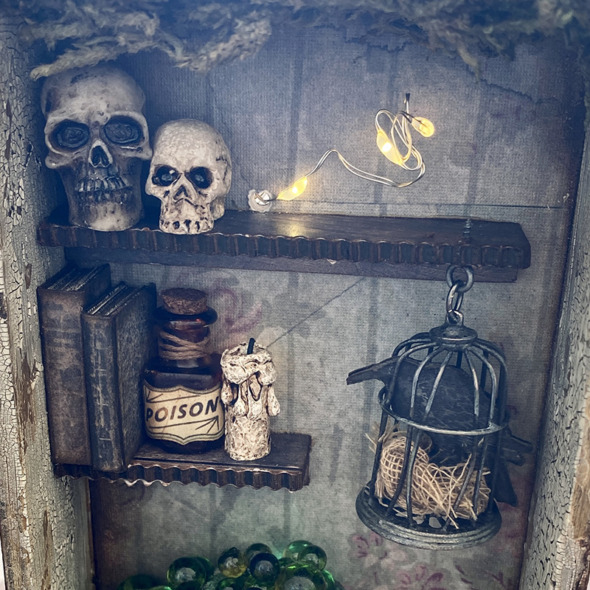
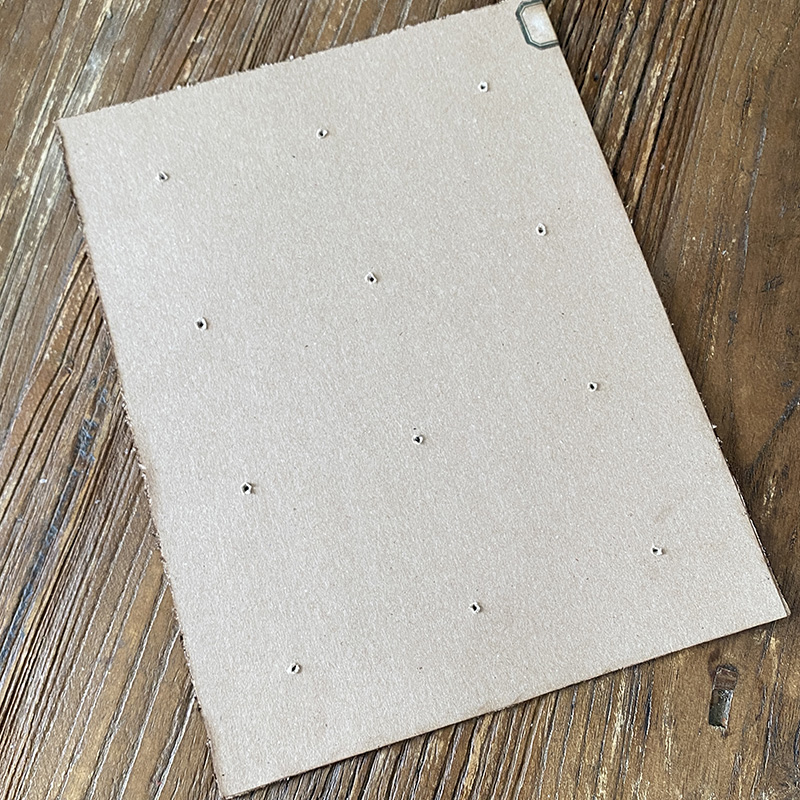
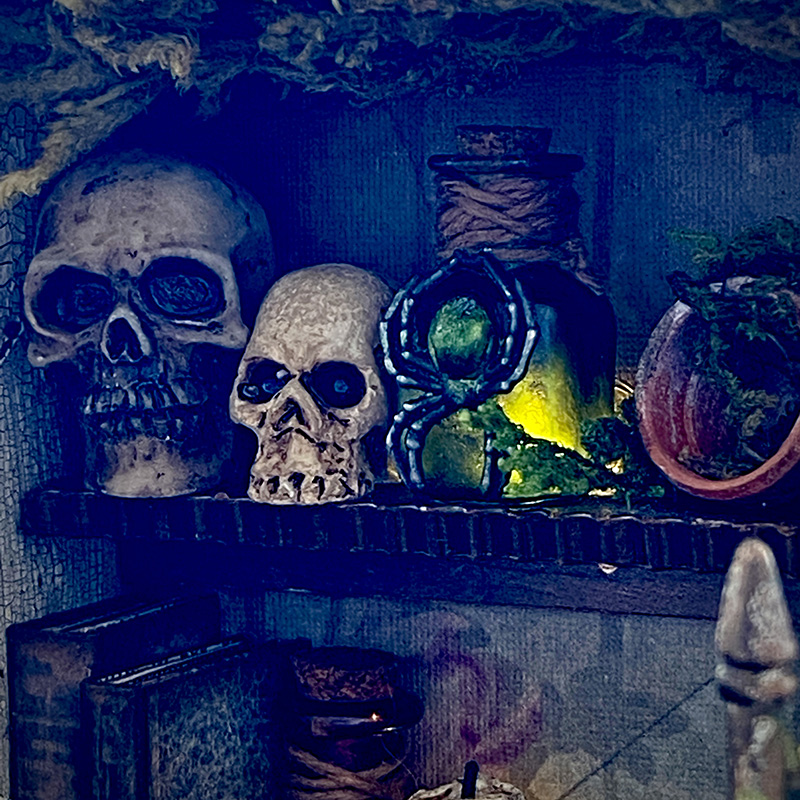
    Thread tiny lights into the vignette box through holes drilled in Part 1. I simply glued the lights behind where the bottle would sit so it lit up the bottle, (see next photo).

    igirlzoe: tim holtz idea-ology halloween witches
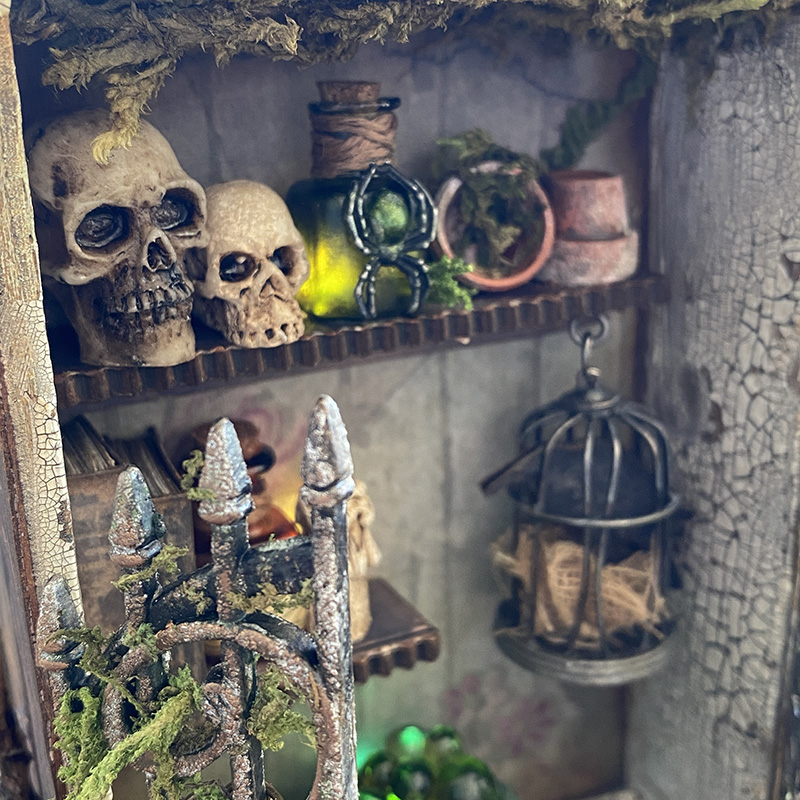
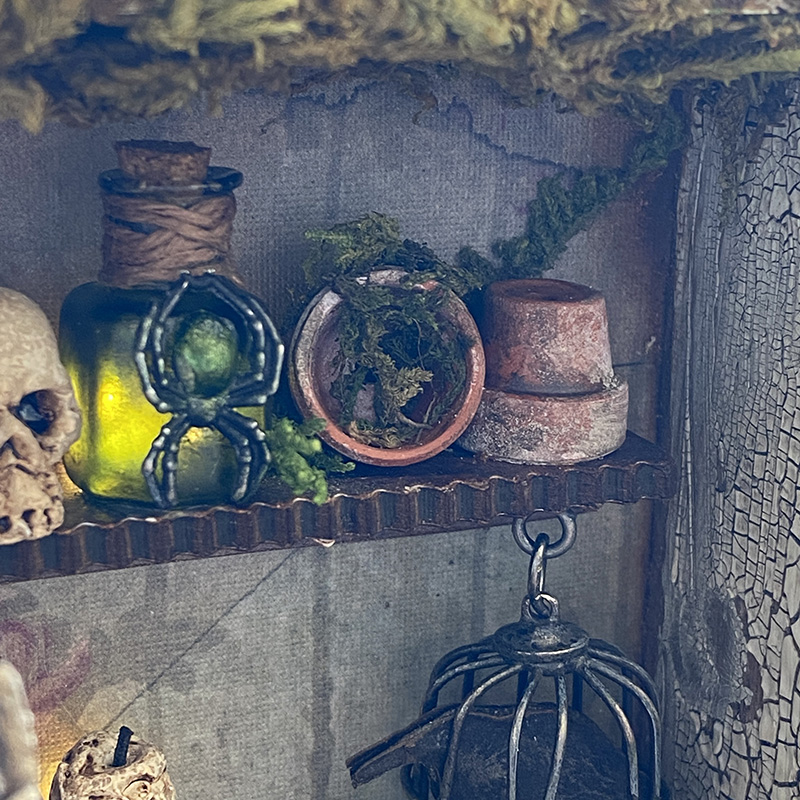
    Cover an idea-ology tiny vial with alcohol ink, I added a spider from the idea-ology Halloween Adornments pack. Cover the spiders back with a drop of envy alcohol pearls ink and tie it to the bottle with twine. The tiny lights glued behind the bottle give it a creepy glow. I added a little moss with distress collage medium to hide the wires.

    igirlzoe: tim holtz idea-ology halloween witches
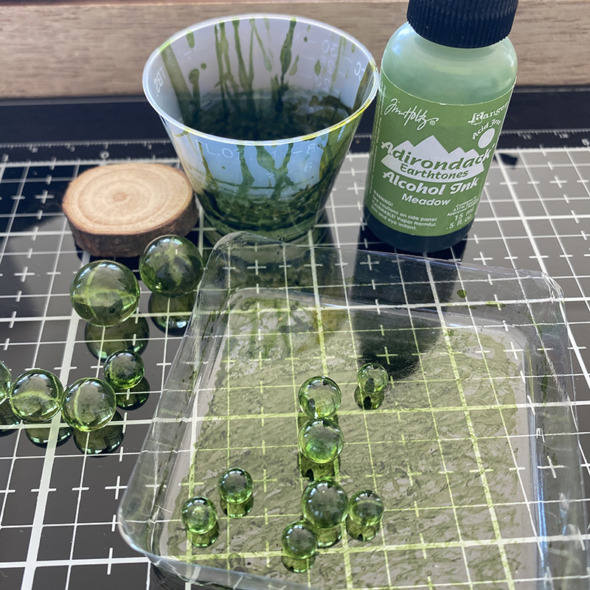
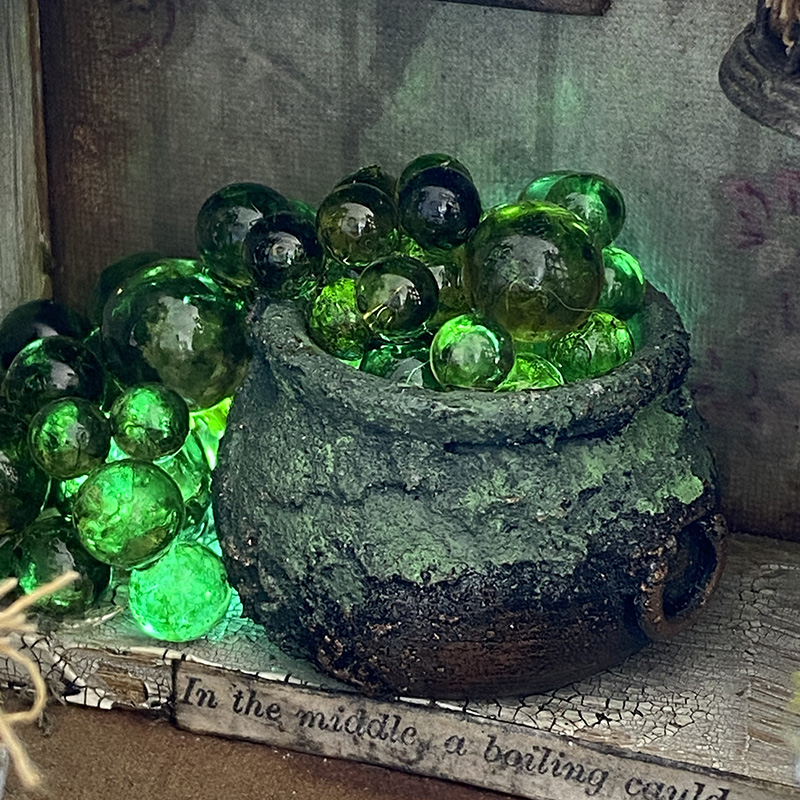
    Using meadow alcohol ink to dye the idea-ology bubbles, I swirled them in a cup and used the packaging they came in as a “bubble drying station!”

    igirlzoe: tim holtz idea-ology halloween witches
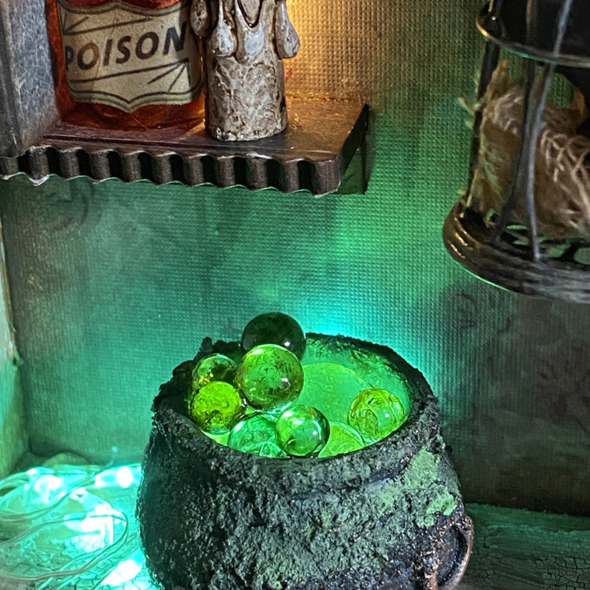
    Thread a set of Halloween tiny lights in green up into the vignette box and through the back of the cauldron. I use a Dremel Micro tool to make the holes and don’t forget to wear your safety glasses for drilling. Glue the tiny lights into the bottom of the cauldron and add one large bubbles and then begin adding more bubbles. I use glossy accents to attach them as it dries clear. You need a little patience with this as the glossy accents take a little while to dry, but worth it.

    igirlzoe: tim holtz idea-ology halloween witches
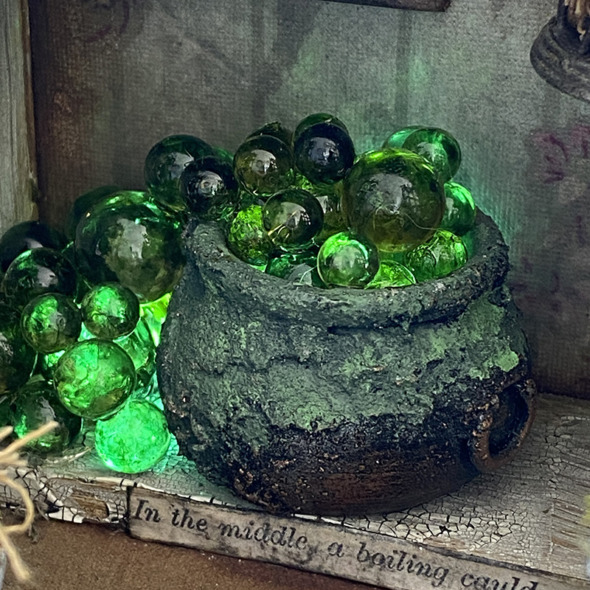
    Add distress crypt-paste to the edges of the cauldron. Once dry I painted with black soot and then added peeled paint distress paint to highlight, allowing it to dry between layers. I added a sticker from the idea-ology curiosities sticker book.

    igirlzoe: tim holtz idea-ology halloween witches
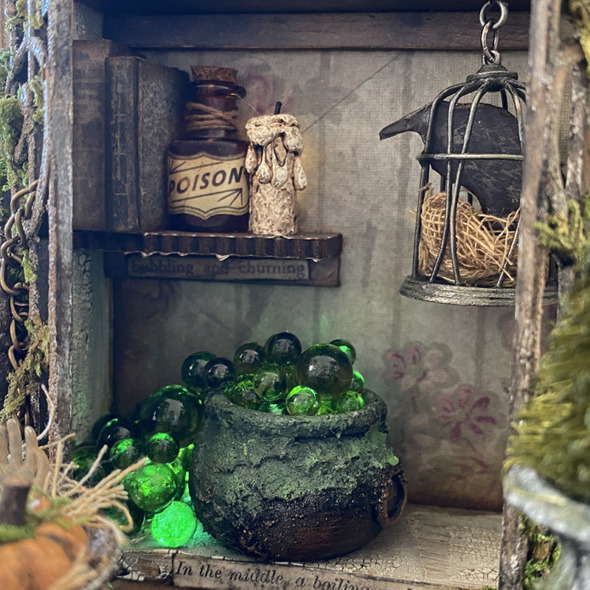
    I added another sticker from the curiosities sticker book under the shelf above the cauldron. These curiosities stickers help tell the story.

    igirlzoe: tim holtz idea-ology halloween witches
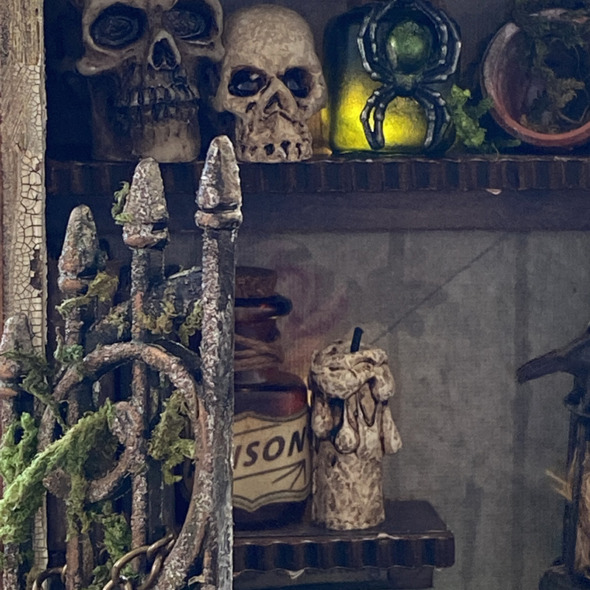
    I love having new larger skulls in the idea-ology Halloween line. I wanted to show the size comparison so used this years and last years together. I LOVE how creepy and dark the 2022 skulls are!

    igirlzoe: tim holtz idea-ology halloween witches
    Every potting shed needs pots, so I added a couple of tiny terracotta pots. They are real terracotta, I bought them from Switzerland 10 years ago. I’m sure you can get similar from hobby stores and if not, maybe we could ask Tim, “wouldn’t it be cool if…” 😉

    igirlzoe: tim holtz idea-ology halloween witches
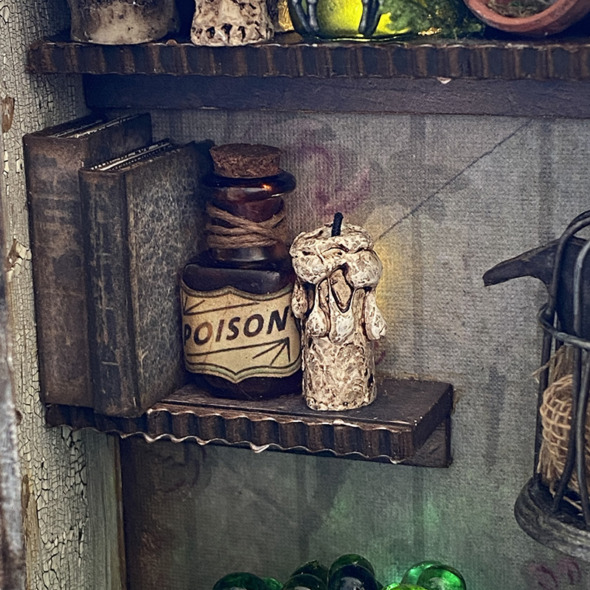
    On another shelf I added a couple of books made using the book covers from the Halloween ephemera pack. I added another bottle, this time dyed brown, with a label from the same ephemera pack. The drippy candle is back lit by a clear tiny light from the same set as the onea sitting behind the green spider bottle.

    igirlzoe: tim holtz idea-ology halloween witches
    Using a piece from the vignette hardware pack, I hung a birdcage. I used pliers to bend the cage bars and added a piece of mummy cloth to the bottom and a crow made using the Halloween ephemera. Glue 2 crows either side of a piece of fun foam and fussy cut.

    igirlzoe: tim holtz idea-ology halloween witches
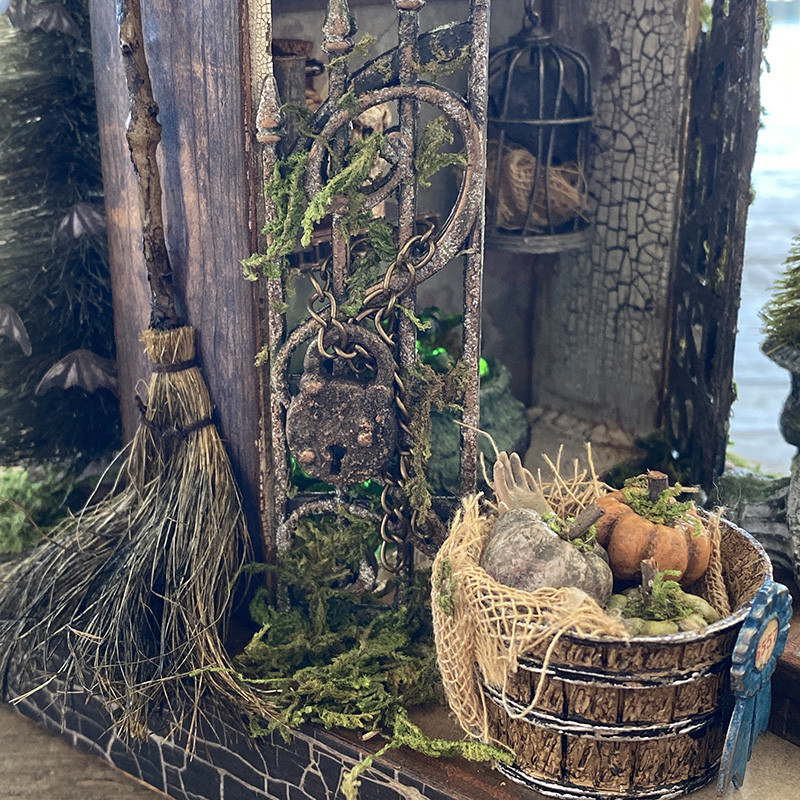
    I added gates to either side of the potting shed using distress collage medium to attach to the edges of the vignette box. Adding distress grit paste to the gates with my finger and once dry, dry brushed black soot distress paint over the top. Once dry, I used bronze Gilders Wax to highlight.

    igirlzoe: tim holtz idea-ology halloween witches
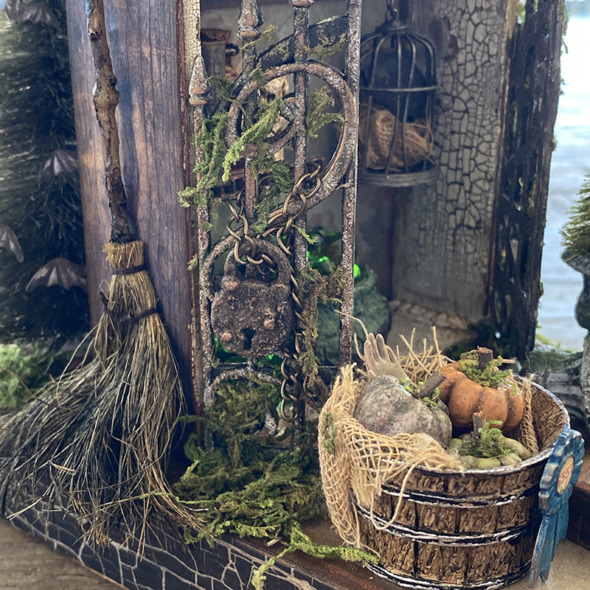
    Finally I wrapped a chain around the gates and added a lock from the locks and keys set. I rubbed distress collage medium onto the gates with my fingers and then added moss and left to dry.

    igirlzoe: tim holtz idea-ology halloween witches
    Thanks for stopping by, I hope you found this post helpful and it has inspired you to make. Let me know if you have any questions.

    Back soon with the next installment in the witches potting shed…
    Part 3 – Bone Garden, Barrel + Urns

    Zoe


    affiliate links used at no cost to you


  7. Retro Santa in Lumberjack Plaid

    17th November, 2022 by iGirlZoe

    igirlzoe: tim holtz lumberjack plaid distress ranger ink

    Hello friends, hope you’re well.  I’m playing catch up still, but before I skip off to finish some blog posts about witches, I wanted to share this card that I made for the Tim Holtz LIVE launch of the newest member of the Distress family, Lumberjack Plaid.

    igirlzoe: tim holtz lumberjack plaid distress ranger ink

    I still have my Christmas cards to make, I always mean to start early but never do so I need some quick and simple cards, like this one I made for the Lumberjack Plaid LIVE launch. The Retro Santa die perfectly carries the new Lumberjack Plaid Distress ink. I stamped with it using a stamp from the Vintage Holiday (CMS423) stamp set and stamped with another stamp from that set and one from the Music and Advert (CMS358) stamp set in Distress Archival Ink. I know both this Santa and Distress Color are going to feature in many of my Christmas cards this year!

    Thanks for stopping by and let me know if you have any questions.

    Zoe


    affiliate links used at no cost to you


  8. Lumberjack with a Hat

    10th November, 2022 by iGirlZoe

    igirlzoe: tim holtz lumberjack plaid distress ranger ink

    I wanted to share another make from the Tim Holtz LIVE launch of the new Distress color, Lumberjack Plaid. It gets busy during the holiday season and sometimes you need a quick gift solution. You could certainly adapt this into a gift card wallet, but for a slightly fancier presentation, a gift card box is a great way to gift. This gift card box couldn’t have been easier to make.

    igirlzoe: tim holtz lumberjack plaid distress ranger ink
    Of course I had to include a little Hat make and Tim kindly added an awesome matching plaid gift card to the inside of the box that he has in his very cool collection of Starbucks cards. You can see this gift box and other makes on the replay over on Tim’s blog.

    igirlzoe: tim holtz lumberjack plaid distress ranger ink
    Cut a box from Distress Kraft Heavystock using the Curio Box Bigz XL die and spray with Lumberjack Plaid Distress Spray Stain and dry with a heat tool.

    igirlzoe: tim holtz lumberjack plaid distress ranger ink
    I used some of the new idea-ology Christmas Linen Tape to cover the sides of the curio box base, also cut from Distress Kraft Heavystock. The tape fits perfectly and has the added bonus of holding the box together, making assembly quick and easy.

    igirlzoe: tim holtz lumberjack plaid distress ranger ink
    I wasn’t kidding when I said I was obsessed with the box label stamp from the new Department Store (CMS458) stamp set! I stamped in Ground Espresso Distress Archival Ink and fussy cut.

    I stamped and fussy cut stamped images from the Vintage Holidays (CMS423) stamp set. The “Special Delivery” stamp was stamped with Lumberjack Plaid Distress Ink and added on top.

    The background is Lumberjack Plaid Distress Ink blended into Distress Watercolor Cardstock stamped with the plaid stamp from the Plaid and Nordic (CMS243) stamp set in Black Soot Distress Archival Ink.

    igirlzoe: tim holtz lumberjack plaid distress ranger ink
    Once the box topper had been added, I assembled the box and added strips stamped onto Distress Watercolor Cardstock with Black Soot Distress Archival Ink with a stamp from the Vintage Holidays (CMS423) stamp set. This has to be one of my favorite Christmas holiday sets and one I pull out each year. I used Distress Collage Medium to glue the strips onto the sides and once dry, trimmed the excess off and inked with Walnut Stain Distress Ink to hide the joins.

    igirlzoe: tim holtz lumberjack plaid distress ranger ink
    The top hat and coat stamped in Black Soot Distress Archival Ink with the Distinguished (CMS378) stamp set, were raised with a piece of black fun foam. I used Lumberjack Plaid Distress Ink to watercolor the hat band and tie.

    Thanks for stopping by and let me know if you have any questions.

    Zoe


    affiliate links used at no cost to you


  9. Don’t Rain On My Plaid

    9th November, 2022 by iGirlZoe

    igirlzoe: tim holtz lumberjack plaid distress ranger ink

    Hello friends, hope your week is going well. I’m sharing another of my makes shown during the Tim Holtz LIVE launch of his New Distress, Lumberjack Plaid. You can see the replay and makes over on Tim’s blog. Make sure you watch to the end! 😉

    igirlzoe: tim holtz lumberjack plaid distress ranger ink
    I was inspired by my good friend Vicki Evans clever alteration of the Woodland Santa into a Lumberjack on it’s release and she graciously allowed me to use her idea and didn’t ask any questions. You can see her awesome make on instagram. I started with an idea-ology vignette tray and added strips of distress watercolor cardstock, embossed with the Lumber 3D folder and blended with walnut stain and ground espresso distress ink.

    igirlzoe: tim holtz lumberjack plaid distress ranger ink
    Ok so a funny story about this umbrella… I’ve been mis-pronouncing “plaid” for a while now and when I began making this I was going to add some words above the “PLAID” that I made with the Alphanumeric Varsity dies.

    “Don’t rain on my PLAID”… my sweet husband (trying not to laugh when I told him my plan) said “it’s not pronounced “PLAYED” it’s pronounced “PLAD” … “Don’t rain on my PLAD” didn’t quite work as well! After some choice words that rhyme with “LUCK” I decided to just go with it and omit the “don’t rain on my…”

    igirlzoe: tim holtz lumberjack plaid distress ranger ink
    Without my mistake, I wouldn’t have used the umbrella which I love. It’s from The Gent thinlits die set. I blended in Lumberjack Plaid distress ink and stamped with black soot distress archival ink using a stamp from the Plaid and Nordic (CMS243) Stamp set. I overlaid the umbrella outline which was stained with ground espresso distress ink.

    I used adhesive foam under the center of the umbrella and distress collage medium at the very edges to make the umbrella curved.

    igirlzoe: tim holtz lumberjack plaid distress ranger ink
    To decorate the outside of the vignette tray, I added strips of distress watercolor cardstock with Lumberjack Plaid distress ink blended in and stamped with the same plaid stamps as on the umbrella. I sanded lightly to give a distressed look.

    igirlzoe: tim holtz lumberjack plaid distress ranger ink
    I altered the Woodland Santa die into a lumberjack stamping his shirt with the plaid stamp and adding Lumberjack Plaid distress ink to his shirt and hat. The rest of him was colored using distress inks in faded jeans, ground espresso, walnut stain and black soot. The buckle and shirt buttons were cut from idea-ology metallic kraftstock. Thanks again to Vicki Evans for her cool inspiration and willingness to share.

    igirlzoe: tim holtz lumberjack plaid distress ranger ink
    I added Lumberjack Plaid distress paint to an idea-ology lantern. I’m not going to lie, it was pretty bright so I dry brushed ground espresso distress paint over the top to tone it down and make it dirty. When almost dry, I rubbed with my finger to remove parts of the paint. I thread a set of idea-ology tiny lights through the back of the idea-0logy vignette tray and up through the wood slice into the lantern. I cut all but 3 lights off the tiny lights set and twisted them to fit inside the lantern. The lantern sits perfectly on the idea-ology wood slices.

    igirlzoe: tim holtz lumberjack plaid distress ranger ink
    Thanks for stopping by and let me know if you have any questions.

    Zoe


    affiliate links used at no cost to you


  10. Tivoli Guards

    4th November, 2022 by iGirlZoe

    igirlzoe: tim holtz lumberjack plaid distress ranger ink

    Hello friends and happy Friday! It’s been a long and busy week for me and I’m looking forward to a creative weekend of making. Hopefully you’re starting to receive your new distress color Lumberjack Plaid and are enjoying getting acquainted with the gorgeous rich red. If you want to watch the replay of the LIVE launch and the maker inspiration, head over to Tim’s blog.

    igirlzoe: tim holtz lumberjack plaid distress ranger ink
    I live pretty close to Tivoli Gardens, an amusement park in the center of Copenhagen city. I’ve been many times, we take out of town visitors there and have even had some special friends join us via facetime.

    igirlzoe: tim holtz lumberjack plaid distress ranger ink
    When Tim released the Harvey thinlits die set I immediately thought of the Tivoli Guards dressed as Nutcrackers. Little did I know that there was the perfect color coming to make them, so when I saw Lumberjack Plaid I knew that I wanted to make this piece.

    igirlzoe: tim holtz lumberjack plaid distress ranger ink
    The new colorize dies are so easy to build and there are resources online to show you how to put these together. I Love the depth of the Lumberjack Plaid on the guards overcoats. Of course I had to make them a little grungy, because that’s what I like, but you could easily block the color. I used idea-ology metallic kraftstock to cut the chin straps, feather medallions and the stripes on one of the guards hats. I decided to use a single feather on 2 of the guards, I love having lots of options with this die set.

    igirlzoe: tim holtz lumberjack plaid distress ranger ink
    I created a platform for the guards to stand on using the Etcetera Trims and the decorative trims die to cut a matching trim which I embossed with the Lumber 3D folder and inked. I added an extra piece of card to make the trim deeper to fit “Tivoli” which I cut using the (retired) Alphanumeric Marquee die and the Alphanumeric 1″ Tall die set. The base alphanumeric letters are cut from idea-ology metallic kraftstock and the marquee letters cut from distress watercolor cardstock and sprayed with Lumberjack Plaid distress spray stain. I love the way the metallic peeps through the holes in the marquee letters and makes the Lumberjack Plaid distress ink pop!

    igirlzoe: tim holtz lumberjack plaid distress ranger ink
    I tucked a couple of pieces of holly underneath the ledge by die cutting distress watercolor cardstock with the Seasonal Sketch thinlits dies. I used the Lumberjack Plaid ink for the base of the berries and the oxide ink for the top outline die cut. I love the contrast these 2 mediums of Lumberjack Plaid give and that it works so well with grungier colors of the Distress palette.

    igirlzoe: tim holtz lumberjack plaid distress ranger ink
    The background is a piece of distress watercolor cardstock, cut to fit the mini etcetera tag. I used the sheet music stamp from the Department Store stamp set to stamp several times in distress archival ink. I stitched the outside of the tag with my sewing machine and glued to the tag using distress collage medium.

    igirlzoe: tim holtz lumberjack plaid distress ranger ink
    Finally, I added the bow from the new Yuletide Colorize thinlits die set which was stained in Lumberjack Plaid distress OG and oxide inks. By adding a little light colored distress paint to the die cut first, it creates a resist for a nice grungy look. I blended in a little walnut stain distress ink on top.

    igirlzoe: tim holtz lumberjack plaid distress ranger ink
    This would be easily adaptable to make a card, gift card or gift box topper and of course you could change the theme to Disney, London or anything you can dream up… I hope this has inspired you to create.

    Thanks for stopping by and let me know if you have any questions.

    Zoe


    affiliate links used at no cost to you